Share
Complete Guide to Using VDO.Ninja (OBS Ninja): Tips for High-Quality Streaming

Index
- What is OBS Ninja (now VDO.Ninja)?
- How to Share Your Screen Using Rooms as a Host
- How to Share Your Screen Using Rooms as a Guest
- How to Share Your Screen Without Rooms as a Guest
- How to Share Your Screen Without Rooms as a Host
- Parameters that Affect OBS Ninja’s Quality
- High-Quality Video Streaming with OBS Ninja! Utilizing Your Smartphone
- How to Address Poor Quality in OBS Ninja
- Conclusion
Many streamers may be struggling with issues like “I want to invite remote guests in high quality,” “I want to easily capture video in OBS,” and “I want to know how to improve bad image quality.”
By using OBS Ninja (now VDO.Ninja), you can achieve high-quality and low-latency video sharing using just a web browser.
This article will explain how OBS Ninja works, how to use it, how to set parameters such as bitrate and FPS that affect quality, and tips for improving image quality.
By reading to the end, you’ll understand how to create a simple yet stable high-quality streaming environment.

What is OBS Ninja (now VDO.Ninja)?
OBS Ninja is a free tool that enables high-quality and low-latency video sharing using just a web browser.
One of its features is the ability to incorporate remote video into OBS Studio through a simple link invite without installing any applications.
This chapter will explain how OBS Ninja works and what it can do, as well as how to use it for different streaming methods.
We will dig deeper into the charm of OBS Ninja, which is simple yet has a wide range of applications.
How OBS Ninja Works and What It Can Do
OBS Ninja works by having the video sharer send video from their webcam or screen, while the receiver simply adds the issued URL as a browser source in OBS Studio.
By capturing remote video in real time, it makes collaboration streaming and screen sharing easy for multiple participants.
In addition to being high-quality and low-latency, its web-based nature lowers the barriers to entry, making it usable in a wide variety of situations.
Effective Streaming Methods with OBS Ninja
OBS Ninja can significantly expand the scope of streaming depending on how it is used.
Particularly, its use in collaborative streaming is highly effective, allowing remote guests to easily participate.
Moreover, here are some specific examples of how OBS Ninja can be applied:
- Game Streaming: Simultaneous streaming of the gameplay and commentary video
- Music Live: Merging videos sent by performers from various locations
- Event Streaming: Achieving an immersive broadcast with multiple participants connected at the same time
The mechanism that allows handling video in high quality and low latency will enhance the viewing experience.
With its simple setup and flexible applications, OBS Ninja can be considered a valuable tool that enables a variety of expressions for streamers.
When using OBS Ninja as a host, the basic method for screen sharing is through the room feature.
To understand the flow of the stream, let’s go over the steps for the host when sharing the screen using a room.
- Step 1: Create a Room
- Step 2: Invite Guests
- Step 3: Capture the Guest’s Video in OBS
Knowing how to use it efficiently will allow you to smoothly set up the streaming environment.
Step 1: Create a Room
When using OBS Ninja as a host, the first step is to create a room as follows.
- Access the VDO.Ninja official site.

- Click on “Create a Room.”
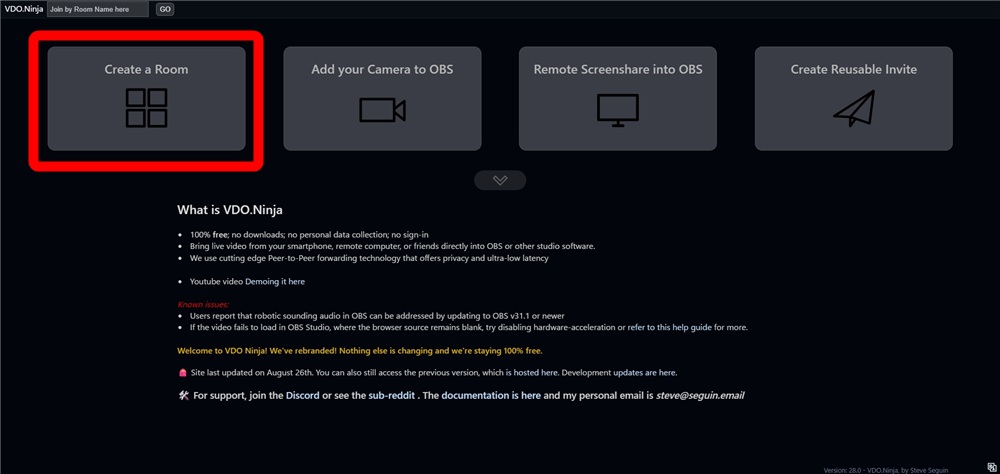
- Enter an optional “Room Name” and “Password,” then click the green button “Enter the room’s Control Center in the director’s role.”
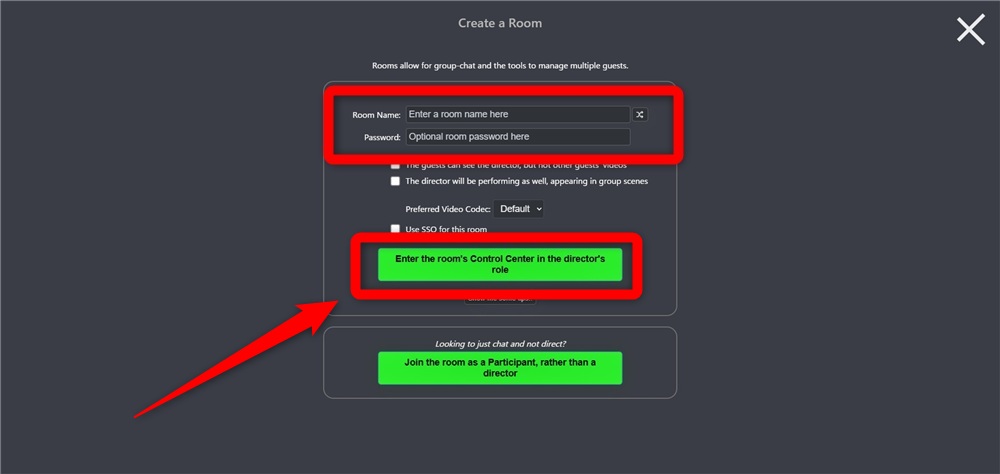
With that, the room creation is complete.
Once the room is set up for inviting guests, proceed to the next step to invite your guests.
Step 2: Invite Guests
From the screen that appears after Step 1, let’s invite guests using the following steps.
- Click on “Copy link” under “INVITE A GUEST” in the management screen of the created room.
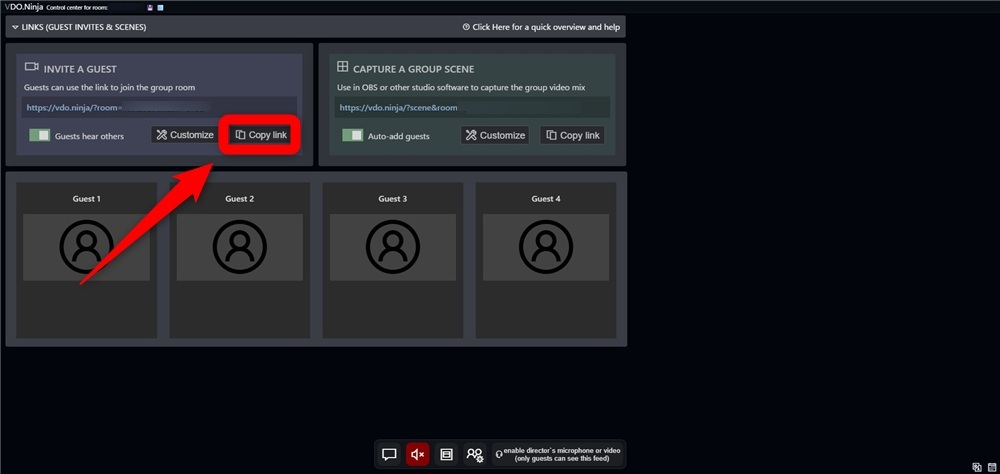
- Share the copied link and password with the people you want to invite.
Now the invitation for the guest is complete.
Once the guest has joined the room, move on to Step 3.
Step 3: Capture the Guest’s Video in OBS
After the invited guest has joined, add the received video to OBS.
Let’s follow these steps to capture the guest’s video in OBS Studio.
- Click on “copy solo view link” at the bottom of the guest’s display in the room.
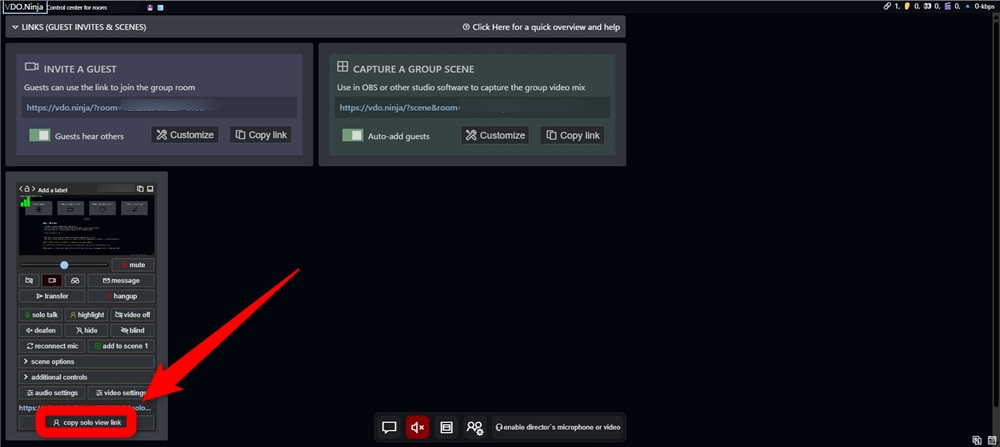
- Open OBS Studio and select “Browser” from the source addition.
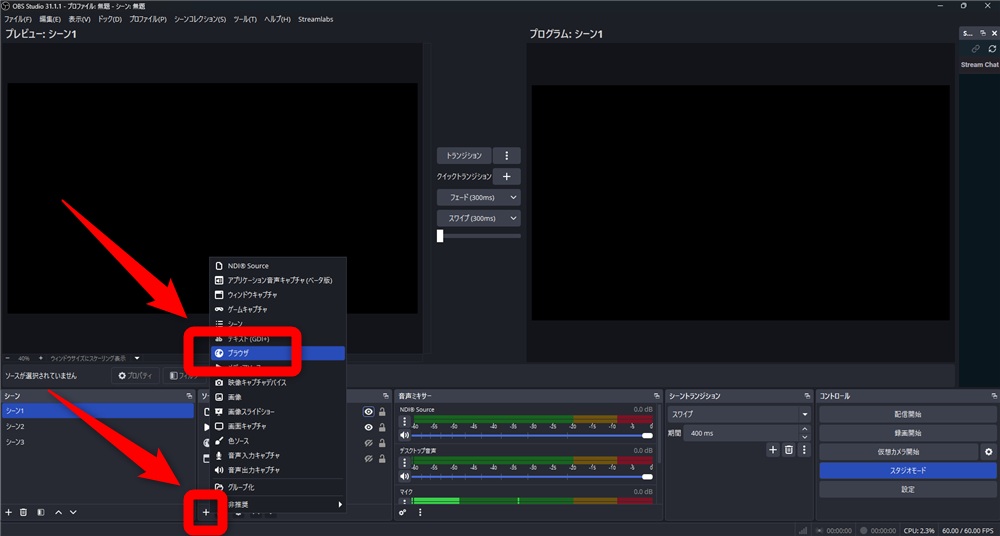
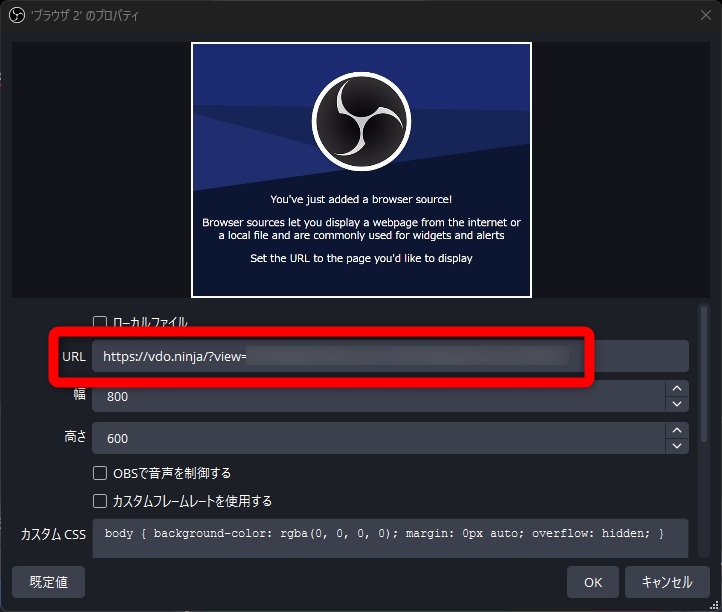
- In the browser settings, paste the link you copied with “copy solo view link” into the URL field and click “OK.”
With these steps, the guest’s video will be displayed in OBS Studio.
If the video does not appear, check whether the link is correct, and verify the guest’s camera settings and network conditions.
To ensure stable screen sharing, it is essential to check the settings for both OBS Studio and VDO.Ninja.
As a guest using OBS Ninja, you will connect to a room to share your video and audio.
Below are the three steps essential for guests to share their screen.
- Step 1: Connect to the Room
- Step 2: Set Up Camera and Microphone and Enter the Room
- Step 3: Share Your Screen
Let’s take a closer look.
Step 1: Connect to the Room
To share your screen as a guest using OBS Ninja, access the room link shared by the host following these steps.
- Access the room URL sent by the host.
- Enter the password shared by the host and click “OK.”
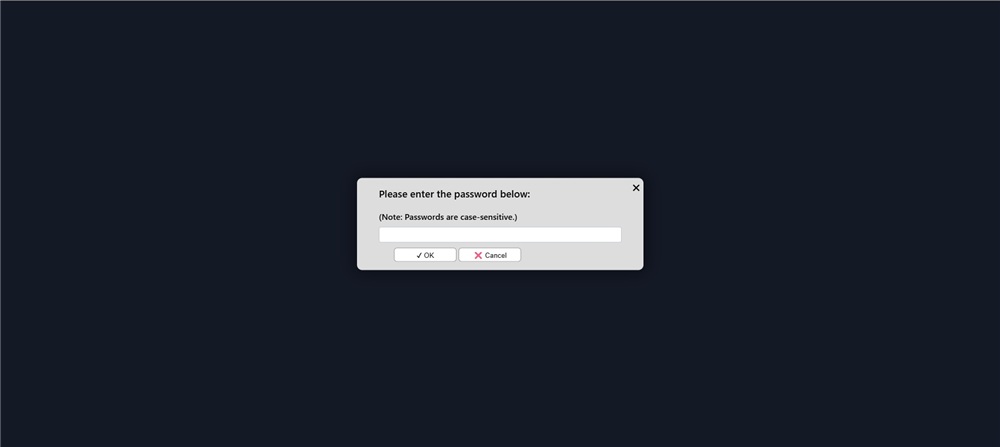
With that, the connection to the room is complete.
Step 2: Set Up Camera and Microphone and Enter the Room
Once connected to the room, prepare to enter by setting up your camera and microphone.
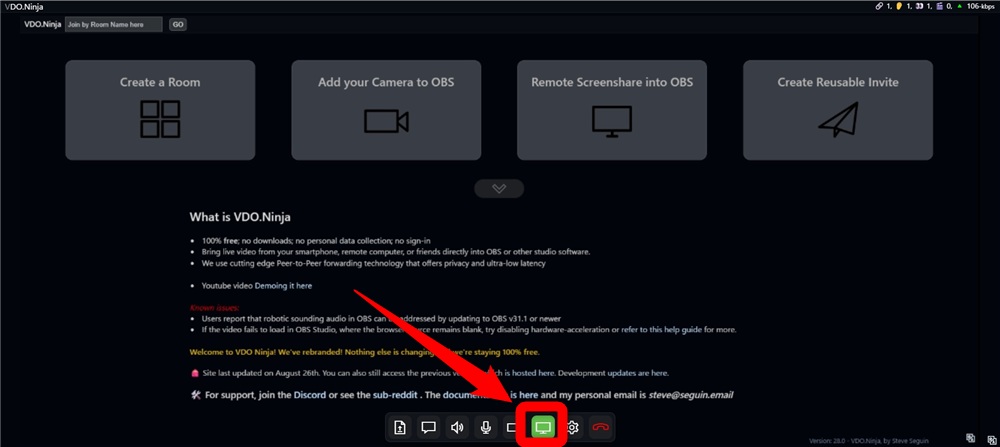
- On the screen after entering, choose your sharing method.
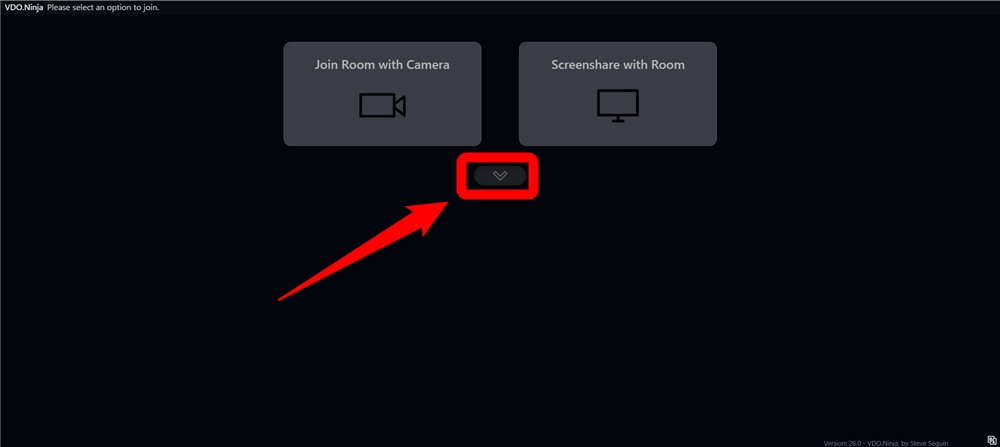
Clicking the red box above will display other sharing options.
Here, we’ll introduce the method where “Screenshare with Room” is selected.
- Click on “SELECT SCREEN TO SHARE.”
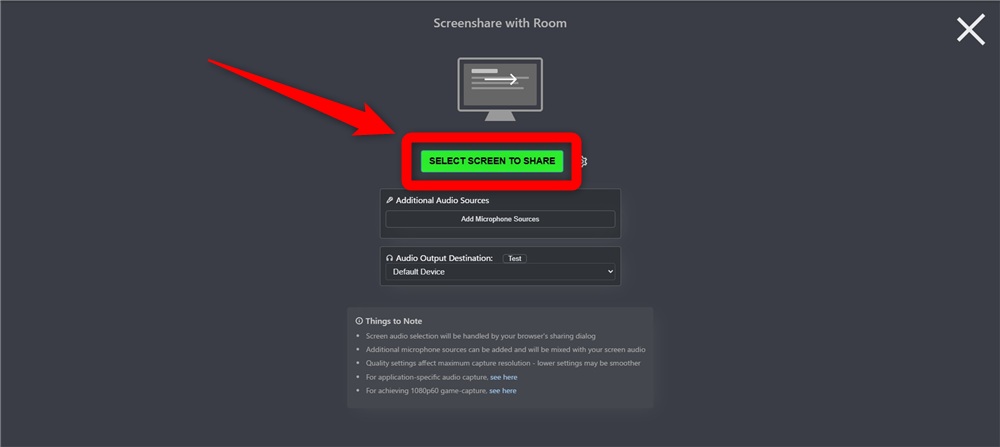
- If you want to share audio along with the screen, click “Add Microphone Sources” under “Additional Audio Sources” and select your audio source.
This completes the initial settings for the camera and microphone.
When you click “SELECT SCREEN TO SHARE” in Step 2, you will be asked to select the screen you want to share.
Select the screen you want to share, such as a Chrome tab, window, or the entire screen.
The shared screen settings can be changed freely after connecting to the room.
If you want to cancel the shared screen and share a different one, click the screen icon in the red box twice.
The first click will end the screen share, and the second will prompt you to select a new screen to share.
By remembering the screen sharing operations, guests can effectively convey video and materials, significantly enhancing the quality of the stream.
OBS Ninja also provides a method to share screens without using rooms.
This chapter explains the three steps to share a guest’s screen simply without using a room.
- Step 1: Create the Screen to Share in OBS
- Step 2: Set Up Sharing in VDO.Ninja
- Step 3: Share the URL with the Host
Let’s go through the flow.
When not using a room, you will share the screen displayed in OBS Studio.
Let’s set up the sharing as follows.
- Launch OBS Studio.
- Set the desired screen as a source to display it.
- Click “Start Virtual Camera.”
With this, the setup for screen sharing is complete.
Step 2: Set Up Sharing in VDO.Ninja
Once you’ve set the screen to be shared, perform the sharing setup in VDO.Ninja.
- Access the VDO.Ninja official site.
- Select “Add your Camera to OBS.”
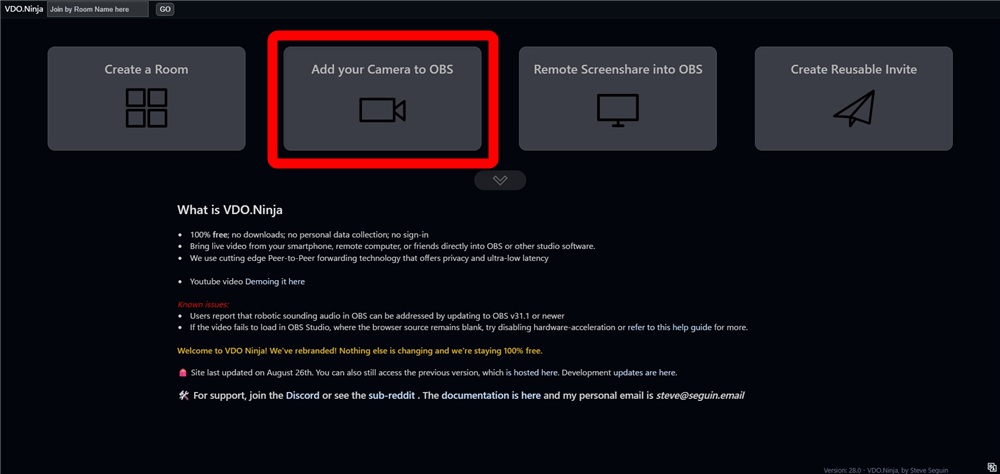
- Set up your camera and microphone, then click “START.”
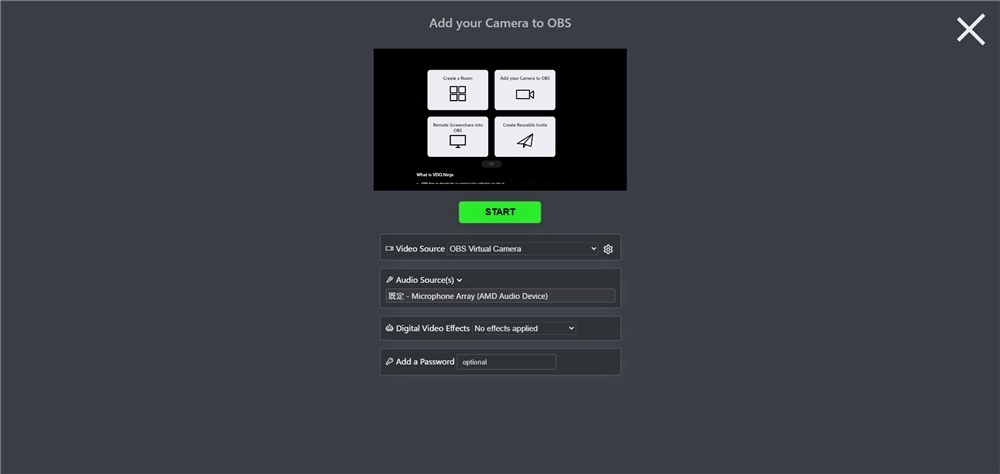
Make sure the video source is set to “OBS Virtual Camera.”
If it is not displayed in the preview at the top of the screen, it may mean that the virtual camera hasn’t been started in OBS Studio or that the configured source hasn’t been reflected in the program.
If audio is not needed, select “No Audio” under “Audio Sources.”
This completes the screen sharing setup.
Finally, share the screen sharing URL with the host.
The green text displayed at the top of the screen is the sharing URL.
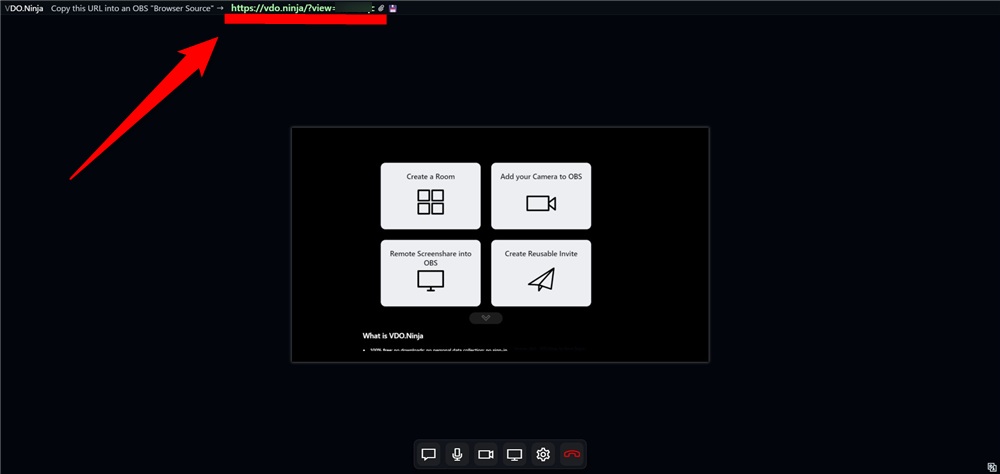
The displayed URL or clicking the clip icon to the right will allow you to copy the URL.
You can share your screen with the copied URL, so make sure to relay this information accurately to the host.
If not using rooms, the host does not need to set up OBS Ninja.
Simply launch OBS Studio and add “Browser” as a source.
Then, enter the URL shared by the guest into the browser settings and click “OK” to complete the setup.
With the above settings, you can manage the screen shared by the guest as part of your sources, allowing you to control the shared screen properly and thereby improve the quality of the stream.
Parameters that Affect OBS Ninja’s Quality
To use OBS Ninja with high quality and sound, appropriate parameter settings are essential.
This chapter explains concrete examples of parameters related to video and audio quality and how to set them.
By understanding the fine-tuning, you will be able to provide your viewers with a comfortable streaming experience.
Specific Examples of Parameters Related to Video and Audio Quality
There are many parameters you can utilize to achieve high video and audio quality while using OBS Ninja.
In particular, numerical adjustments including bitrate will greatly affect quality.
The following table summarizes representative parameter examples that impact streaming quality.
| Parameter | Description |
|---|---|
| &bitrate&vb | Parameter to set video bitrate, determining the clarity of the video. |
| &ab | Parameter to set audio bitrate, determining the clarity of the sound. |
| &framerate&fr | Parameter to set frame rate, adjusting the smoothness of the video. |
Lowering the bitrate parameter results in a coarser image, while setting it too high can lead to unstable communication, so it is important to adjust according to the line conditions.
The parameters that can be set can be referred to on the Ninja Docs site.
How to Set Parameters
If you have parameters you want to utilize, additional settings can be performed from OBS Studio.
- Launch OBS Studio.
- Double-click on the browser of the source to which you want to add parameters.
Then, append parameters to the end of the URL.
Note that when appending multiple parameters, continue entering them with “&” without leaving spaces.
With this, you can set parameters, so find and utilize parameter settings that suit your streaming environment.
High-Quality Video Streaming with OBS Ninja! Utilizing Your Smartphone
OBS Ninja enables easy high-quality video streaming by making use of your smartphone.
This chapter explains the steps for high-quality video streaming using smartphones like the iPhone.
Harness the flexibility of your smartphone to enhance your expressiveness in streaming.
Step 1: Create a Link for Mobile
First, create a link for accessing on mobile.
- Access the VDO Ninja official site.
- Click on “Create Reusable Invite.”

- Enter an optional source name for mobile and click “GENERATE THE INVITE LINK.”
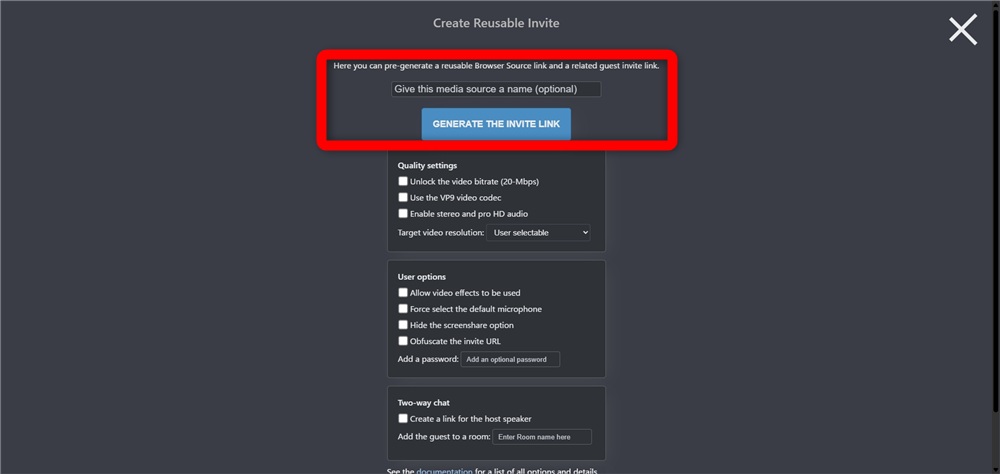
Now the mobile link will be generated.
Step 2: Send the Link to Your Smartphone
Next, send the generated link to your smartphone.
The portion highlighted in red is the mobile link, so copy it and share it with your smartphone.
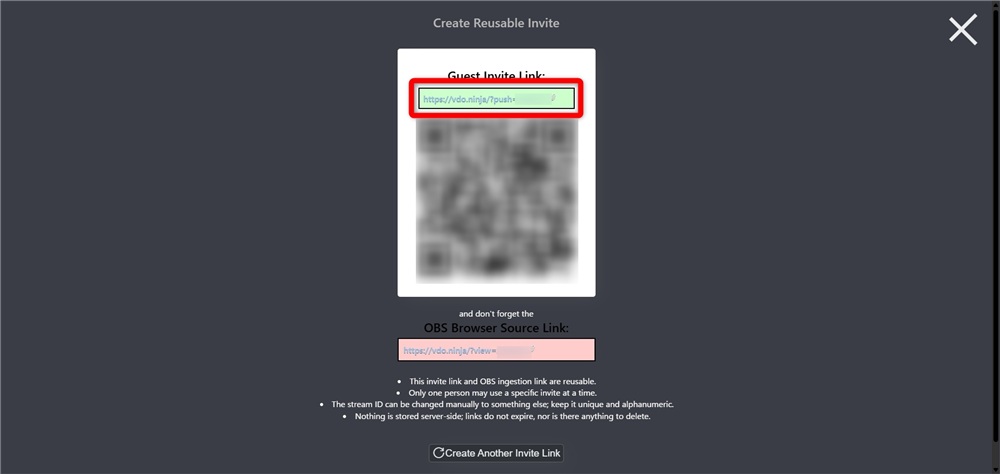
By scanning the displayed QR code with your smartphone camera, you can directly access the URL shown in the red frame.
Step 3: Open the Link on Your Smartphone
Open the link you created in Step 2 from your smartphone and set the camera.
- Open the mobile link
- Tap “Share your Camera”

- Check the screen that appears and tap “START.”
If the app requests permission to access the camera and microphone, choose to allow access and proceed with the settings.
This completes the setup on your smartphone.
Step 4: Capture the Smartphone Screen in OBS
Finally, capture the smartphone screen in OBS Studio.
- Launch OBS Studio.
- Select “Browser” from the sources.
- Enter the OBS link into the “URL” field and click “OK.”
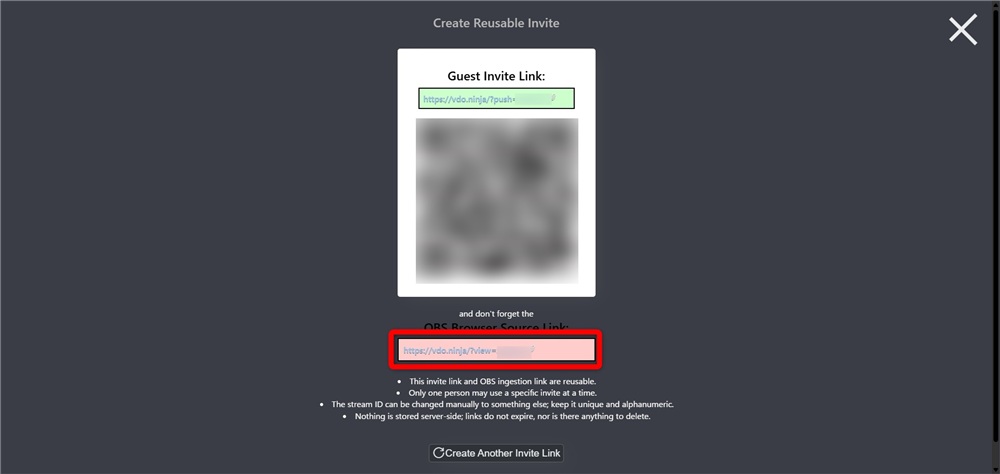
Above that, the link for OBS is the portion highlighted in red from the link generated in Step 2.
The screen capture setup from the smartphone is now complete.
By leveraging your smartphone, you can stream from outside or handle dynamic broadcasts, greatly expanding your streaming possibilities.
How to Address Poor Quality in OBS Ninja
This section will explain three solutions to improve image quality when using OBS Ninja.
- Check and Adjust Video Settings
- Reevaluate PC Specifications and Internet Connection
- Align with the Streaming Platform’s Limitations
By taking appropriate measures, you will be able to achieve stable high-quality streaming. Let’s take a closer look.
Check and Adjust Video Settings
If image quality is poor in OBS Ninja, reviewing video settings can be effective.
In particular, inappropriate values for bitrate and FPS can cause pixelation or stuttering in the video.
The basic improvement method is to adjust the bitrate according to your connection speed and change FPS from 30 to 60 for videos with a lot of movement.
Additionally, lowering the resolution to prioritize stability can also be effective.
For details on encoder settings in OBS Studio, you can refer to the following article.
» Guide to OBS Encoder Settings! What Settings are Needed for High-Quality Streaming and Recording?
Reevaluate PC Specifications and Internet Connection
One cause for poor quality in OBS Ninja is a lack of PC performance or internet speed.
If CPU or memory resources are insufficient, processing lags may occur, disrupting the video.
For stable streaming, recommended specifications include at least 8GB of memory and a mid-range CPU.
Additionally, an upload speed of at least 10Mbps is a good guideline, and ensuring stability allows you to maintain the appropriate bitrate settings.
For more details on the necessary specifications for OBS Studio, refer to the article linked below.
Align with the Streaming Platform’s Limitations
Another factor contributing to poor quality in OBS Ninja may be limitations imposed by the streaming platform.
Platforms like YouTube and Twitch have maximum bitrate limits, and exceeding these settings can lead to video compression and degradation.
| Platform | Recommended Bitrate |
|---|---|
| YouTube Live | 10,000kbps |
| Twitch | 3,000–6,000kbps |
| Niconico Live | Max 6,000kbps |
| TwitCasting | Max 6,000kbps |
| OPENREC | 1,500–5,000kbps |
| MiraTube | 500–1,000kbps |
Furthermore, when sharing on Discord, the free plan has restrictions on resolution and frame rate, requiring a paid plan for high-quality streaming.
By checking the limits for each service you utilize and aligning OBS Ninja settings accordingly, you can achieve stable video streaming without exceeding limits.
You can also refer to the article below for more details on bitrate guidelines for streaming platforms.
» [OBS Bitrate Guide] Clearly Explained Settings for Streaming and Recording
Conclusion
This article explained the features, usage, and practical examples of OBS Ninja.
OBS Ninja can be utilized via a browser, making it useful for collaborative streaming and sharing video via smartphones in a variety of situations.
To achieve high-quality streaming, it is crucial to adjust bitrate and FPS, verify PC specs and internet speed, and be aware of platform-specific limitations.
By setting up the streaming environment, you can deliver stable video to your viewers.
Refer to this article to explore how you can utilize OBS Ninja to expand your streaming capabilities.