Share
OBS Setup Reset Guide: Complete Tutorial with Backup Steps
Index
The process of initializing the settings in OBS Studio (hereafter referred to as OBS) is very simple, but there are some key points you must not forget. By understanding the steps to initialize OBS, you can smoothly operate and master its use.
This article explains when OBS initialization is necessary, how to back up your data before initializing, the steps for initialization, how to restore backup data, and the method for uninstalling OBS comprehensively.

Situations Requiring Initialization in OBS
You may need to initialize OBS in the following situations:
- When OBS fails to start properly
- When the OBS system frequently crashes
If OBS is not functioning normally due to some trouble, trying initialization is recommended. It is also useful when you want to reset OBS settings to zero and start over.
In the following sections, we will take a closer look at backing up before initializing OBS and the steps for initialization.
Backing Up Before Initializing OBS
Make sure to back up before initializing OBS. By having a backup, you can smoothly revert to previous settings even after initialization if necessary.
Here are three key points for backing up your OBS settings:
- Settings in OBS that can be backed up
- Two methods to back up OBS settings
- Don’t forget to save images and video data!
OBS Settings that Can Be Backed Up
The following two settings in OBS can be backed up:
- Profile
- Scene Collection
Let’s explain the detailed contents of each setting below.
Profile
A profile in OBS refers to the function to save streaming or recording settings equipped in the OBS toolbar. It’s characterized by the ability to switch settings smoothly according to scene or streaming purposes. Depending on the use, such as for Twitch or YouTube, you can change bitrates, URLs, and switch between vertical and horizontal orientation on the screen.
It is convenient because you can save settings with a single click according to your streaming purpose.
Scene Collection
The Scene Collection in OBS refers to initial settings for scenes, sources, and audio mixers in OBS. You can save what is displayed on the bottom of OBS’s main screen.
In the Scene Collection, you can change settings according to your streaming purpose, and call up scenes and sources. With prior settings for scenes, sources, and audio mixers tailored to your streaming needs, the operation is as simple as choosing for the broadcast.
Backing up Scene Collection allows you to continue using existing OBS settings on different PCs.
Two Methods to Back Up OBS Settings
When backing up OBS settings, proceed with either of the following procedures:
- Method to export profiles or scene collections individually
- Method to back up by copying and pasting the folder
Until you get used to backing up, exporting individually is recommended.
The following article goes into more detail on backup procedures. Please refer to it as well.
A Complete Guide to Backing Up OBS Settings! How to Restore and Useful Plugins Included
Method to Export Profiles or Scene Collections Individually
Here are the steps to export settings individually:
1. Click on “Profile” or “Scene Collection” in the toolbar
2. Check if the file to be exported is selected
3. With “Profile” or “Scene Collection” selected, click “Export” in the toolbar
4. Save the exported files or folders in a folder of your choice
Method to Back Up by Copying and Pasting the Folder
When backing up by copying and pasting the folder containing the settings, follow these steps:
1. Go to “File” → “Show Settings Folder” at the top left of the OBS screen
2. Copy “basic,” “global.ini,” and “user.ini” within the settings folder and save them in a backup folder. Note: “user.ini” is available only in versions 31.0 and later
Don’t Forget to Back Up Image and Video Data!
Images and video data saved in OBS need to be stored separately from the settings backup. Before initializing OBS, it’s a good idea to copy and save image and video files to your desktop or a desired folder.
It’s safe to change the file name before saving the copy to prevent data from being overwritten and lost.
For more details on saving images and videos in OBS, please check the following article.
Two Ways to Save Your OBS Settings: A Complete Guide to Backup and Restore
Steps to Initialize OBS
Below are the steps to initialize OBS. Rest assured that the procedures are simple in each case.
- Display the OBS settings folder
- Delete the contents of the OBS settings folder
- Launch OBS and reconfigure
- If you want a thorough cleanup, check inside drive C as well
The basic initialization process is up to the third step above. Try the fourth step only if problems are not resolved.
Display the OBS Settings Folder
First, go to “File” → “Show Settings Folder” at the top left of the screen to display the “Settings Folder.”
Once the “Settings Folder” is displayed, exit OBS. You won’t be able to delete files while OBS is running.
Delete the Contents of the OBS Settings Folder
Exit OBS and delete everything inside the “Settings Folder” to complete the initialization.
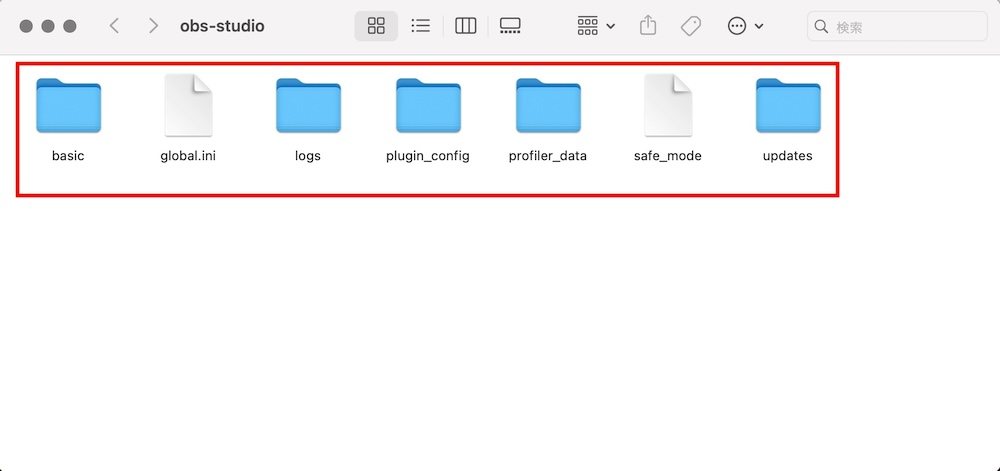
Among the folders to delete, “basic” is particularly important, as it contains the scene collection and profile.
Launch OBS and Reconfigure
After deleting the contents of the settings folder, relaunch OBS. When the “Auto Configuration Wizard” pops up, click “Cancel.”
Now that OBS is back to its initial state, reconfigure OBS from scratch.
These are the basic steps to restart OBS. In some cases, the above method might not complete initialization. If the problem persists, try the following solutions.
If You Want a Thorough Cleanup, Check Inside Drive C as Well
If deleting the “Settings Folder” doesn’t solve the problem, also delete folders relating to plugins in drive C. When utilizing plugins in OBS, simply deleting the contents of the “Settings Folder” may leave the root of plugins, causing them to automatically boot upon restarting, thereby interfering with proper initialization.
By following the steps below, you can delete the root of plugins as well:
1. Navigate within the “Settings Folder” to “C Drive” → “Program Files” → “obs-studio”
2. Click on “bin data obs-plugins”
3. Click on “64bit” and delete all data in the folder.
* This may impede the ability to start OBS, but it is not an issue
4. Complete up to step 3, then redownload OBS
Restoring OBS to Pre-Initialization Settings
If you wish to restore OBS to pre-initialization settings for any reason, you can do so with either of the following methods:
- Use OBS’s import feature
- Directly overwrite files in the “Settings Folder”
To use OBS’s import feature, proceed with the following steps:
1. Click in order on the upper toolbar: “Scene Collection” or “Profile” → “Import.”
2. By clicking the imported folder or file, you can incorporate pre-initialization settings.
When directly overwriting files in the “Settings Folder,” exit OBS after opening the “Settings Folder,” just like when taking a backup. Then, paste and replace the three files “basic,” “global.ini,” and “user.ini” to revert to pre-initialization settings.
Consider Uninstalling OBS if Problems Persist
If problems persist even after initializing OBS, consider uninstalling and reinstalling OBS. Uninstalling allows you to clear OBS settings. Here’s how to deal with this according to your OS:
- Steps for Uninstalling and Reinstalling on Windows
- Steps for Uninstalling and Reinstalling on Mac
Steps for Uninstalling and Reinstalling on Windows
First, uninstall OBS from your PC by the following method:
1. Go to the “Start Menu” → “Settings” on your PC.
2. Click on “Apps” in the Settings window.
3. Click “Apps & Features” and uninstall OBS Studio.
After uninstalling OBS, reinstall it with the following method:
1. Access the official OBS Studio website and download the Windows installer.
2. Double click on the installer to run it.
* Click “Yes” on “User Account Control.”
3. In the “Welcome to OBS Studio” window, click “Next >”
4. Click “Next >” in the “License Information” window to agree with the terms.
5. Verify the install location in “Choose Install Location.”
* Click “Browse” to select a new install location if desired.
6. After setting the path, click “Install” to start the installation process.
7. Click “Finish” after installation is complete, and OBS Studio will automatically launch.
Steps for Uninstalling and Reinstalling on Mac
Mac users can uninstall OBS with the following steps:
1. Click “Finder” on the Mac desktop.
2. Click “OBS.app” in “Applications.”
3. Move “OBS.app” to “Trash” on the desktop.
4. Empty “Trash” to delete OBS.
After uninstalling OBS, install OBS again:
1. Click the Apple logo on the top left of the Mac and check the chip information in “About This Mac.”
2. Access the official OBS Studio website and download the Mac installer.
* For Intel Core~ or Intel Xeon in “About This Mac,” click macOS (intel), for Apple M1, M2, M3, click macOS (Apple Silicon)
3. Launch the installer after the download is complete.
4. Drag “OBS.app” from the drive and move it to “Applications” on the Dock.
5. Double click “OBS.app” in “Applications” to start OBS.
If issues persist after initialization, uninstalling and reinstalling OBS can be effective.
For key tips on using OBS on a Mac, be sure to check out the following article. It covers everything from how to download OBS to the best settings for streaming on macOS.
OBS Works on Mac Too! How to Download and Configure Settings for Streaming
Conclusion
When initializing OBS, back up the settings first, and save image and video data separately on the desktop before proceeding. Having a backup provides peace of mind in case you need to revert to pre-initialization settings. If deleting the contents of the “Settings Folder” does not change the situation, deleting folders related to plugins in drive C is advisable.
If neither of the two methods solves the problem, consider uninstalling and reinstalling OBS.
Master the functions of OBS and smoothly enjoy video streaming.


