Share
Fix Audio Delay in OBS Music Streams: Key Settings Explained

Index
If you are using OBS for singing streams and are troubled by audio synchronization issues, this article will explain the causes of desync and provide solutions.
Additionally, we will also cover methods to add karaoke subtitles and how to apply echo during your streams, which may be helpful for those hosting singing sessions. Feel free to use this as a reference.

What is Audio Desync?
Audio desync refers to the misalignment between video and audio.
This issue occurs when the video runs ahead, and the audio comes later. It is particularly noticeable in fast-paced streams, such as gaming broadcasts.
Additionally, in music-based streams where you sing along with the music, like singing streams, the misalignment between lip movements and audio leads to discomfort. Once noticed, audio desync can be distracting and disrupt your streaming experience, potentially leading to a loss of viewers who find it difficult to watch.
In the following sections, we will discuss the causes and solutions to audio desync.
Note that fixing audio desync requires a specific configuration sequence, so please follow the order outlined in this article for adjustments.
Causes of Audio Desync in OBS Singing Streams
This section explains the reasons behind audio desync in OBS singing streams. The main causes of audio desync include:
- Mismatch in sample rate
- Dropping frames
- High audio bitrate
- Timestamp settings
- Incorrect sync offset values
We will explain each factor in detail and their solutions in the following sections.
Mismatch in Sample Rates
Audio desync can occur when there is a mismatch between the sample rate settings in OBS and the operating system.
Sample rate relates to audio quality—higher values translate to better sound quality. When the sample rate values differ between OBS and the OS, desync issues can arise, requiring attention.
The recommended values are either “44.1kHz” or “48.0kHz.” If you’re uncertain about the settings, choose “44.1kHz” as a default.
While a higher value allows for higher sound quality, the difference between the two is negligible enough that 44.1kHz suffices for stream quality.
The next sections will explain how to configure settings in OBS and the OS respectively.
OBS Configuration
First, launch OBS and select “Settings” from the control panel.
After choosing “Settings,” select “Audio,” where you can change the sample rate from the “General” section.
As mentioned earlier, set the value to either 44.1kHz or 48.0kHz. Press the OK button to complete the OBS configuration.
OS Configuration
Here is how to configure for Windows. Start by pressing the start button, then select “Settings” followed by “System.”
Next, choose “Sound,” and then select “Sound Control Panel” under Related Settings.
After selecting the Sound Control Panel, options for speakers, microphones, and headsets appear. Click on “Speakers.”
You can change the sample rate from the “Advanced” tab in the Speakers Properties. After configuring the speaker, apply the same settings to the microphone in use.
Ensure the sample rate matches that set in OBS, using the guidelines below:
- OBS set at 44.1kHz: 44100Hz
- OBS set at 48.0kHz: 48000Hz
For bit depths, either 16-bit or 24-bit will work. While a higher bit depth results in better quality, if you encounter issues with 24-bit, switch to 16-bit.
Do not worry about the labels “CD quality,” “DVD quality,” or “Studio quality” during configuration, as these can be ignored.
Mac users can configure their settings by following these steps:
- Select the Utilities folder within Applications
- Open Audio MIDI Setup
- Select the active microphone from “Audio Devices”
- Match the sample rate to either 44.1kHz or 48.0kHz
Ensure your OS sample rate aligns with the settings in OBS.
Dropping Frames
“Dropping frames” occurs when OBS cannot process video graphics in time, leading to unsent images. To check for dropped frames, launch OBS and click “View.”
Once you select “View,” click “Stats.”
If the numbers enclosed within the stats screen appear in red, frame dropping might be causing the audio desync.
If frames are dropping, lowering the bitrate can help. We’ll explain how to configure the bitrate settings in the next section.
Audio Bitrate Set Too High
Setting the audio bitrate too high can cause noise or result in audio desync.
The recommended audio bitrate for singing streams is 128kbps, so be careful not to overdo it. To configure this, launch OBS and select “Settings” from the control panel.
Select “Output,” and you can choose the “Audio Bitrate” from the drop-down menu, setting it to the recommended 128kbps to complete the task.
Timestamp is Checked
The timestamp setting, accessible only on Windows, should be noted. Mac users cannot fix audio desync by configuring this function.
Open OBS and focus on the device experiencing audio desync in the “Audio Mixer.”
Click on the section where three vertical dots are visible and select “Properties.”
Uncheck the checkbox labeled “Use Timestamps” under the device’s settings. If the audio desync persists even after changing the timestamp setting, reverting the checkmark is fine.
Incorrect Sync Offset Values
The sync offset in OBS allows you to delay or advance audio. To configure it, open OBS and click the section with three vertical dots under “Audio Filters.”
The “Adjust audio sync” screen appears, allowing modification of the “Sync offset” values to fix audio desync.
For instance, if the microphone audio is delayed by 15ms, change the sync offset value for the mic to “-15ms” to synchronize it.
If you are unsure of the precise delay, approximate the value to set in the sync offset and fine-tune it by recording and reviewing your stream to verify the delay.
How to Apply Echo in OBS Singing Streams
This section explains how to apply echo in OBS singing streams. For echo effects, installing the “OrilRiver” plugin is recommended.
See the following sections for instructions on installing and configuring the plugin.
Installing the Free Plugin “OrilRiver”
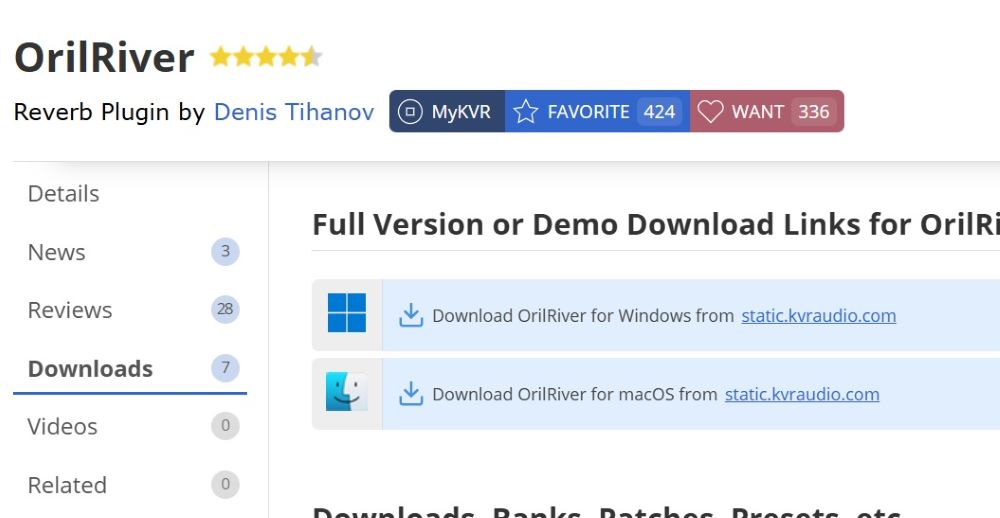
The “OrilRiver” plugin for adding echo in singing streams can be downloaded below:
On the download page, separate versions for Windows and Mac are available, so download the appropriate plugin for your OS. First, here is the installation method for Windows.
Extract the zip file and add “OrilRiver.dll” from the files to your desktop. Next, open “Program Files” from “Windows-SSD.”
Open the folder and place “OrilRiver.dll” you added to the desktop into the “VSTPlugins” folder.
If the “VSTPlugins” folder doesn’t exist, create a new one with the same name.
After adding it, open OBS, and select “Filters” under the preview in the top-left corner of the screen.
Once you select “Filters,” press the plus button under “Audio Filters” and choose “VST 2.x Plugin.”
From the VST 2.x Plugins dropdown, select “OrilRiver” and click “Open Plugin Interface.”
Installation completes when the screen below appears.

For Mac, follow the installation steps below:
- Install the Mac version of OrilRiver
- Find the file labeled “OrilRiver.vst” in the extracted files
- Open the Library from “Macintosh HD”
- Open “Audio” and then “Plug-Ins”
- Add “OrilRiver.vst” to the “VST” folder within Plug-Ins
Following this, activate OrilRiver within OBS as you would in the Windows setup.
How to Use OrilRiver
Essential functions of OrilRiver are as follows:
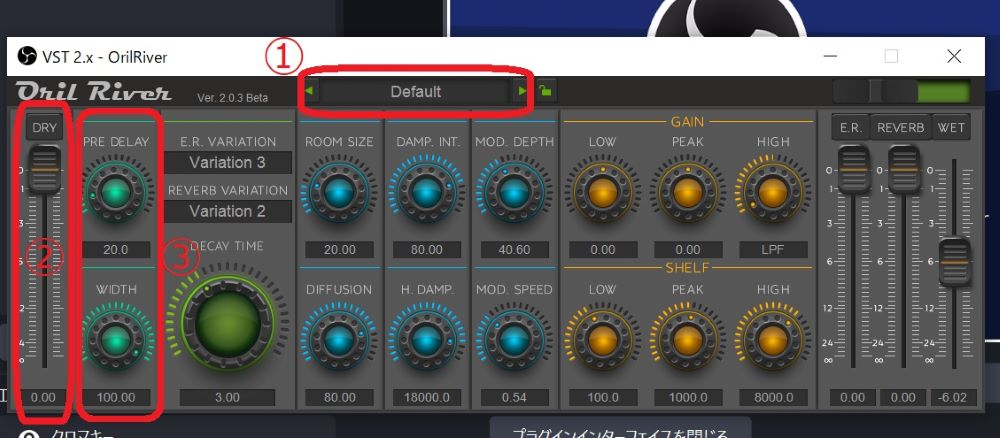
- ① Audio processed with detailed settings can be used
- ② Adjust the volume using the slider, and mute the original sound with “DRY”
- ③ The smaller the “PRE REPLAY” value, the faster echo is applied, and “WIDTH” adjusts audio spread
If unsure about detailed settings, change the Default at ① to find your ideal streaming setup.
Configuring OrilRiver
Beyond the explained functions, OrilRiver enables comprehensive settings.
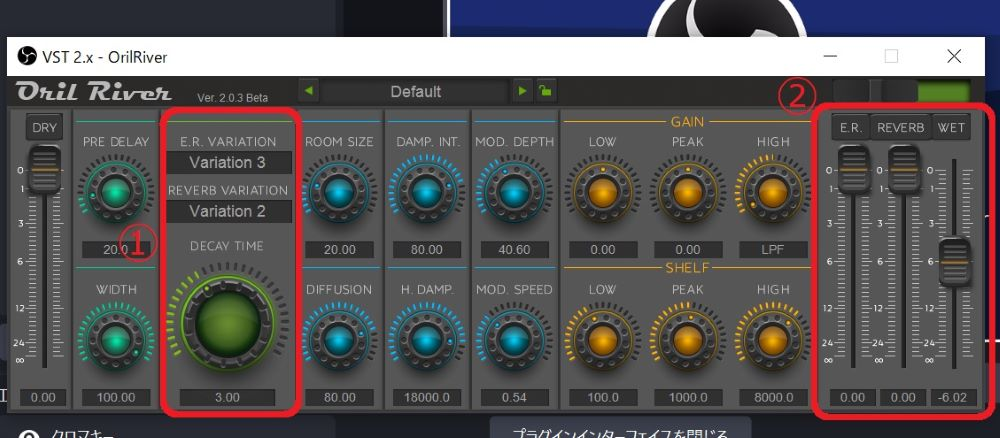
Functions within ① (on the left) are configured as follows:
| Item Name | Detailed Function |
|---|---|
| E.R.VARIATION | Selects the type of initial reflection sound |
| REVERB VARIATION | Options for echo variations |
| DECAY TIME | Adjusts the duration of the echo effect |
Functions within ② (on the right) are configured as follows:
| Item Name | Detailed Function |
|---|---|
| E.R. (Button) | Mute the initial reflection sound |
| E.R. Slider | Adjust volume for initial reflection |
| REVERB (Button) | Mute echo |
| REVERB Slider | Adjust echo volume |
| WET (Button) | Mute both initial reflections and echo |
| WET Slider | Simultaneously adjust volume for both initial reflections and echo |
Combine these with the primary uses to configure settings for your singing stream.
If you need further details on applying echo, check out the following article:
Free OBS Tutorial: How to Add Echo to Your Stream with Audio Filters
How to Display Karaoke Subtitles in OBS Singing Streams
If you want to display karaoke subtitles in OBS singing streams, the free tool “Jimac” is recommended. This section explains how to use Jimac and display it in OBS.
Using the Free Tool “Jimac”
No installation is required for Jimac. Access Jimac via the link below.
Upon accessing, the following screen appears. The red outlined section is editable for inputting your desired lyrics.
When using Jimac for OBS singing streams, capture the green background using a window capture to output subtitles.
Note: The “Animation” section allows editing of subtitle output methods, offering “fall” for top-to-bottom display and “Stairs” for left-to-right flow.
Displaying in OBS
To display Jimac in OBS, open OBS and select “Window Capture” from the “+” button under “Sources.”
Choose the window displaying “Jimac,” and click OK.
Next, click “Filters” under the preview, select “Chroma Key” from “Effect Filters,” and choose it.
The chroma key makes the green background transparent, allowing only the subtitle text to be visible during streaming.
Finally, press the “alt” key (Option key on Mac) to crop the image, ensuring that only the lyrics section is visible, completing the process.
This article explained how to resolve audio desync in OBS singing streams. Implementing the correct settings can make your streaming experience more pleasant.