Share
Twitch Guide: How to Watch, Stream, and Monetize Effectively

Index
- [For Viewers] How to Watch Twitch Streams and Basic Operations
- How to Use Twitch Chat
- How to Send Private Messages Using Twitch Whispers
- How to Create and View Twitch Clips
- How to Accumulate and Use Twitch Channel Points
- [For Streamers] How to Start Streaming on Twitch and Necessary Preparations
- Convenient Features to Enhance Streaming: Extensions and Clips
- Conclusion
“I want to watch streams on Twitch, but I have no idea how to operate the screen…” Many people have this concern. Since Twitch is a platform originating overseas with many unique features, newcomers may feel confused at times.
This article provides a wide-ranging explanation from how to use Twitch’s viewing screen, understand its layout, perform basic chat operations, create clips, and even prepare for starting a stream and conditions for monetization.
Whether you just want to enjoy as a viewer or are considering debuting as a streamer, please refer to this article.

[For Viewers] How to Watch Twitch Streams and Basic Operations
The first thing you want to learn when watching Twitch is the layout of the streaming screen and the functions of various buttons. Understanding how to use them will make viewing more comfortable. We will introduce the viewing methods, settings, and how to find streams in order.
How to Watch Streaming Screen and Role of Each Button
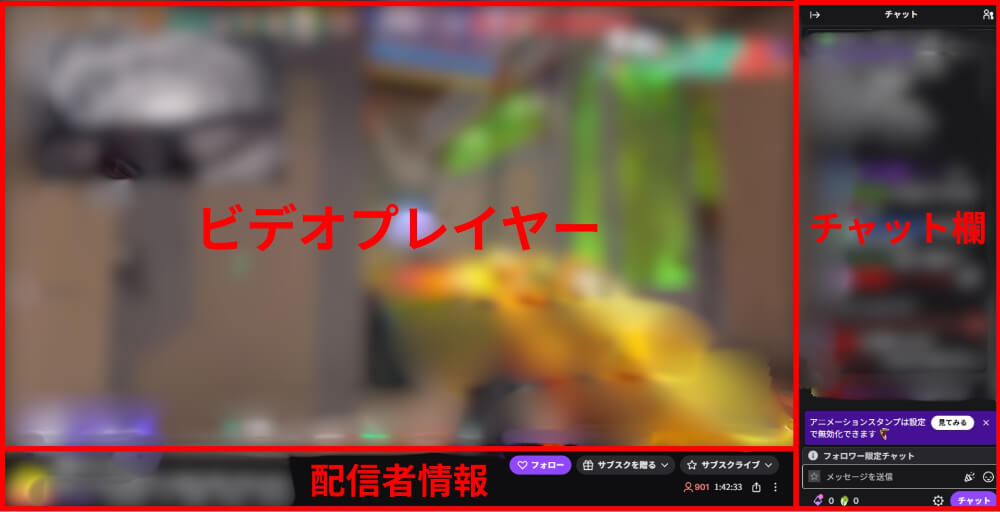
The Twitch streaming screen consists of three parts: the video player, chat section, and streamer info panel. The video player displays the stream video, and the chat section is placed on the right side (for the PC version).
The streamer info panel is located at the bottom of the screen, where you can check the stream title, category, streamer’s profile, etc.
The operation buttons are lined up under the video player. You can stop or resume the video using the play/pause button, and adjust the sound volume with the volume slider.
By clicking the gear icon, you can open the quality settings menu and choose from “Source,” “1080p,” “720p,” etc. If your connection is unstable, lowering the quality can help prevent the video from stopping.
By pressing the theater mode button, you can enlarge the video player while keeping the chat section visible. The full screen button allows the video to spread across the entire screen, which is useful to enhance immersion.
Settings for Comfortable Viewing on PC and Smartphone
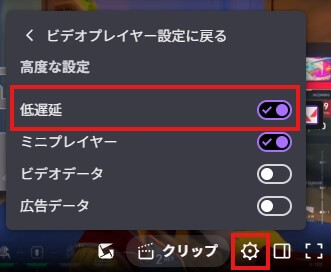
If you want to reduce delay (lag) during viewing, enable low latency mode. On the browser version of Twitch, select “Advanced Settings” from the gear icon on the bottom right of the video player and turn on “Low Latency.” This reduces the lag between the timing the streamer responds to comments and your viewing, making chat interactions smoother.
When viewing on a smartphone, there are two ways: installing the Twitch app or accessing Twitch from a browser. The app version has a rich notification feature. When a followed streamer starts live streaming, you can receive push notifications. On the other hand, the browser version is attractive for its ease of watching without installing an app, so choose according to your usage style.
* Specifications are subject to change. Please check the official help for the latest information.
Efficiently Find the Stream You Want to Watch

A representative method for finding streams is category search and tag filtering. Click “Find Content” at the top of the screen, and a list of categories such as “Games,” “Chatting,” and “Music & DJ” will appear. Choosing an interested category efficiently displays streams in that genre.
Also try using tags for filtering. Searching with tags such as “Japanese” or “Beginner Welcome” makes it easier to find streams that meet your criteria. You can check if a followed streamer is live from the “Following” on the left sidebar.
Once you find a streamer you are interested in, follow the channel. Following allows you to receive notifications when streaming starts, and you may be able to use follower-exclusive stamps (emotes) as a perk.
How to Use Twitch Chat
One of the attractions of Twitch is the chat function where streamers and viewers can communicate in real-time. We will explain the points to master chat, from how to send comments to using stamps and convenient commands.
Basic Operations for Sending Comments in the Chat Section
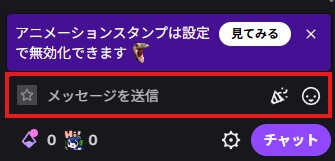
To chat on Twitch, you need to be logged into your account. Enter your message in the input box on the right side of the stream screen, and press the Enter key (or the send button if on mobile) to post a comment. The simplicity of use means that even beginners can quickly get used to it.
When commenting for the first time on a channel, you may be asked to agree to chat rules, so please check the displayed content and click “Understood!”.
If you want to address a specific viewer, the mention function is convenient. Enter “@” in the chat box, and candidate users participating in the chat will be displayed. Click the username of your intended recipient, and continue entering a message to send a comment in a way that notifies them.
Types and Usage of Stamps (Emotes)
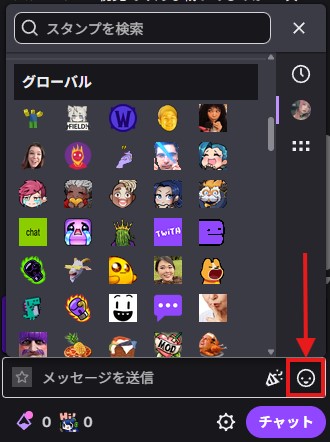
On Twitch, there’s a stamp (emotes) feature that allows posting illustrations or icons in the chat. By clicking the face mark on the right side of the chat input box, you open the emote picker where you can select available stamps.
There are multiple types of stamps. “Global Emotes” available to everyone are provided by Twitch, including famous purple face icons. “Subscriber-only emotes” are stamps available only to viewers subscribed (paid) to a specific channel. They often feature original designs by streamers and are popular as subscription perks.
Although not an official Twitch feature, by installing browser extensions like BetterTTV or FrankerFaceZ (FFZ), external emotes can be used. They are displayed among viewers who have installed the extension, so if you want to use them, add them to your browser in advance.
For detailed instructions on how to create stamps, refer to the article below.
>>Maximizing Twitch Emotes: Tips on Creation, Usage Limits, and Expansion
Chat Commands to Know for Convenience
In Twitch chat, you can perform specific operations by entering commands that start with a slash (/). Here is a list of major commands available to viewers.
| Command | Function |
|---|---|
| /mods | Display a list of channel moderators |
| /vips | Display a list of VIP users in the channel |
| /color [color name] | Change the color of your username (e.g., /color blue) |
| /me [message] | Emphasize messages in italic |
| /block [username] | Block a specified user |
| /unblock [username] | Unblock a specified user |
| /w [username] [message] | Send a whisper (DM) to a specified user |
The “/color” command is a feature for Turbo users or Prime Gaming members, limiting the colors available to regular users. Remembering how to use commands can make chat communication more enjoyable.
Reference: Twitch “Chat Commands“
How to Send Private Messages Using Twitch Whispers
Whispers are a DM (direct message) feature that allows sending private messages to specific users on Twitch. Unlike the chat section, the content is not displayed to other viewers watching the stream.
It can be used to communicate with moderators or for private conversations with acquaintances.
There are three methods to send a whisper, and here is how to use each:
| Method | How to Use |
|---|---|
| Sending from Username | Click the user’s name in the chat box and select “Whisper” from the menu displayed |
| Sending by Command | Enter /w [username] [message] in the chat input box and send |
| Sending from Whisper Panel | Click the whisper icon (speech bubble mark) in the navigation bar at the top of the screen and search for and send to the recipient |
If you want to prevent spam messages from unknown accounts, change the reception settings.
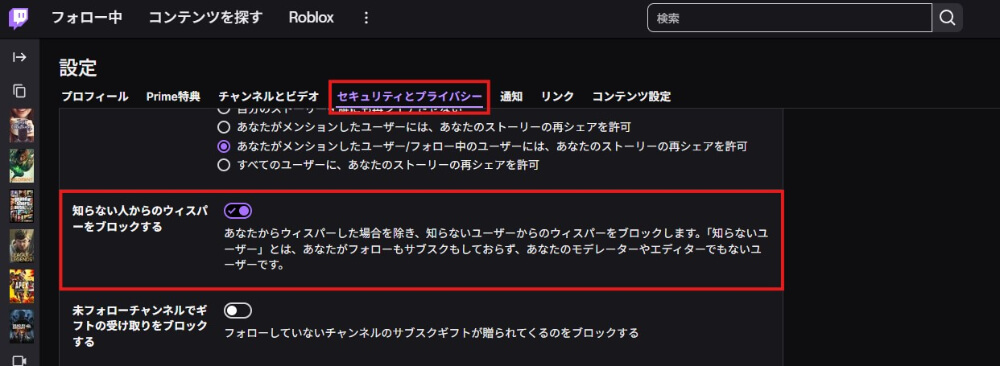
By going to “Settings” → “Security and Privacy” and turning on “Block whispers from strangers,” you can set not to receive messages from users you are not following.
Reference: Twitch “About Whispers“
How to Create and View Twitch Clips
Clips are a feature where you can cut and save up to 60 seconds of highlight moments from a stream for sharing. Once you learn how to use it, you can easily preserve your favorite moments and help in spreading them on social media.
Steps to Create Clips While Watching
Creating clips can be done in a few clicks while watching the stream. The steps are as follows:
1. Hover over the stream screen, and click the clip icon (a film-like mark) displayed on the bottom right
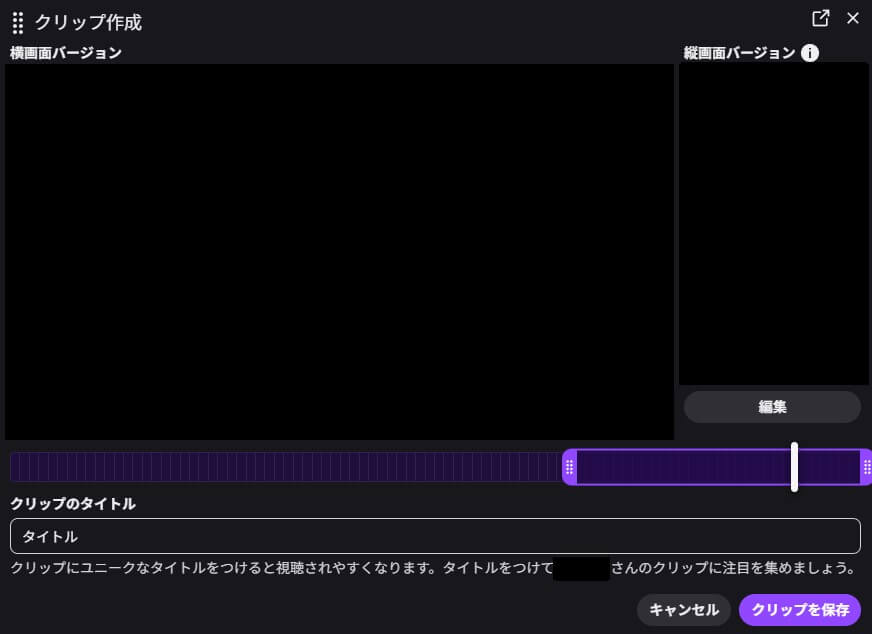
2. The clip editor opens, so drag to adjust the range you want to shorten (settable from 5 to 60 seconds)
3. Enter an easy-to-understand name in “Clip Title”
4. Click “Save Clip” to complete
In the clip editor, you can also create a vertical version of the video. If you want to post on YouTube Shorts or TikTok, use the “Edit Vertical Video” function to adjust which part of the horizontal screen to use as a vertical video.
If the clip icon is not displayed, the streamer may have disabled clip creation or set it so only followers or subscribers can create clips.
How to Check and Manage Clips Made by Yourself or Other Users
Created clips can be checked from the Clip Manager. Access it by the following steps:

1. Open the Creator Dashboard
2. Click “Content” on the left menu
3. Select “Clips”
In the Clip Manager, you can manage clips with two types of tabs.
- Clips of Your Channel: All clips created from your streams are displayed
- Clips You Created: Clips you made on other channels are displayed
If you want to delete a clip, select “Delete Clip” from the three-dot menu of the specific clip. Note that even as a creator, you cannot delete it if:
- The streamer has edited the clips
- The streamer has set it as “Featured”
Clips have no expiration date and are generally stored for a long time. You can also save them as video files using the download button, so use it if you want to back them up.
Reference: Twitch “How to Create, Edit, and Share Clips“
How to Accumulate and Use Twitch Channel Points
Channel points are a free point feature that accumulates simply by watching streams. Collected points can be exchanged for rewards set by the streamer. The usage is simple and accumulates automatically while watching without any special settings.
Points can be earned as follows:
| How to Earn | Details |
|---|---|
| Watch streams | About 220 points per hour are automatically given |
| Bonus Points | Click the button displayed on the screen to get 50 points |
| Continuous Viewing & Raid Participation | Earn additional points by continuous viewing or moving to another channel |
| Subscribe Benefits | Earn rate increases up to 2x depending on the tier |
Rewards vary by streamer, but typically include “Highlight Message (display chat prominently),” “Unlock Stamps,” and “In-game Requests.” You can check your balance and redeemable rewards from the point icon at the bottom left of the chat input box.
Reference: Twitch “Viewer’s Channel Points Guide“
[For Streamers] How to Start Streaming on Twitch and Necessary Preparations
To start streaming on Twitch, you need to install streaming software and make various settings.
The recommended software for different streaming environments is as follows:
| Streaming Environment | Recommended Software/Feature |
|---|---|
| PC | OBS Studio (Free), Streamlabs, etc. |
| Smartphone | Streaming feature of the Twitch app |
The essentials required for streaming are as follows:
- Required: PC for streaming (or smartphone), a stable internet connection, Twitch account
- For game commentary: Capture board
- For chatting streams: Webcam, microphone
By appropriately setting up scene composition, bit rate (amount of data sent per second), and resolution in the streaming software, you can deliver easy-to-watch videos to your audience.
For detailed methods of streaming using OBS Studio, and setup procedures for both PC and smartphones, check out the article below. It covers everything from how to stream to conditions for monetization.
>>How to Start Streaming on Twitch: Setup, Essential Gear & Monetization Tips
Convenient Features to Enhance Streaming: Extensions and Clips
By using Twitch Extensions, you can add various interactive elements to the streaming screen. Extensions are a popular feature for streamers who want to create viewer-participation content.
Extensions can be added from the “Extensions” menu in the Creator Dashboard. Extensions are listed by category, and you can simply click the “Add to Channel” button to install them. After installation, activate it, set the display position (overlay, panel, etc.), and you will be able to use them.
A representative use of extensions is displaying viewer polls and mini-games. You can conduct surveys during a stream, display game records in real-time, and more to expand the scope of your stream.
Extensions are generally available for free, but some are paid. Check the features and fees before installation, and select extensions that suit your streaming style.
Reference: Twitch “How to Use Extensions“
Conclusion
This article explained how to use Twitch, from basic operations for viewers to how to start streaming for streamers.
As a viewer, it’s smooth if you understand how to view the screen, use the chat, and utilize channel points. For debuting as a streamer, prepare by setting up streaming software and necessary equipment, and enhance your stream with extensions.
Start exploring Twitch by actually trying it out and learn the functions at your own pace.