Share
How to Install Plugins in OBS and Recommended Ones

Index
OBS Studio has many plugins that make streaming easier. If you want to eliminate background noise or enhance audio clarity, installing plugins is recommended.
This article explains how to install plugins and introduces five recommended plugins. Use this as a reference to find your ideal streaming setup.

Preparation Before Adding Plugins to OBS
This chapter introduces how to prepare before adding plugins to OBS.
Before installing plugins, it’s crucial to ensure the developer is trustworthy and to back up your system in case of an emergency. Detailed instructions for confirming safety and creating backups are provided below.
Creating a Backup
There are two key items to back up in OBS:
- Profiles: Settings related to streaming destinations and recordings
- Scene Collections: Settings such as scenes, sources, and audio mixers
To back up a “Profile,” first open OBS and select “Profile” from the top menu.
By clicking on the profile as shown in the image, a tab will appear. In the image, it’s labeled “Untitled,” but for those using multiple streaming sites, it will indicate YouTube, Twitch, etc.
Ensure that the profile you want to save is checked, click export, and select your desired save location to complete the backup.
Next, here’s how to back up your Scene Collection. Select “Scene Collection,” located next to “Profile” at the top of the OBS screen.
As with profiles, ensure that the scene collection you want to save is checked. Finally, click export and select the desired save location to complete the backup.
Ensuring Plugin Safety
When installing plugins, safety should also be a consideration. If you’re installing for the first time and are concerned about safety, it’s recommended to download plugins from the official OBS website.
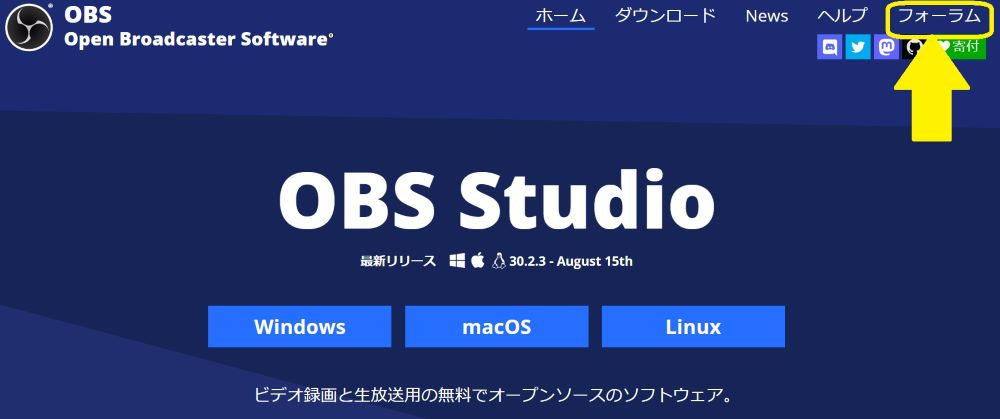
First, access the official OBS website and click “Forum” in the upper right corner.
Clicking on the forum will change the screen; please click “Plugins.
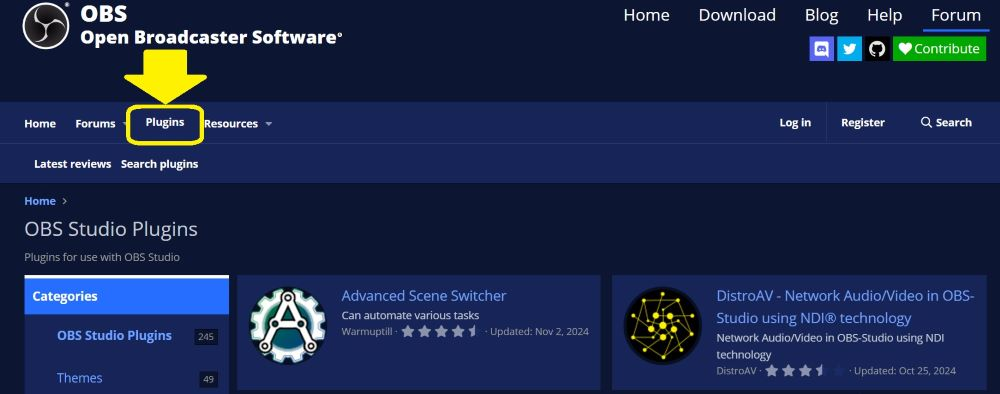
After clicking on Plugins, you can access a page introducing various plugins. Find the plugin that suits your needs.
You can also see ratings for each plugin page, which can be helpful when making your choice.
How to Add Plugins to OBS (With Installer)
This section explains how to add plugins when an installer is available.
An installer is software used to install applications or systems on a computer. Having an installer makes the process of adding plugins to OBS smooth.
Download the Plugin
First, download your desired plugin. As mentioned earlier, for safety reasons, it is recommended to download plugins from the official OBS website.
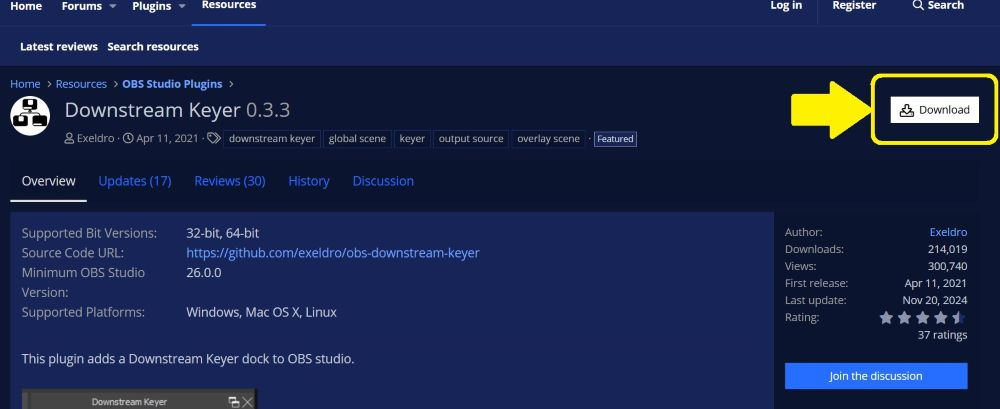
Once you’ve decided on a plugin, press the download button in the yellow portion of the image above.
Once the plugin is downloaded, a file will be added to your desktop.
Follow the Installation Wizard
When you click the downloaded file, it will ask, “Do you want to allow this app to make changes to your device?” Click “Yes.”

An installation wizard will appear as shown in the image, allowing you to easily install by following the instructions.
How to Add Plugins to OBS (Without Installer)
This section explains how to add plugins to OBS without an installer. Although the process may seem more intricate compared to having an installer, the steps are straightforward.
Download and Extract the Plugin
Just like when there’s an installer, press the download button from the page of your desired plugin.

After pressing the download button, the screen above will be displayed, so download the appropriate zip file for Windows or Mac.
- For Windows: Select windows.zip (shown in the image above as ①)
- For Mac: Select macos.zip (shown in the image above as ②)
After downloading, extract the files.
Copy to the OBS Folder
Once you extract the downloaded file, you will find two files:
Copy the “data” folder and “obs-plugins” folder into their corresponding folders within the OBS installation directory.
For Windows, select “Windows-SSD (C:)” from Explorer.
Next, choose “Program Files” , and look for “obs-studio.”
Within “obs-studio,” you’ll find folders with names matching those you extracted on your desktop. Move the two extracted folders to their corresponding folders within obs-studio to complete the process.
For Mac, follow these steps:
- Right-click on the OBS app and select “Show Package Contents”
- Ensure “data” and “obs-plugins” exist within the “obs-studio” folder
- Move the extracted data and obs-plugins folders to the same-named folders you just checked
Although there are more steps with checking and moving folders, installation without an installer is simple.
Causes of Slow Operation When Using Plugins in OBS
This section explains the causes of and solutions for slow operation when using plugins in OBS.
The main reasons for slow performance are plugins that require high resources or an excessive number of profiles. Try deleting unnecessary plugins to support smooth operation.
Heavy Plugin Usage
Heavy plugins can impede smooth performance.
Some plugins can consume significant computer resources, eventually slowing down OBS and causing streaming delays.
If your computer specs are quite low, they tend to have less capacity, making them unsuitable for large plugins. Consider upgrading your computer’s specs or using additional memory to enhance processing capabilities.
Incompatibility Between Plugins and OBS Versions
Incompatibility between a plugin and the OBS version can lead to operational issues.
This often happens when the OBS version is outdated or when the plugin version doesn’t keep up with an OBS upgrade. If OBS operates slowly, check the compatibility between plugin and OBS versions.
To resolve this, regularly check official sites of OBS and plugins for new releases, and update accordingly to minimize compatibility issues.
Too Many Plugins
Since plugins consume computer resources, having too many installed can slow down operations.
Actively uninstall plugins that are infrequently used or unnecessary after installation.
The best approach is to install only essential plugins to avoid unnecessary resource consumption while maintaining OBS usability.
5 Recommended Plugins for Specific Streaming Purposes on OBS
This section introduces five recommended plugins for different streaming purposes with OBS.
We introduce useful plugins for improving audio or adding effects, perfect for those looking to create unique streams. Use these suggestions to elevate your broadcasts today.
Remove Environmental Noise
To remove environmental noise, “Reafir standalone” is recommended. When streaming at home, mics often pick up sounds like footsteps, doors closing, or household appliances.
Reafir standalone offers automatic noise removal, preventing the mic from capturing such household sounds. Since such noise can be stressful to listeners, consider implementing this for more comfortable streaming.
You can also reduce background noise in OBS by using the “Noise Gate” filter, one of the built-in audio tools. For a detailed explanation of how to set it up—and how it differs from noise suppression—check out the article below:
What Is the Noise Gate in OBS? How to Set It Up and How It Differs from Noise Suppression
Add a Memo Function
To add a memo function to OBS, “Scene Notes Dock” is recommended.
Scene Notes Dock allows you to take notes directly on the OBS screen, making it ideal for users who want to refer to a script or note-taking during streaming. While notes can also be opened in a separate tab, a plugin that integrates this function offers superior operability.
Furthermore, not only is note-taking possible, but font size and color can also be changed. Customize highlight script sections and notes to your liking—another attractive feature.
Enhance Audio Quality
For cleaner audio during streaming, the “Marvel GEQ” plugin is recommended. Marvel GEQ allows the application of an equalizer on mic audio, a major feature.
Equalizers, which are used for adjusting audio quality, allow you to freely adjust sound frequency heights. Use an equalizer if you have an ideal sound profile in mind.
For those looking to improve mic audio quality directly within OBS, this article offers a detailed breakdown of recommended audio filters and how to set them up:
Top 5 OBS Audio Filters to Improve Mic Quality – Setup Guide Included
Create Unique Streams with Effects
If you want unique streaming experiences with OBS, consider using “Stream FX” for effects.
Stream FX, a plugin for adding significant visual changes, helps create a personalized streaming style. Below are the main effects Stream FX offers:
| Effect Features | Effect |
|---|---|
| Blur | – Adds a blur to materials – You can also blur parts of the screen |
| SDF Effects | – Provides outlines to avatars or images – Can also add shadows |
| Color Grading | – Allows adjustment of hues and tones of materials – Easily change the atmosphere |
| Dynamic Mask | – Darkens avatar based on the game (Example) Make avatar darker in caves, brighter in bright areas to match the game’s atmosphere |
As various distinctive streamers emerge, having a unique broadcasting style is a step toward gaining followers.
Apply diverse effects with Stream FX to establish your distinct streaming style.
Stream with a Vertical Screen
For vertical screen streaming, “Aitum Vertical” is ideal. Aitum Vertical lets you create and stream a vertical screen within OBS, saving the effort of editing a horizontal screen into a vertical one.
Popular platforms like TikTok and Instagram use vertical videos due to the convenience of viewing them on smartphones.
Moreover, even YouTube, traditionally horizontal, has seen a surge in vertical content with the advent of short videos. Due to the ease and viewability of not needing to rotate the screen, the demand for vertical videos continues to rise.
Establishing a following through Aitum Vertical could indeed be a valid strategy due to these outlined reasons.