Share
OBS & Discord Screen Sharing: Step-by-Step Guide and Troubleshooting Tips!

Index
The method for screen sharing on Discord using OBS varies based on the purpose, such as whether you want to share only video or both video and audio.
In addition to simple screen sharing, there are scenarios where you might want to use OBS to display overlays on Discord or share in full screen.
This article explains how to perform screen sharing by combining OBS and Discord. Proceed with the necessary settings in the correct order to ensure smooth screen sharing.

By combining OBS and Discord, you can easily perform screen sharing useful for online meetings or streaming. However, since the setup method varies depending on the purpose, it’s important to understand the correct procedures.
Here, we will explain the setup methods according to the following purposes, so adopt the settings that suit you for comfortable screen sharing.
- Steps to share only video
- Steps to share video and audio
If you want to share only video, it is recommended to use OBS’s virtual camera feature. With this method, you can share screens like PowerPoint slideshows or notepads with no audio on Discord.
Refer to the following for specific steps.
1. Prepare OBS
Launch OBS and set up the screen you want to share. If displaying a PowerPoint slideshow, select “Window Capture” from OBS’s “Sources” and specify the relevant window.
2. Start the Virtual Camera
Next, click “Start Virtual Camera” in the “Controls” panel at the bottom right of the OBS screen. OBS will operate as a virtual camera, allowing the set video to be sent to Discord.
3. Set Up on Discord
Open Discord and click the gear icon at the bottom left to open “User Settings.” Select the “Voice & Video” tab, and choose “OBS Virtual Camera” in the Camera section. Ensure OBS video is displayed in the preview.
4. Start a Call and Share the Screen
On Discord, start a call and click the “Video” button in the call screen to share the OBS video with other participants. Don’t worry if it appears mirrored in the preview; the actual video sent will be correct.
If you’re curious about virtual cameras, we’ve covered it in detail in the following article. Check it out to learn how to use OBS’s virtual camera feature with platforms like Discord and Zoom.
What Is OBS Virtual Camera? How to Use It with Discord and Zoom
If you want to share gaming streams or YouTube videos, you’ll need to set up both video and audio sharing.
Refer to the following for specific steps.
1. Prepare Video in OBS
First, launch OBS and set up the screen you want to share. For a gaming screen, add a capture board by selecting “Video Capture Device” from OBS’s “Sources.” For browser sharing, choose “Window Capture” and specify the desired window.
2. Configure Full Screen Projector
Right-click the preview screen on OBS and select “Full Screen Projector (Preview).” Choose the monitor where you want to display the video; the OBS video will fill the entire monitor.
3. Set Up Audio
Prepare the audio next. In OBS’s “Audio Mixer,” ensure the audio you want to share (game audio or browser audio) is enabled. Adjust volume as needed.
4. Share Screen on Discord
Open Discord and start the call. Click the “Screen” button displayed in the call screen, select “Full Screen Projector,” set the resolution and frame rate, and click “Go Live” to get started.
If you want to stream high-quality Discord audio with OBS, be sure to check out this article.
How to Share and Integrate Discord Audio and Screen in OBS Streams
How to Show Overlays with OBS×Discord
Overlays allow you to display the caller’s icon and name on the screen during streaming. Using overlays, you can customize the streaming screen and differentiate from other streamers.
However, to achieve overlays with OBS and Discord, the StreamKit tool is essential. Here’s a guide on configuring StreamKit and OBS settings.
StreamKit Setup Procedure
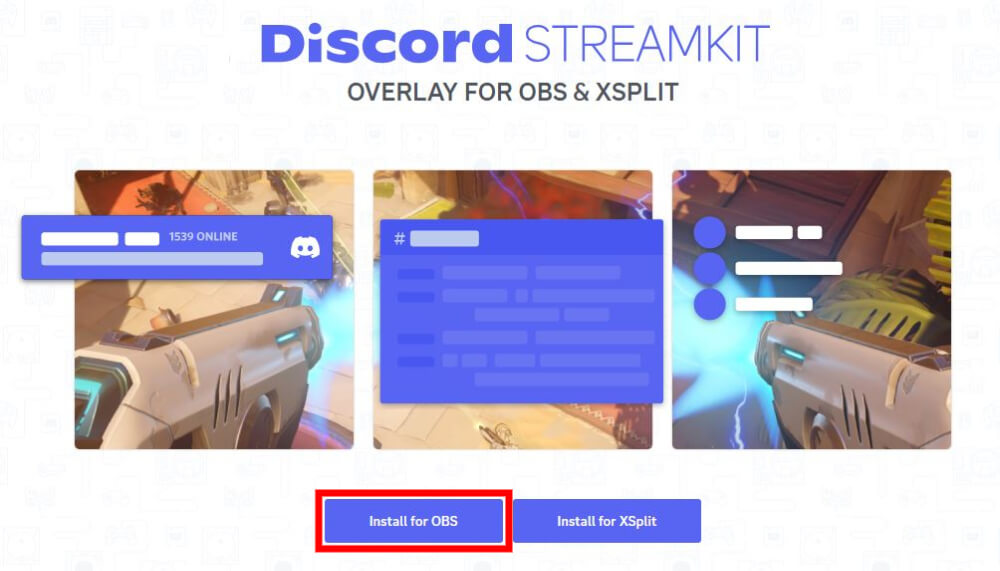
1. Start StreamKit and Allow Connection
After logging into Discord, open StreamKit in your browser and allow integration with your Discord account.
2. Install Settings for OBS
Click “Install for OBS” on the main screen of StreamKit.
3. Select Server and Channel
From “STATUS WIDGET,” choose the server where you want to set the overlay. Check the server name and icon in the preview on the right to ensure the correct server is selected.
4. Select Voice Channel
Specify the voice channel you want to display in the overlay under “VOICE WIDGET.”
5. Adjust Overlay Design
Scroll down to access customization options such as text size, background color, and icon display format. Set a design that matches your streaming screen using the preview.
6. Copy Overlay URL
After setting up, copy the overlay URL displayed at the bottom right of the screen.
OBS Setup Procedure
1. Add Browser Source
Open OBS, click the “+” button in “Sources” at the bottom of the screen, and select “Browser.”
2. Paste StreamKit URL
Paste the overlay URL copied from StreamKit into the “URL” field of the OBS settings screen. Enter the width and height specified by StreamKit as well.
3. Confirm Overlay Preview
Save the settings, and the overlay will be reflected in the OBS preview screen. Adjust the on-screen placement while checking its appropriateness.
Full-Screen Sharing with OBS×Discord
We explain the method for full-screen sharing using OBS and Discord.
1. Prepare Preview in OBS
Start OBS and register the video you wish to share in the “Sources” section. Select “Game Capture” for sharing game screens, or “Window Capture” if sharing a browser.
2. Open the Full-Screen Projector
Right-click the preview screen, select “Full Screen Projector (Preview)” from the menu, and specify the monitor for showing the video.
3. Start a Call on Discord
Open Discord, and start a call with the person you wish to share with. Join a voice channel or make a direct call.
4. Set Up Screen Sharing
Click “Screen” below the call screen and select “OBS Full Screen Projector” from the displayed list.
5. Adjust Quality and Frame Rate
Set the resolution and frame rate in the sharing settings screen. A resolution of 720px or 1,080px and a frame rate of 30fps or 60fps are common. Adjust these settings to match viewer connectivity if issues arise.
6. Start Sharing
Click “Go Live” to start full-screen sharing, and live video will be streamed to participants on Discord in real-time.
Troubleshooting Screen Sharing with OBS×Discord
Although using OBS and Discord for screen sharing is convenient, certain issues may occur depending on the environment or settings, such as:
- Discord not displaying in OBS
- No Discord audio in OBS
- Wanting to exclude Discord audio from the stream
Solutions to these issues are explained below.
Discord Not Displaying in OBS
If screen sharing doesn’t work, it could be due to Discord’s “Streamer Mode” settings or an incorrect “Source” selection in OBS.
Check your settings using the following steps:
1. Launch Discord, and click the gear icon at the bottom left to open “User Settings.”
2. Select “Streamer Mode” under “App Settings.”
3. Ensure “Hide Discord’s window from Screen Capture” is unchecked.
4. Launch OBS, and select the existing “Window Capture” from “Sources.”
5. Open “Properties” and ensure the Discord window is correctly selected in the “Window” section.
6. If the Discord window is not displayed, close Discord once and restart to recheck.
If the methods mentioned above didn’t solve the issue or if you want to learn more about screen capture in OBS, be sure to check out this article.
Complete Guide to Screen Capture in OBS: What to Do If It Doesn’t Show Up
No Discord Audio in OBS
If Discord audio is inaudible in OBS, unify the output device settings across Windows, OBS, and Discord.
Check each setting with the following steps to resolve audio issues:
1. Set Windows Audio Device
1-1. Right-click the speaker icon at the bottom right of the taskbar and open “Sound Settings.”
1-2. Select your speaker or headphones from “Output Device.”
2. Set OBS Audio Device
2-1. Open OBS and click “Settings” at the bottom right.
2-2. Select “Audio” and set “Desktop Audio” to “Default.”
3. Set Discord Audio Device
3-1. Launch Discord, and click the gear icon at the bottom left to open “User Settings.”
3-2. Select “Voice & Video” and set “Output Device” to “Default.”
If you’re still experiencing issues like “no game audio after setup” or “screen sharing not working properly,” try reconnecting your devices and attempting the setup again. If you’re still unable to get audio output, be sure to check out this article:
No Sound in OBS? A Clear Guide to Troubleshooting Based on the Symptoms
Excluding Discord Audio from OBS Stream
With the “win-capture-audio” plugin, you can stream other audio while excluding Discord from OBS. Useful for protecting privacy or when you don’t want to share call content in your stream.
Check the steps below for details:
1. Install the Plugin
1-1. Install “win-capture-audio” from the official site and add it to OBS.
1-2. Restart OBS to activate the plugin.
2. Adjust OBS Audio Settings
2-1. Open OBS, select “Settings” → “Audio” tab.
2-2. Set “Desktop Audio” under “Global Audio Devices” to “Disabled.”
3. Configure Application Audio Capture
3-1. In OBS “Sources,” click “+” and add “Application Audio Output Capture.”
3-2. Configure the properties as follows.
・”Mode” → “Capture specific window”
・”Window” → “Discord.exe”
・Check “Capture all audio EXCEPT the selected window.”
4. Confirm Settings
4-1. Check the streaming preview to ensure Discord audio isn’t included.
We’ve explained how to use OBS and Discord for screen sharing.
Screen sharing with OBS and Discord can be widely used if you’re familiar with the settings suited to your objectives.
| For Sharing Only Video | For Sharing Video and Audio | Overlay Display |
|---|---|---|
| Utilizing the virtual camera feature enables a simple and efficient screen sharing experience. Perfect for video without audio like PowerPoint or notepads. | Using the full screen projector feature and audio mixer settings makes it easy to stream games or share videos. | With StreamKit, you can display the caller’s icon and name on the screen. |