Share
Vtube Studio & OBS Setup Guide: Troubleshooting Tips & Solutions

Index
- How to Configure Vtube Studio×OBS① Installation
- How to Configure Vtube Studio×OBS② Display the Avatar
- How to Configure Vtube Studio×OBS③ Display Game Screen
- How to Configure Vtube Studio×OBS④ Adjust Avatar Position
- Recording with Vtube Studio×OBS
- Troubleshooting When Vtube Studio Does Not Display or Work in OBS
If you’re eager to start streaming as a VTuber but find yourself struggling with how to connect “Vtube Studio” and “OBS,” you’re not alone. The general flow involves setting up the background in VTube Studio first, followed by configuring the capture settings in OBS.
This article provides a step-by-step guide, complete with images, from setting up Vtube Studio to streaming with OBS.
Be sure to follow through to the end and take your first step towards your streaming debut.

How to Configure Vtube Studio×OBS① Installation
Vtube Studio is downloaded via a site called “Steam.” Therefore, you first need to install the “Steam Client” on your computer.
Here’s how to introduce the Steam Client and download Vtube Studio, specifically for Windows users.
Install the Steam Client
Access the official Steam website, click “Install Steam” at the top right, and follow the steps below to install it.
1. Click the blue “Install Steam” button and the “SteamSetup.exe” file will be automatically downloaded.
2. Double-click the downloaded “SteamSetup.exe” to begin the installation
Key settings include:
・Language Selection: Selecting “Japanese” can make it easier to understand.
・Install Location: The default setting usually works fine, but feel free to change it if needed.
3. After completion of the installation, check “Run Steam” and click finish
1. Once Steam launches, you’ll see the “Create Account” screen
2. Enter your email address, clear the ReCAPTCHA (authentication), and click “Continue.”
3. A confirmation email will be sent to your registered email address; click “Verify Email Address” within the email
4. Return to the client and complete the setup to finish creating your account
Install Vtube Studio
Once the Steam Client is safely installed, proceed to introduce Vtube Studio.
1. Launch the Steam Client and enter “Vtube Studio” in the search bar at the top
Select and open the page for Vtube Studio from the search results list.
2. Click the button in the middle of the page labeled “Free” to start the installation
When you press the button, terms of use will appear. After reviewing and agreeing to the terms, the installation will proceed automatically.
3. When the installation is complete, a “Launch” button will appear on the screen
Press this button to launch Vtube Studio.
How to Configure Vtube Studio×OBS② Display the Avatar
To display an avatar by linking Vtube Studio and OBS, it’s necessary to use certain functions or plugins available in OBS.
| Game Capture | Video Capture Device | Spout 2 |
|---|---|---|
| Relatively lightweight and easy to handle but may capture the UI on the streaming screen. | Can hide the interface screen, but is slightly heavier. | Low load and easy to display transparently but requires prior setup. |
Each has its features, so it’s essential to choose based on your streaming environment.
Here’s a detailed procedure for setting up Vtube Studio and OBS to display your avatar. Experiment with multiple methods to find the one that lets you become the best VTuber.
Using OBS’s “Game Capture”
Here is the general process of using the “Game Capture” method with OBS.
1. Camera Settings (Vtube Studio)
2. Background Settings (Vtube Studio)
3. Game Capture Settings (OBS Studio)
Camera Settings (Vtube Studio)
1. Launch Vtube Studio
Start Vtube Studio and click the settings icon on the left.
2. Move to the “Camera” section
Within the settings menu, click on “Camera.”
3. Select the camera to use
Ensure that the connected webcam is correctly selected. If not, choose the appropriate camera from the dropdown menu.
4. Enable the camera
Click the “Camera ON” button to enable tracking. This will sync your avatar with the camera movements.
5. Set auto-start (optional)
If manually setting up every time is a hassle, turning “Auto Start” on can be convenient.
Background Settings (Vtube Studio)
To display only the avatar on the streaming screen, it’s crucial to set the background to transparent in Vtube Studio. Follow these steps to configure it.
1. Launch Vtube Studio
2. Click on the green background icon at the top left of the screen
3. Once the background settings screen appears, scroll and click “Color Picker”
4. Switch the “Transparency (OBS)” option to ON
A green background will appear, but it will become transparent by setting it in OBS.
5. Once the settings are complete, do not minimize Vtube Studio; keep it running
Minimizing it may stop the avatar from functioning.
Game Capture Settings (OBS Studio)
This section explains how to capture Vtube Studio’s avatar in OBS using “Game Capture.” Though a bit detailed, setting it up once will let you start streaming smoothly.
1. Add game capture
1-1. Launch OBS.
1-2. Click the “+” button in the “Sources” at the bottom left of the screen.
1-3. Select “Game Capture” from the list of sources and choose “Create New.” Entering a memorable name can help with management (e.g., “Avatar”).
1-4. In the game capture settings screen, change the “Mode” to “Capture a specific window.”
2. Select the target window
2-1. From “Window,” choose “Vtube Studio.exe.” Vtube Studio must be running for it to appear, so ensure it’s launched first.
2-2. Once the settings are applied, check that the avatar appears correctly in OBS.
3. Set the background to transparent
3-1. In OBS, right-click “Source” and select “Filters.” Click the “+” in “Effect Filters” and add “Chroma Key.”
3-2. Set the color key color to green, making the background transparent, so only the avatar appears.
4. Set UI to invisible
4-1. To prevent Vtube Studio’s menu from appearing in the streaming screen, click the “×” button for each item to close them.
4-2. To hide the right screen button, turn off “Use Screen Button” in Vtube Studio’s settings.
If your game capture isn’t showing up, be sure to check out this article:
How to Fix Game Capture Not Showing in OBS: A Thorough Guide to Causes and Solutions
Using OBS’s “Video Capture Device”
By using “Video Capture Device,” you can capture avatars without showing the UI on the streaming screen. Follow the steps below to configure it.
1. Background Settings (Vtube Studio)
2. Virtual Camera Settings (Vtube Studio)
3. Video Capture Device Settings (OBS)
Background Settings (Vtube Studio)
1. Launch Vtube Studio and click the green icon on the left
2. From the menu, choose “Color Picker” and turn “Transparency (OBS)” to ON
3. Close the settings, but keep Vtube Studio running
The background may appear green, but setting transparency in OBS will hide it.
Virtual Camera Settings (Vtube Studio)
Enabling the virtual camera is essential for OBS to recognize Vtube Studio as a camera. Follow the steps below for setup.
1. Launch Vtube Studio and click the settings icon (gear mark) on the left side of the screen
2. Open the “Virtual Webcam” item from the menu
3. Turn “Start Virtual Webcam” to ON to complete
Video Capture Device Settings (OBS)
1. Click “+” in “Sources” and select “Video Capture Device”
2. Choose “Create New” and enter a custom name (e.g., VtubeStudio)
3. Specify “VtubeStudioCam” in the device, and adjust the following settings:
・Resolution/FPS Type: Custom
・Resolution: 1,920×1,080
・FPS: 60
・Video Format: ARGB
Using the “Spout 2” Plugin
“Spout 2” is a convenient plugin that’s lightweight and allows for easy transparency. Follow the steps below to proceed from installation to configuration in OBS.
1. Plugin Installation
2. Check if the Plugin is Linked with OBS
3. Background Settings (Vtube Studio)
4. Add Source in OBS
Plugin Installation
To introduce “Spout 2,” you’ll need to download the installer from the official site. Follow these steps to proceed.
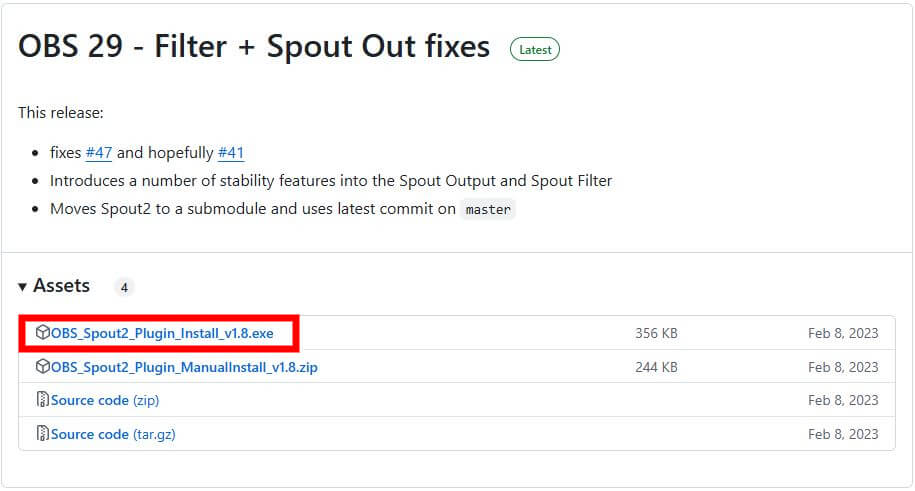
1. Download the installer
1-1. Access the official Spout 2 page.
1-2. Select “Installer” within the page and begin the download.
2. Execute the installation
2-1. Double click the downloaded file (e.g., Spout2Setup.exe) to execute it. You might see a screen prompting “More Info”→”Run,” which is fine.
2-2. Once the installer launches, click “Next.”
2-3. Select “I Agree” to agree to the terms and conditions.
3. Confirm the installation location
3-1. Confirm the folder where OBS Studio is installed and ensure the install location matches. If the default is fine, click “Next.”
3-2. Click “Install” ⇒ “Finish” to complete the installation.
Check if the Plugin is Linked with OBS
It’s crucial to confirm that “Spout 2” has been added correctly to OBS. Follow these steps to verify.
1. Launch OBS
2. Click “+” in “Sources” and confirm “Spout2 Capture” is displayed
If not displayed, the install location might be incorrect, so try reinstalling it.
Background Settings (Vtube Studio)
It’s essential to make settings for the avatar’s background to be transparent. If transparency is not set correctly, other elements will appear on the streaming screen.
Set up according to the following steps.
1. Set up the background to be transparent
1-1. Start Vtube Studio, double-click within the screen to display the menu.
1-2. In the left menu, choose “Background Settings (Image Mark).”
1-3. After the background settings screen opens, select “ColorPicker.”
1-4. Switch “Transparency (OBS)” to ON and save the settings.
2. Enable Spout 2
2-1. Once the background setting is complete, click the “Gear Icon” from the left menu.
2-2. Open the “Camera Icon” within the menu and turn “Start Spout2” ON.
This completes the preparation on the Vtube Studio side.
Add Source in OBS
The last step for using “Spout 2” on the OBS side is to capture the avatar with a transparent background.
1. In “Sources,” click “+” and select “Spout2 Capture”
2. Adjust the following settings in the property screen
2-1. Spout Senders: Select “VTubeStudioSpout”
2-2. Composite mode: Set to “Default”
3. Close the properties and save the settings
How to Configure Vtube Studio×OBS③ Display Game Screen
To display both the avatar and game screen with OBS, the order of sources is crucial. Set the game screen as the background and have the avatar displayed on top of it.
Reversing the order of sources will hide the avatar, so pay careful attention. Follow these steps to configure the avatar and game screen.
1. In the list of sources, drag the added game screen source to the bottom
2. Ensure the avatar source (e.g., video capture device or Spout 2) is positioned above the game screen
How to Configure Vtube Studio×OBS④ Adjust Avatar Position
The position and size of the avatar significantly affect the overall impression of the streaming screen. OBS allows for fine-tuning using the “Crop” feature.
Achieve ideal avatar placement by following these steps.
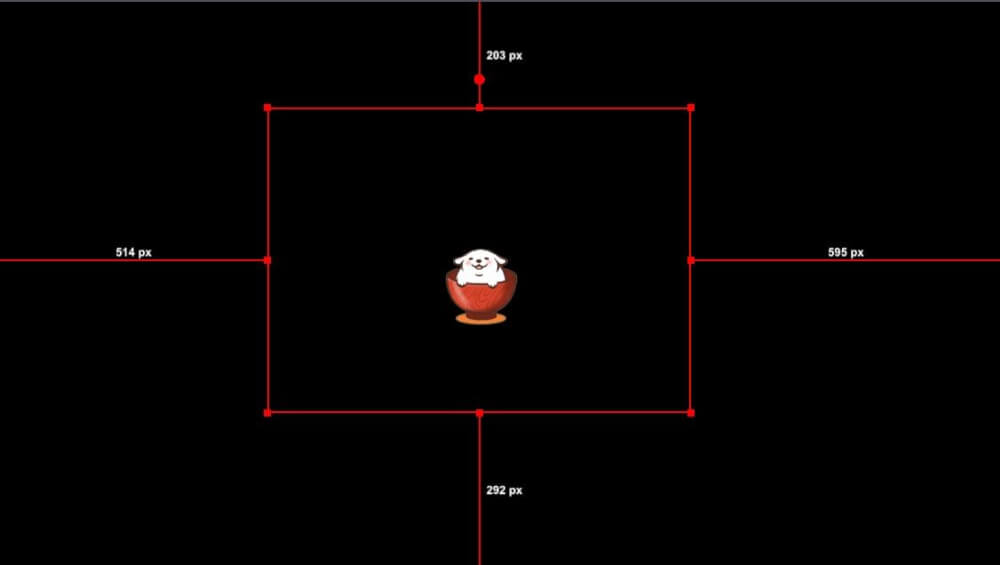
1. In OBS “Sources,” select the avatar source (e.g., video capture device or Spout 2)
2. To adjust avatar size, click and drag the avatar frame
Stretch or shrink the frame so it fits perfectly on the screen.
If you want to learn how to crop in OBS, check out this article.
3 Ways to Crop in OBS: Including Cropping for Highlight Clips!
Recording with Vtube Studio×OBS
By using Vtube Studio and OBS, you can record videos necessary for VTuber activities. You can capture high-quality recordings with your avatar and the game screen integrated.
Proceed with the configuration based on the following recording methods.
1. Launch OBS and click the “+” in “Scenes” at the bottom left
2. Click the “+” in “Sources” and select from the following as needed:
2-1. Game Capture: For recording game screens.
2-2. Video Capture Device: For capturing avatars.
2-3. Window Capture: For recording specific applications.
2-4. Image: To add still images as backgrounds or logos.
3. Click “Settings” at the bottom right of the OBS screen
4. Select “Audio” and set the following:
4-1. Desktop Audio: Set to “Default” (Record game or PC audio).
4-2. Microphone Audio: Specify the microphone you wish to use.
Once set, start recording by clicking the “Start Recording” button at the bottom right of OBS.
Conduct a test recording of about 30 seconds if needed to verify sound balance. The recorded file will be saved in the location specified in “Settings”→”Output.”
If you’re interested in recording high-quality videos in OBS or want to know exactly where your files are saved, be sure to check out these articles.
Where Are OBS Recording Files Saved? How to Check, Change, and Set Your Save Location Explained
Tips for High-Quality OBS Recordings: Key Points and Detailed Settings Guide
Troubleshooting When Vtube Studio Does Not Display or Work in OBS
If Vtube Studio doesn’t appear or work in OBS, it’s necessary to review the settings. Causes can vary from camera and background settings to source selection errors or security settings.
Here, we explain specific methods and solutions to verify and troubleshoot.
- Verify Vtube Studio settings
- Check OBS settings
- Review security settings (for Mac)
Verify Vtube Studio Settings
First, check the basic settings of Vtube Studio. If the camera, background, or virtual camera activation is not correctly configured, OBS won’t display visuals.
- Is the camera recognized
- If the camera isn’t recognized, other apps like Zoom or Teams might be occupying the camera. End those apps.
- Is the background setting correct
- Open “Background Settings” in Vtube Studio’s settings menu and confirm “Transparency (OBS)” is ON. Enable it if it’s OFF.
- Is the virtual camera or Spout output enabled
- Go to “Settings”→ “Virtual Webcam” in Vtube Studio and turn “Start” to ON.
- If using Spout output, turn ON “Spout Output” in “Settings”→ “Spout Output.”
Check OBS Settings
Display issues may arise due to OBS configuration errors. Verify the following items in order.
- Check OBS Version
- Click “Help” → “Check for Updates” in OBS. If not up-to-date, proceed to update.
- Adjust Output Settings
- Open “Settings”→ “Output” and check the following:
Lower the bitrate if it’s too high (e.g., 3,000~6,000kbps).
Change encoder settings to “x264” or “NVENC” to reduce load.
- Open “Settings”→ “Output” and check the following:
- Verify Plugins
- If using plugins like Spout 2, confirm they’re correctly installed in the OBS directory. If necessary, reinstall them.
After making adjustments, restart OBS and verify the operation.
Review Security Settings (for Mac)
If Vtube Studio doesn’t appear on OBS on a Mac, it might be due to system security settings. Follow these steps to troubleshoot.
1. Select “System Preferences” → “Security & Privacy”
2. Choose “Screen Recording” within “Privacy” and check OBS
Before checking, unlock the lock icon at the bottom left of the window by clicking it.
3. When checking, a popup saying “Restart to Open Again” may appear. Click it to restart OBS
Note that the Mac version of OBS lacks a game capture feature; therefore, use window capture to bring the Vtube Studio screen into view.
Also, if screen recording permissions are not configured correctly, Vtube Studio might not appear in the window capture, so be wary.
In this guide, we’ve covered how to connect Vtube Studio and OBS. By setting them up correctly, you’ll ensure smoother avatar movements and enhanced streaming and recording quality.
Once you’ve finished configuration, you’ll be able to seamlessly display your avatar and capture your game screen. Take a moment to organize the key points.
| Background Settings | Avatar Capture | Game Screen Arrangement | Recording & Streaming Settings |
|---|---|---|---|
| Set the background to transparent in Vtube Studio. Use chroma key in OBS to make it invisible. | Select a suitable method, like a video capture device, game capture, or Spout 2, for intended purposes. | Adjust OBS source order to display “game screen below, avatar above” for proper visibility. | Create a scene, verify audio and screen placement. Initiate recording with “Start Recording” and set destination in advance. |