Share
Fix OBS Lag and Stutter: Causes and Solutions Explained Clearly
Index
- What could be the causes when OBS becomes heavy or choppy?
- Identifying causes of heavy OBS with “Log Files”
- Solution for Heavy OBS ① Optimize OBS Streaming and Recording Settings
- Solution for Heavy OBS ② Lower Game Graphic Settings
- Solution for Heavy OBS ③ Improve PC Environment
- Solution for Heavy OBS ④ Upgrade PC Specs
The main reason OBS becomes heavy is that the processing needed for streaming cannot keep up with your computer’s performance.
By closing unnecessary tasks and reviewing the bitrate, you can achieve stress-free streaming.
This article will explain appropriate solutions step by step to resolve issues such as “game streaming is choppy” or “delays in streaming.”
If you are struggling with OBS becoming heavy quickly, let’s review the settings while using this as a reference.

What could be the causes when OBS becomes heavy or choppy?
We have summarized three main potential causes when OBS becomes heavy or streaming gets choppy.
| Cause | Details |
|---|---|
| OBS settings are overloading the PC | If the settings like resolution, frame rate, or bitrate are too high, it might overburden the PC. |
| Game settings increase the load | If having choppiness when streaming high graphics games, the game settings are likely the cause. |
| Unstable network environment | Slow connection speed or instability can also be a cause. |
For those who do not know which cause applies to them, we will explain how to explore potential causes in the next section.
Identifying causes of heavy OBS with “Log Files”
OBS is equipped with a “Log File” feature that allows pinpointing issues with game settings, network environment, or insufficient PC specifications.
The following explains how to use log files.
Uploading Log Files
First, run the stream or recording for about 30 seconds. Even a short duration captures enough information, so you do not have to force a longer test.
After that, upload the log file by following the steps below.
1. Select “Help” from the OBS menu
2. Click “Log Files” → “Upload Current Log File”
3. Copy the displayed URL
Check Errors with Log Analysis Tool
The uploaded log file’s error content can be checked with a dedicated analysis tool. Although the tool is in English, using the translation function poses no problems.
The analysis results are divided into the following three categories.
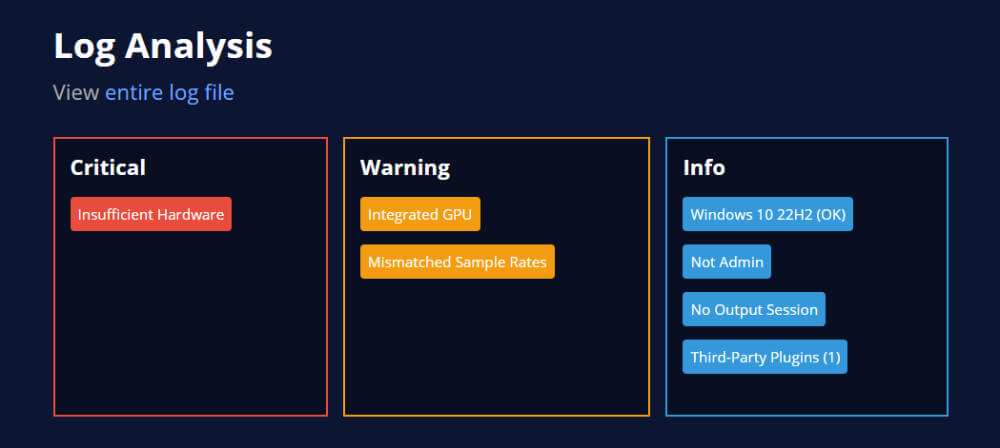
| Analysis Result | Analysis Details | Example of Trouble |
|---|---|---|
| Critical | Problems directly impacting streaming or recording are displayed as “Critical” in a red box. | GPU hardware acceleration is not functioning properly. |
| Warning | Areas needing review are displayed as “Warning” in an orange box. | OBS sampling frequency doesn’t match the audio interface settings. |
| Info | Supplementary information on OBS operating environment and settings is displayed in a blue box. | Bitrate is low. |
The URL of the analysis results can be shared with others. If you find it difficult to solve on your own, sending the URL to someone trustworthy with knowledge is a good option.
Solution for Heavy OBS ① Optimize OBS Streaming and Recording Settings
Once the cause of heavy OBS is identified with log files, review the settings in the following order to optimize streaming and recording settings.
- Update to the latest version
- Use game capture
- Use hardware encoder
- Lower resolution and frame rate
- Start OBS in administrator mode
- Delete unnecessary sources
- Disable preview feature
- Optimize bitrate
- Change presets
- Enable network optimization
Update to the Latest Version
If OBS performance feels sluggish, first consider updating to the latest version.
The latest version addresses bug fixes and optimizations, likely leading to lighter streaming and recording.
Update procedure is as follows.
1. Check the OBS version
- Click “Help” from the menu bar
- Select “About OBS Studio”
- Confirm the current version
2. Download the latest version from the official site
- Access the official OBS site
- Download the installer that matches your OS
- Select “Keep settings” to prevent resetting during installation
Check if operation improves after updating. Recommended for those experiencing slowness in an outdated environment.
Use Game Capture
If capture boards become “choppy” or experience stuttering during game streaming, switching from “Window Capture” to “Game Capture” is recommended.
Setting procedure is as follows.
1. Add Source
- Click “+” in the OBS source list
- Select “Game Capture”
2. Set Capture Mode
- Select “Capture Specific Window”
- Specify the currently playing game
Use Hardware Encoder
To make streaming or recording lighter, using a hardware encoder is advisable.
Encoding with the GPU performs well on PCs with a GPU installed, drastically reducing CPU load while streaming smooth video.
Setting procedure is as follows.
1. Open “Settings” in OBS
2. Select “Output”
3. Change output mode to “Advanced”
4. Set Streaming Tab’s “Video Encoder” to “NVIDIA NVENC H.264”
<Other Recommended Settings>
- Keyframe Interval: 2 seconds
- Bitrate: 5,000kbps (Adjust to the recommended value of the streaming destination)
- Preset: Performance Priority
<For Recording>
- Select the encoder in the “Recording” Tab
- Set the recording format to “mp4” or “mkv”
Hardware encoders are supported by NVIDIA’s “NVENC,” AMD’s “VCE,” or Intel’s “Quick Sync.”
Lower Resolution and Frame Rate
If streaming or recording places too much load on the PC, lowering the resolution and frame rate alone can improve the situation.
High resolution or frame rate enhances smoothness and image quality, but exceeding the PC’s processing capacity can cause choppiness and lag.
Setting procedure is as follows.
1. Open “Settings” → “Video”
2. Change “Output (Scaled) Resolution”
- Recommended Value: 1,280×720
- Lowering the resolution reduces PC load, but note that the image quality will decrease
3. Change the Frame Rate
- Set “FPS Common Value” to 30fps (Default might be 60fps)
- 30fps provides sufficient smoothness while lightening the PC load
Balance resolution and frame rate, using the following as a guide.
| Resolution | Frame Rate | Recommended Environment |
|---|---|---|
| 1,920×1,080 | 60fps | For high-performance PCs |
| 1,280×720 | 30fps | Optimal for general PCs |
| 640×360 | 30fps | For cases nearing limit load |
Wanting to stream in high quality is understandable, but reducing choppiness requires some compromise on image quality.
Launch OBS in Administrator Mode
In the Windows environment, the game is prioritized over OBS when the GPU utilization is high.
Therefore, elevate priority by launching OBS in “Administrator Mode” to stabilize operations.
However, note that game movement might become heavy, so consider this as a temporary solution.
Setting procedure is as follows.
<For Regular OBS Version>
1. Close OBS
2. Right-click OBS shortcut, select “Properties”
3. Open “Compatibility” tab, check “Run this program as administrator”
4. Click “OK,” then restart OBS
<For Steam OBS Version>
1. Open Steam, right-click OBS Studio from “Library”
2. Select “Manage” → “Browse Local Files”
3. In the opened folder, right-click “obs64.exe” in “bin” → “64bit”
4. On “Properties” → “Compatibility” tab, check “Run this program as administrator”
5. Press “OK” and restart OBS
Launching OBS in administrator mode is effective when GPU utilization exceeds 95%.
Raising OBS priority might make game operations choppy, so be careful.
Delete Unnecessary Sources
If OBS performance is sluggish, unrecognized source quantity might be an overlooked issue.
If unused sources like screen capture, images, and text remain, they might adversely affect OBS performance.
Consider the following when checking if there are any forgotten sources left unchecked.
| Source | Problem Example | Solution |
|---|---|---|
| Game Capture | Unstable operation with specific games | Temporarily delete and then reset |
| Image Source | Excess images causing load | Reduce to essential minimum |
| Browser Source | Always active, graining performance | Add when needed |
When deleting sources, check for duplicate sources or temporarily added browser sources.
Disable Preview Feature
By disabling OBS’s preview feature, you can reduce CPU and GPU load. Stopping real-time screen display alone has a significant impact, so try it out.
1. Right-click OBS preview area
2. Uncheck “Enable Preview”
Optimize Bitrate
Bitrate shows the amount of data transmitted per second. If it’s too high, it overburdens the PC and network, causing choppiness or interruptions.
Each streaming platform has different appropriate bitrate guidelines, necessitating adjustments.
1. Click “Settings” in OBS
2. Select “Output”
3. Adjust “Bitrate” value
| Platform | Maximum Recommended Value | Recommended Value for Load Reduction |
|---|---|---|
| YouTube Live | 4,500–9,000kbps | 2,000–3,000kbps |
| Twitch | 6,000kbps | 2,000–3,000kbps |
| Niconico Live | 6,000kbps | 1,500–2,500kbps |
| TwitCasting | 6,000kbps | 1,500–2,500kbps |
For guides on OBS bitrate during streaming and recording, check out this article:
Optimal OBS Bitrate Settings for Streaming and Recording Explained
Change Presets
Presets adjust video encoding performance; higher quality presets place more load on the PC.
When aiming for load reduction, use the following guide to lower from “MaxQuality” by two to three levels.
1. Open “File” → “Settings”
2. In the “Output” tab, check “Encoder” settings
3. Change “Preset” to “Performance” or “Quality”
Enable Network Optimization
If streaming experiences frequent drops, suspect network instability by enabling “Network Optimization.”
1. Open “File” → “Settings” in OBS
2. Select “Advanced Settings”
3. Check “Enable Network Optimization”
Solution for Heavy OBS ② Lower Game Graphic Settings
Playing games at the highest quality while streaming imposes a heavy burden on many PCs.
While games alone might run smoothly, launching a stream causes an abrupt workload increase.
Focus adjustments primarily on the following three points.
1. In-game settings screen, change quality to “High” or “Medium”
Change through presets in the settings screen. If presets are unavailable, set individual items such as shadow quality, anti-aliasing, and texture resolution—the taxing ones—to “Medium” or “Low.” Even lowering only shadow quality or view distance can noticeably improve processing speed.
2. Lower game resolution from “1,920×1,080” to “1,280×720”
3. Limit the frame rate to 60fps
Even if you use a gaming monitor, keeping over 120fps during streaming is unnecessary.
Limiting the frame rate to 60fps is acceptable even for gaming monitors above 120Hz.
Setting the frame rate to unlimited places undue stress on the PC, so be cautious.
Solution for Heavy OBS ③ Improve PC Environment
One cause of heavy OBS is the influence of the PC environment on OBS.
By improving the PC environment with the following methods, proceed with seamless streaming.
- Disable HAGS
- Set dual monitor refresh rate to 60Hz
This time, settings assume a Windows environment. Mac users, please refer to this article for OBS settings.
OBS for Mac: Download Guide and Streaming Setup Explained
Disable HAGS
Windows’ “Hardware-accelerated GPU Scheduling” (HAGS) optimizes GPU load.
However, this feature might cause problems with OBS. If experiencing choppiness, freezing, or bitrate dropping to “0kb/s,” try disabling HAGS.
1. Right-click the desktop blank area
2. Select “Display Settings”
3. Click “Graphics Settings” at the page bottom
4. Choose “Change default graphics settings”
5. Switch “Hardware-accelerated GPU Scheduling” to OFF
6. Restart PC
If disabling HAGS doesn’t improve the problem, re-enable and explore other causes. Some games and software benefit from HAGS, so consider reviewing settings only while using OBS.
Set Dual Monitor Refresh Rate to 60Hz
Using dual monitors, differences in refresh rates might cause OBS to become heavy.
If visuals are choppy, try changing settings.
1. Right-click the desktop blank area
2. Open “Display Settings”
3. Choose “Advanced display settings” at the page bottom
4. Select sub-monitor, click “Display Adapter Properties”
5. Open “Monitor,” change “Screen Refresh Rate” to 60Hz
6. Click “Apply” and save settings
Unifying refresh rates lightens streaming load, stabilizing OBS operation. Dual monitor users, be sure to try this.
Solution for Heavy OBS ④ Upgrade PC Specs
If PC performance deficit causes heavy OBS, the final solution is spec enhancement.
If previous solutions fail, consider the following options.
- Upgrade PC
- Acquire a second PC
Upgrade PC
If current PC specs do not meet OBS requirements, upgrading is necessary.
Since streaming demands high processing, aim to improve CPU, memory, and graphics card performance.
Here’s a summary of the recommended specs.
| Item | Recommended Specs |
|---|---|
| OS | Latest Windows OS |
| CPU | Intel Core i7 or above |
| Memory | 16GB or above |
| Graphics Card | GeForce RTX 40 Series |
| Storage | 500GB to 1TB (NVMe SSD) |
Acquire a Second PC
The fundamental cause of heavy OBS is running both game and stream on one PC. A foundational solution is introducing a second PC for task distribution.
Consider dividing workload: one PC for gaming, the other for streaming.
For the streaming PC, high performance like gaming PCs is unnecessary. Select according to these spec guidelines.
| Item | Recommended Specs |
|---|---|
| CPU | Intel Core i5 or above |
| Memory | 8GB or above |
| Graphics Card | GeForce GTX 600 Series or above |
| Storage | SSD 250GB〜 |
We’ve explained the causes and solutions for heavy, laggy, or choppy OBS. Optimizing settings and PC environment enables smoother streaming.
Applying the following methods can enhance stream smoothness and reduce lag.
| Method | Example Content |
|---|---|
| Optimize Broadcasting Settings | Lower resolution & bitrate, update to the latest version |
| Adjust Game Graphic Settings | Lower quality and frame rate to reduce PC load |
| Improve PC Environment | Disable HAGS, unify refresh rate |
| Upgrade PC Specs | Upgrade to high-performance PC or introduce a second PC |
Finding optimal settings starts with identifying the cause via “Log File” and adjusting based on results. However, if the methods in this article don’t provide improvements, please check out this article too.
Reduce OBS Streaming Delay: Easy Setup Tips and Troubleshooting