Share
OBS Tutorial: How to Animate Images and Character Standees for Streaming
Index
When streaming with OBS, some of you might want to move images around. This article provides a detailed explanation on how to move images.
Additionally, we also cover how to animate the standing illustrations for those using character images during streaming.
Furthermore, this guide includes settings for image resolution and background transparency. If you’re looking to animate images or use clearer images, make sure to check it out.

How to Move Images in OBS
There are two methods to move images in OBS:
- Move images by scrolling them
- Move images in a slideshow format
Detailed explanations of each method are provided in the following sections.
Procedure to Scroll Images
Scrolling images means moving the displayed images from right to left or top to bottom. Here’s how to do it:
- Add images from sources
- Add filters
- Scroll images
We also explain settings for continuous movement, so refer to them as needed.
Adding Images from Sources
Launch OBS and click the plus button in “Sources”.
After pressing the plus button, select “Image” from the list displayed.
Click on “Image” and the following screen will be displayed. Click the “Browse” button to add the image you want to move.
Finally, click the OK button to complete the image addition.
If you want to move text instead of an image, select “Text” from the source plus button to add text.
Adding Filters
After completing the image addition, move on to adding a “Filter”.
Right-click the image added to OBS and select “Filter” from the displayed options.
After selecting a filter, press the plus button displayed at the bottom left of the screen and choose “Scroll”.
Scrolling Images
Selecting scroll brings up the following settings screen.
You can scroll the image by changing the “Horizontal Speed” and “Vertical Speed” bars or values.
Firstly, “Horizontal Speed” is a setting that moves the image from right to left. Setting a value above 0 will scroll from right to left, while a value below 0 will scroll from left to right.
Next, “Vertical Speed” is a setting that moves the image up and down. Setting a value above 0 will scroll from bottom to top, while a value below 0 will scroll from top to bottom.
By combining horizontal and vertical speeds, you can scroll the image diagonally.
For example, setting the horizontal speed to 50.00 and the vertical speed to -50.00 will scroll the image diagonally downward. Conversely, setting the horizontal speed to -50.00 and the vertical speed to 50.00 will scroll the image diagonally upward.
If you check the loop (repetition), you can continuously move the image. As shown in the image below, you can check the scrolling movement in the settings screen, so try changing the values to move the image in your desired direction.
Procedure to Move in Slideshow Format
This section explains how to move images in a slideshow format. Slideshows are useful when you want to switch images according to the stream. Those using multiple images for streaming should refer to this.
Add Image Slideshow to Source
First, click the plus button in “Source” and select “Image Slideshow”.
Clicking on image slideshow brings up a settings screen. Press the plus button for “Image Files” to select images.
You can select several images, so choose the ones you want to display in slideshow format.
Confirm Slideshow Settings
After selecting images for slideshow display, the slideshow will flow within the red frame of the following image.
If the images are switching automatically, the setup is complete.
Furthermore, you can change how the slideshow moves from “Transition” within the properties.
With four types of movement options available as shown above, select one that fits the streaming.
Additionally, by adjusting the “Slide Time Interval” or “Screen Transition Speed” in the red frame below, you can tune the display time for each image or the speed at which slides change.
Use it according to your streaming method when you want to show each slide for a longer period.
Steps to Animate Standing Illustrations
This section explains how to animate standing illustrations for those using them in their streams.
It’s useful when you want to animate the standing illustration along with the speaker during streaming.
Access Standing Illustration Display Generator
First, access the “Standing Illustration Display Generator”.
The method introduced this time involves creating CSS and pasting it into OBS to animate standing illustrations. “Standing Illustration Display Generator” generates CSS automatically, saving you the trouble of setting it yourself.
The generator allows for free customization of blinking, movement speed, border colors, etc., of standing illustrations.
Set your preferred appearance on the site and utilize the automatically generated CSS by pasting it into OBS. The site for the “Standing Illustration Display Generator” can be accessed below.
Standing Illustration Display Generator
Add Browser to Sources
First, open OBS, press the plus button in “Sources”, and add “Browser”.
Next, start “Discord”. Since Discord is a free downloadable app, if it’s not installed, install it from the link below.
After launching Discord, access the “Discord StreamKit Overlay”.
Obtain Voice Widget URL from Discord
Upon access, the following screen is displayed.
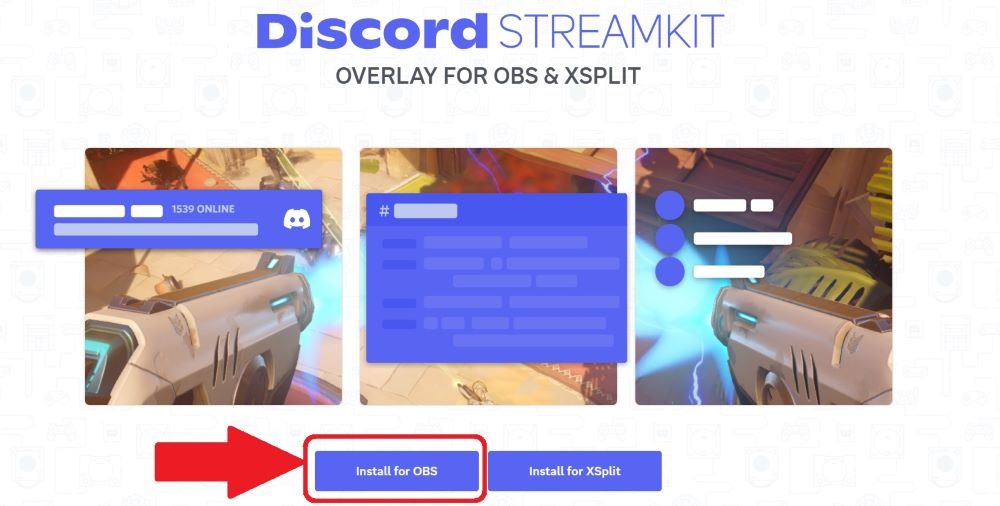
Click the arrow “Install for OBS” to transition to the following screen, select “VOICE WIDGET”, and copy the URL within the red frame.
Once copied, return to OBS, click the added “Browser” in sources, and paste the URL.
Create and Enter Custom CSS
Next, return to the standing illustration display generator and change the settings to your liking, such as movement speed and border blinking.
Once you’ve decided on your preferred settings, scroll down to automatically display the generated CSS.
Copy all generated CSS and paste it into the “Custom CSS” in the “Browser Properties” in OBS.
Finally, press OK, and the setup is complete.
How to Rotate and Flip Images in OBS
This section explains how to rotate and flip images in OBS. You can freely change the direction and angle of rotation as needed.
For flipping, changes can be made horizontally or vertically.
Procedure for Rotating Images
Right-click the image displayed in the preview screen at the top left of OBS and select “Transform”.
Select “Transform” to choose from the following options:
- Rotate 90 degrees clockwise
- Rotate 90 degrees counterclockwise
- Rotate 180 degrees
Click the item for the direction you want to rotate, and it will reflect immediately.
For angles other than 90 or 180 degrees, right-click, select “Transform”, and then “Edit Transform”.
Clicking on edit transform displays the following screen. You can change to angles other than specified by changing the value in “Rotation”.
Procedure for Flipping Images
To flip an image, as with rotation, right-click the image, and choose “Transform”.
Select “Transform” to display “Flip Horizontal” and “Flip Vertical”. Flip in the desired direction.
The horizontal direction allows flipping left to right, and vertical direction lets you flip top to bottom.
Tips for Setting Image Resolution in OBS
This section explains how to increase image resolution in OBS. Resolution is an important aspect for those using images in streaming.
Using clear images makes it easier for viewers to see, enhancing satisfaction. Those looking to level up their stream should definitely refer to this.
Importance of Resolution
Higher image resolution has the significant advantage of delivering clear images to viewers.
However, if the resolution is too high, it may impact the PC and streaming; hence caution is needed.
High resolution results in beautiful images but places a huge load on the PC. The PC’s processing speed may also slow down, leading to interrupted or paused streaming.
On the other hand, if the resolution is too low, the images become grainy, possibly leaving viewers dissatisfied. Ideally, the resolution should be set at a level that is neither too high nor too low.
The following sections elaborate on resolution settings and points to note. Understanding resolution settings can help deliver a satisfying stream for viewers.
Output Resolution
In OBS, output resolution directly affects the resolution of the video seen by viewers.
Note that increasing output resolution consumes more data, so use a high-spec PC. If using a PC with limited data capacity, lowering output resolution can help.
To modify settings, open OBS, select “File” at the top left, then “Settings”.
After selecting settings, click “Video”. You can change resolution settings from “Output (Scaled) Resolution”.
The recommended value for output (scaled) resolution is 1280×720.
Bitrate
In OBS, bitrate indicates how much video can be transmitted per second.
The higher the bitrate value, the higher the quality of the video streamed, but it might cause lag if the PC specifications are insufficient.
Configure settings by opening OBS, pressing “Settings” at the top left, and selecting “Output”.
Within output, you can adjust values from “Video Bitrate”.
Recommended values for major platforms are as follows:
- Twitch: 3,000–6,000kbps
- Niconico Live: Up to 6,000kbps
- TwitCasting: Up to 6,000kbps
- YouTube Live: 10,000kbps
Refer to these when configuring settings.
Additionally, for detailed explanation on bitrate for streaming and recording, please see the following article.
Optimal OBS Bitrate Settings for Streaming and Recording Explained
Frame Rate
In OBS, frame rate, also known as FPS value, indicates how many images can be displayed per second. A higher frame rate results in smoother video during streaming.
While the maximum setting is 120fps, a high-spec PC is essential for 120fps. As 30–60fps is sufficient for typical streaming, refer to it when adjusting the frame rate.
Set the frame rate by selecting “Video” from the settings at the top left of the screen.
By changing the FPS common value within the red frame, you can adjust frame rate settings.
Note that some platforms support only up to 30fps. Confirm the supported values before streaming thoroughly.
Three Methods for Background Transparency in OBS Streaming
The three methods for background transparency in OBS streaming are:
- Chroma key composition
- OBS plugin
- NVIDIA Broadcast
Each method is explained in the following sections.
Chroma Key Composition
Chroma key composition allows you to make parts of a specified video transparent where colors like green, blue, or magenta are applied. This is useful when you want to composite only the subject from a video shot with a green screen.
Start by opening OBS and pressing the plus button in the “Sources” section.
Then select “Video Capture Device”.
Selecting a video in the video capture device displays a preview screen in OBS.
Click “Filter” under the source displayed in the preview screen.
When you click the filter, the above screen is displayed, so select “Chroma Key” from the plus button at the bottom left of “Effect Filters”.
When you select the color you want to make transparent (green for a green screen) in “Color Key Type”, the background transparency is complete.
NVIDIA Broadcast
If you want to achieve background transparency without using a green screen, using NVIDIA Broadcast is recommended. Download it from the link below.
Select what suits your PC from the “Video Effects” download section and download it.
After downloading, return to OBS and edit the source added in “Video Capture”. First, select “Filter” at the bottom of the OBS preview screen.
Press the plus button in “Effect Filters” displayed at the bottom left of the screen and select “NVIDIA Background Removal”.
Finally, return to the initial screen of OBS, select the image or video you want to make transparent from the “Sources” section, and the setup is complete.
OBS Plugin
Finally, I will introduce how to install plugins to OBS. The recommended plugin for background transparency is “obs-backgroundremoval”.
“obs-backgroundremoval” can be downloaded from the link below.
After downloading, select the image or video you want to make transparent from the plus button in “Sources” of OBS.
Next, select “Filter” displayed under the added source to bring up the following screen, and choose “Background Removal” from the plus button in “Audio Filters”.
Set the “Background Color” to green on the setting screen, and finally, use the Chroma Key function to make the green transparent, completing the process.
For a detailed explanation on plugin installation, please refer to the following article.
How to Install Plugins in OBS and Recommended Ones
Additionally, the following article provides detailed explanations on Chroma Key composition and achieving background transparency without a green screen.
Chroma Key Compositing in OBS: Transparent Background Without Green Screen!
This time, we explained how to animate images in OBS. By leveraging scrolling and slideshow, you can add movement to the streaming screen, creating more engaging effects.