Share
Troubleshooting OBS Installation Issues: Causes and Solutions

Index
- Causes and Solutions for OBS Installation Issues
- OBS Installation Issues Can Be Identified from the Error Messages
- Common Pitfalls to Avoid When OBS Installation Fails
- What to Do if OBS Still Won’t Install?
- Handling Issues After OBS Installation
- Summary
You might feel uneasy if the installation of OBS Studio (hereinafter referred to as OBS) stalls midway or if error messages appear preventing its installation.
You might worry there’s an issue with your computer, but difficulties installing OBS are not uncommon.
This article explains common causes and solutions for when OBS fails to install, simplified for beginners.

Causes and Solutions for OBS Installation Issues
The inability to install OBS can be attributed to various reasons, significantly influenced by the computer’s environment and settings.
We will detail four major causes of trouble to ensure a smooth OBS installation.
Some Applications are Running in the Background
Applications running in the background on your computer might unexpectedly interfere with the installation of OBS.
Resident applications are those that start automatically when the computer is turned on and continue to operate in the background.
These can conflict with the OBS installer, causing errors.
Particularly, be cautious with the following types of applications.
- Screen recording software (such as Bandicam, NVIDIA ShadowPlay)
- Game capture tools (like Radeon Software)
- Streaming support apps (e.g., Stream Deck, official Twitch app)
These applications may perform similar functions to OBS, leading to installation blockages if functionalities overlap.
The solution is to close all relevant applications before installing OBS. If unsure how to close them, open “Task Manager,” right-click on the application in question, and click “End Task.”
Security Software Wrongly Detecting the Installer
If the OBS installation stops midway, it may be because the antivirus software mistakenly identifies the OBS installer as a dangerous file and blocks it.
OBS is safe if downloaded from the official site, but as the installer is a .exe file, it occasionally gets flagged.
Here are the steps to resolve this:
1. Open the notification center and check for any messages like “Blocked a file associated with OBS”
2. Temporarily turn off your security software’s “real-time protection (monitoring capabilities)”
3. Re-run the OBS installer
4. Once installation is complete, turn the protection features back on.
In most cases, this method will solve the issue. However, if you’re using a workplace computer or shared device, avoid changing settings yourself. If unsure, consult with someone knowledgeable or a system administrator.
Lack of Microsoft Visual C++
If OBS doesn’t launch post-installation, it might be due to the absence of a software known as “Microsoft Visual C++.”
Receiving error messages like “Microsoft Visual C++ Runtime not found” or “Runtime Error” indicates a need to install Microsoft Visual C++.
▼Steps to Install Microsoft Visual C++
1. Visit the official Microsoft website
2. Scroll to “Latest supported Visual C++ Redistributable version”
3. If your computer is 64-bit, select “x64 version” and download the file
4. Double-click the downloaded file to start the installation
5. Restart your computer after completing the installation, then launch OBS
This auxiliary software is utilized by various Windows applications and essential not only for OBS but also for games and editing software, thus installing it is beneficial.
If you’re struggling with “OBS isn’t working!” first check if Microsoft Visual C++ is installed.
Using a 32-bit Environment or an Old OS
If you encounter “This app cannot run on your PC” while attempting to install OBS, it might indicate that your system is outdated.
Particular caution is needed if using a “32-bit version of Windows” or an “Old OS no longer supported.”
OBS is exclusive to 64-bit versions from version 28.0 onwards. It won’t even start installation on a 32-bit environment.
To check if your PC is 64-bit, follow these steps.
▼How to Check the Bit Version of Your PC (Windows)
1. Open “Settings” from the Start Menu
2. Select “System” → “About”
3. Check “System Type”
・Displays “32-bit operating system” if it’s a 32-bit version
・Displays “64-bit operating system” if it’s a 64-bit version
If you desperately need to use OBS on a 32-bit system, you can download an older version (e.g., 27.2.4) from the official site by searching for and installing the following file.
OBS-Studio-27.2.4-Full-Installer-x86.exe
However, note that some functionalities might be limited in older versions.
OBS Installation Issues Can Be Identified from the Error Messages
If an error occurs during the installation of OBS, try interpreting the displayed messages or warnings. In many cases, error messages state the cause of the issue.
For instance, if you see a message saying “OBS files are being used by the following applications,” it likely means other applications are obstructing OBS.
▼Examples of Interfering Applications
- Discord
- Google Chrome
- Microsoft Teams
- Adobe Creative Cloud
- DeepL (may appear as CefSharp.BrowserSubprocess)
- Microsoft Edge related (msedge.exe, msedgewebview2.exe, etc.)
These apps, which handle recording, audio processing, or similar tasks as OBS, can easily cause conflicts when run simultaneously.
▼Steps to Address the Issue
1. Note the app listed in the error message
2. Right-click the icon in the notification area (task tray) at the bottom right of the screen to “Quit”
3. If still running, open Task Manager to forcibly end the app
4. Re-execute the OBS installer
5. If the app cannot be closed, try restarting the PC
Error messages can be easily overlooked but are essential hints. It’s important to calmly read the content and address the issues sequentially.
Common Pitfalls to Avoid When OBS Installation Fails
When OBS installation fails, one might hastily assume there’s an issue with the computer, but often the cause is operator error or overlooked steps.
Here are frequent unconscious mistakes and the problems they can trigger.
| Mistake | Resulting Problems |
|---|---|
| Downloading from unofficial sites | Virus infections, nonfunctional installer |
| Using outdated versions | Errors due to OS or driver incompatibility |
| Attempting to install 64-bit OBS on a 32-bit PC | Displays “This PC cannot run this app” |
| Installing without administrative rights | Security may obstruct, causing stoppages |
| Proceeding without disabling security software | Installer might be blocked midway |
| Keeping configuration files during reinstallation | Previous bugs may persist |
When one thinks “OBS is famous, so it’s safe to download from anywhere,” they risk encountering viruses or fake installers if downloaded from unofficial sites.
If installation issues arise, instead of immediately blaming the computer, it is advisable to verify if there’s any oversight in the installation steps.
What to Do if OBS Still Won’t Install?
If OBS cannot be installed after trying all the solutions, it might be due to deeper issues with Windows or application settings.
Nevertheless, even if common solutions don’t work, other users might have encountered the same trouble and shared their resolutions online.
As a final strategy, consider using Microsoft’s official troubleshooting tools to address the problem sequentially without giving up.
For Mac Users, Focus on “Security Settings” and “Rosetta”
When installing OBS on a Mac, you might encounter the message “Can’t open this app because it was not downloaded from the App Store.” This is due to Apple’s security features, and you can manually allow it to continue installation.
Here’s the specific procedure.
▼How to Allow OBS on Mac
1. Open “System Preferences”
2. Go to “Security & Privacy” → “Allow apps downloaded from”
3. Select “Open Anyway” for the displayed OBS
To run OBS correctly on a Mac with Apple Silicon, a software known as “Rosetta” is needed.
When launching OBS for the first time, if asked “Would you like to install Rosetta?”, select “Install.” Without Rosetta, OBS will not launch.
Search for Similar Cases on Forums or GitHub
If issues with OBS installation persist, visit the official OBS forum or GitHub where OBS users worldwide congregate.
Given the vast OBS user base, it is likely that even rare issues have been encountered and resolved by others.
Searching for similar symptoms might lead to posts with resolved solutions.
▼Common Research Sources
While mainly in English, tools like Google Translate make it easy to comprehend the content. For best results, search using “copy the error message directly.”
If you want to find information in Japanese, technical blogs or Q&A sites might also have relevant summaries, so check those as well.
Ultimate Course of Action: “Microsoft’s Official Troubleshooting Tool”
The “Program Install and Uninstall Troubleshooter” offered by Microsoft for free is useful when installation or uninstallation problems occur.
It automatically diagnoses and fixes issues causing installer crashes or failures to open.
Here’s how to use it.
1. Go to the official Microsoft page
2. Click “Download Troubleshooter”
3. Launch the downloaded file by double-clicking
4. Follow the prompts to automatically diagnose and repair issues
While not specific to OBS, it might fix issues from previous software installations or removals. If you’re on the verge of giving up without finding a solution, try this as a last resort.
Handling Issues After OBS Installation
Even after successful installation, OBS might encounter faults like failing to start, choppy streams, or blank video output.
While it’s a highly flexible software, minor misconfigurations or compatibility issues can destabilize its performance.
Here, we’ll cover common issues and their solutions.
Completely Reset by Deleting “User Settings”
If problems persist after reinstalling OBS, the configuration files might be causing issues, so completely reset OBS.
Resetting will clear all saved profiles, scenes, sources, returning OBS to a clean state.
▼How to Reset OBS Settings on Windows
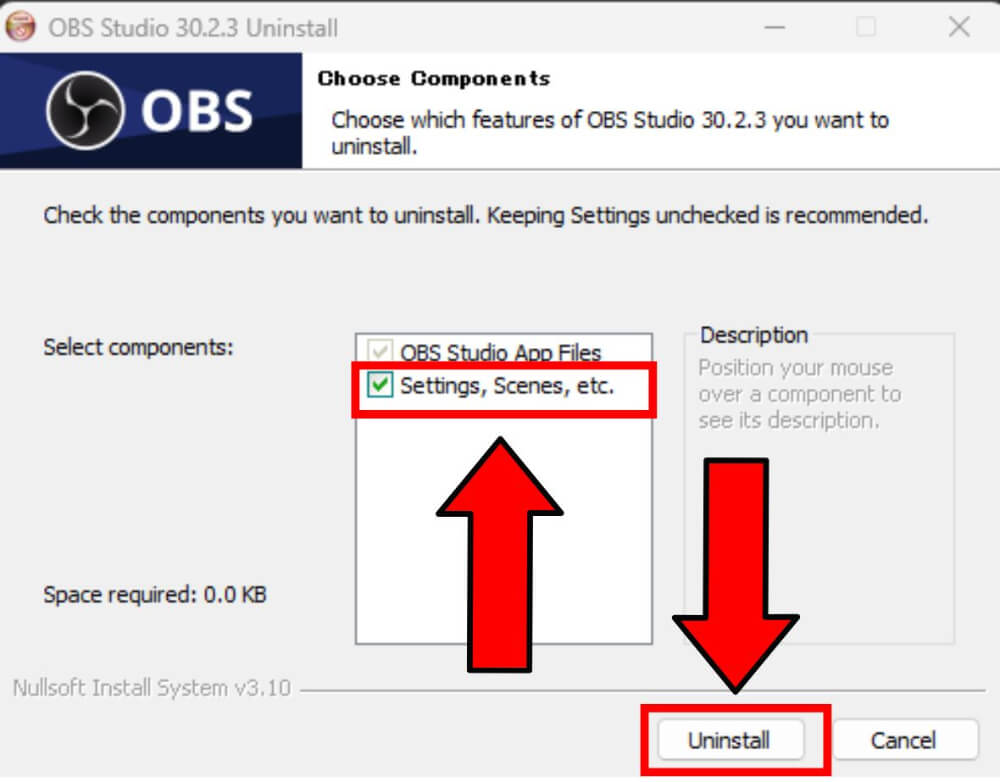
1. Click the “Windows icon” in the Start Menu
2. Select the gear icon for “Settings”
3. Open “Apps” → “Installed Apps” from the left menu
4. Find “OBS Studio” and click “… (ellipsis)” → “Uninstall”
5. On the uninstallation screen, check “Settings, Scenes, etc.”
6. Press “Uninstall” to remove it
For users of versions 22.0.2 to 23.0.2, initialization via the OBS uninstaller might not work properly, so follow these steps to delete the folder.
1. Reopen OBS and select “File” → “Show Settings Folder” from the top screen
2. Delete the “obs-studio” folder within the opened folder
After successfully installing OBS, refer to the following article for backing up your data to protect it.
Complete Guide to Backing Up OBS: How to Restore and Recommended Plugins
Manually Delete Unnecessary Plugins for a Clean Start
While plugins can enhance OBS functionality, outdated or incompatible plugins might cause issues.
Take a moment to check the plugins folder using the steps below.
▼How to Delete Plugins (Windows)
1. Open File Explorer
2. Enter the following path into the address bar and press Enter
⇒C:\Program Files\obs-studio\obs-plugins
3. Remove the folder of any unused plugin names displayed
If unsure about “unnecessary plugins,” consider the following criteria:
- Clearly unused items
- Things you don’t remember installing
- Items with descriptions in English, making them unreadable or suspicious
If uncertain, delete everything once and reinstall only the necessary items with the latest versions.
If you plan to organize your plugins, check out the article below.
[A Must-Read for Streamers] Recommended OBS Plugins: Organized by Use Case
Re-evaluate Differences Between Official, Steam, and Zip Versions if Issues Persist
OBS is available in Official, Steam, and Zip versions. If you’re encountering unexplained issues, reviewing which version of OBS you’re using can be essential.
Below, we outline which users each version is intended for.
Choose “Official Version” for Auto-Updates and Stable Operation
The “Official Version” downloadable from the OBS official site automatically places all necessary files and offers the most stable operation.
Since updates occur automatically, there’s no hassle with manual updates.
Problems like a blank screen or no audio can often be resolved by switching to the official version.
Disengage from “Steam Version” if Steam-Related Launch Issues Persist
The Steam version of OBS is convenient for game streaming but is prone to impacts from Steam updates or login statuses.
If you repeatedly encounter problems like “OBS suddenly won’t open” or “Settings are reset,” the Steam connection might be at fault.
Uninstalling the Steam version and switching to the official OBS might resolve these issues.
Zip Version Useful for Isolating Issues
The zip version of OBS is a special format that can be launched without installation.
It doesn’t affect configuration files or registry (Windows internal settings), making it perfect as a “test tool” to investigate issues.
For example, if the “Official Version isn’t working well and the reason is unknown,” testing a zip version can help determine if “settings are flawed” or “the PC environment is the cause.”
Reinstall OBS
If issues are insurmountable, reinstalling is the most certain approach after uninstalling. Combining this with settings initialization and plugin deletion provides a fresh start with OBS.
Installation steps slightly differ between Windows and Mac, but overall, both processes are straightforward.
- For Windows: Download the installer from the official site and complete it by clicking [Next] → [Install]
- For Mac: Download the version that matches your OS (Intel or Apple Silicon) and simply drag to Applications
For detailed instructions, follow the steps outlined in the following link. Beginners or anyone feeling unsure are encouraged to refer to it.
Summary
Common reasons why OBS won’t install are as follows:
- Interference from resident apps or security settings
- Lack of Microsoft Visual C++
- 32-bit environments or outdated OS
- Operator error or use of unofficial installer
Reviewing settings according to the cause and reinstalling following the correct procedure can resolve many issues.
If still unresolved, searching forums for information or using Microsoft’s official troubleshooting tools are viable options.
Persistently try each method and successfully setup OBS.