Share
OBS Not Capturing Nintendo Switch Audio? Common Causes and Fixes

Index
- How to Identify the Cause of No Sound from Switch in OBS Using a Level Meter
- Causes and Solutions for No Sound from Switch in OBS [Equipment & Connection]
- Causes and Solutions for No Sound from Switch in OBS [Software Settings]
- Causes and Solutions for No Sound from Switch in OBS [PC Settings]
- What to Do If There’s Still No Sound from Switch in OBS
- No Sound from Switch2 in OBS? Points to Consider for Next-Generation Consoles
- Conclusion
Are you experiencing issues during your game streaming such as “no sound from the Switch in OBS” or “concerned about audio delay or distortion”?
The reason for no game sound from the Switch (Nintendo Switch) in OBS (OBS Studio) might lie in the equipment connections, software settings, or PC settings, and it can be resolved by systematically troubleshooting each one.
This article will explain how to identify the cause using a level meter, the solutions for equipment, software settings, and PC settings, as well as the steps to take if the issue persists.
By the end of this article, you should be able to pinpoint the reason why sound isn’t coming from the Switch in OBS, enabling you to establish a stable game streaming environment.

How to Identify the Cause of No Sound from Switch in OBS Using a Level Meter
If there is no sound from the Switch in OBS, checking the state of the level meter can help identify the cause. Since the response will vary depending on the behavior of the system, it’s essential to accurately assess the current situation.
- The level meter is working
- The level meter is unresponsive
- No level meter present
Let’s look at the causes and specific troubleshooting steps for each situation.
Additionally, there is also an article explaining troubleshooting methods based on symptoms when there is no sound in OBS, so please check that as well.
» Fixing OBS Sound Issues: Easy Solutions for Common Problems
The Level Meter is Working
If the level meter is responding to the game sound from the Switch, then there is likely no issue with the capture board itself.
The causes may likely lie in the settings on OBS or Windows, so let’s follow these steps to address them.
- Restart OBS: Close OBS and restart it after a few seconds to see if the issue resolves.
- Check “Advanced Audio Properties”: Set “Audio Monitoring” to “Monitor Only (Mute Output)” and ensure all “Tracks” are checked.
The Level Meter is Unresponsive
If the level meter is completely unresponsive, it means the game sound is not being captured by OBS.
In this case, the capture board may not be recognizing audio, or there might be issues with the connection or settings. Specifically, the following causes should be considered.
- Earphones are plugged into the Switch
- Poor connection in HDMI or USB cables
- The capture board is not recognized by the PC
To resolve this, it is necessary to focus on checking the settings and connections of the capture board. Here are the specific verification methods and troubleshooting steps:
- Check the settings of the “Video Capture Device”: Double-click the “Video Capture Device” source and set “Audio Output Mode” to “Capture Audio Only.”
- Check connections and operation of the capture board: Verify that the cables are properly connected and that the capture board is functioning normally.
- Review OBS “Settings” → “Audio”: Ensure the capture board is not selected as “Mic Audio.” Only the microphone being used should be set here.
No Level Meter Present
If the level meter is not displayed at all, there is a high possibility that audio is not being input into OBS.
The reason nothing is displayed in the audio mixer is likely because there is no source set up to capture the audio from the Switch. In many cases, only the video capture is added while the audio input capture remains unregistered.
To display items in the audio mixer, you need to add an audio input capture and specify the device correctly. The setup is not complicated, so let’s follow these steps:
- Add Audio Input Capture: Add from the source and select the audio from the capture board.
- Check the audio settings of the Video Capture: Verify that the audio output settings within the device are enabled.
- Restart OBS: After setting up, restart OBS and check if it is displayed in the audio mixer.
Causes and Solutions for No Sound from Switch in OBS [Equipment & Connection]
The cause of no sound from the Switch in OBS could be due to equipment or connection troubles, as outlined below.
- Earphones are plugged into the Switch
- Poor connection in HDMI or USB cables
- The capture board is not recognized by the PC
Issues on the equipment side can easily be overlooked, so let’s confirm the causes and solutions for each item.
Earphones are Plugged into the Switch
If earphones are plugged into the Switch, then you won’t hear audio from the Switch in OBS.
When earphones are connected, the audio output on the Switch prioritizes the earphones, which may stop the audio output through HDMI. Therefore, even if the video is displayed correctly, the audio signal may not be sent to the capture board and will not be reflected in OBS’s audio mixer.
When audio is not heard during streaming or recording, it’s essential to first check the audio output path. Simply removing the earphones will revert the audio output back to HDMI, making this the first point to reconsider.
Poor Connection in HDMI or USB Cables
Poor connection in HDMI or USB cables can also be a reason for no sound from the Switch in OBS.
The capture board captures video and audio through cables; if the connection is unstable, it can lead to instances where only audio is not captured. Especially if there’s a mistake in connecting the HDMI IN and OUT, the video may display, but audio will not be transmitted correctly. Moreover, looseness in connectors or poor contact can intermittently break the signal.
If there’s no sound, a good practice is to disconnect all the cables and reconnect them to the correct ports. Simply revisiting the connections often leads to improvement, so make sure to check this fundamental operation.
Additionally, there is an article explaining how to connect the Switch and PS5 to the capture board, so please check that as well.
» Connect Capture Cards to Switch & PS5: Easy Setup Guide & Tips
The Capture Board is Not Recognized by the PC
If the capture board is not recognized by the PC, then there will be no sound from the Switch in OBS.
When the device isn’t recognized at the PC level, no video or audio signals are captured, so adjusting the settings in OBS won’t help improve the situation. Particularly, issues with USB connections or missing drivers can lead to scenarios where the device does not operate properly.
If there is no sound, it is important to first check the recognition status on the PC side. Open the device manager in Windows and confirm that the capture board appears in the list. If it does not appear, changing USB ports or reconnecting, as well as reinstalling drivers, may help improve the situation.
Causes and Solutions for No Sound from Switch in OBS [Software Settings]
If there is no sound from the Switch in OBS, the following software configuration issues could also be at fault.
- “Custom Audio Device” is not set
- OBS is muted
- “Audio Output Mode” is not configured
- “Audio Input Capture” is not set
- Dedicated software for the capture board is interfering
To identify the cause of no sound, let’s review each setting step by step.
“Custom Audio Device” is Not Set
When using a capture board, one reason why game audio may not enter OBS is that the “Custom Audio Device” setting is not configured.
Here are the setup steps:
- Set the “Video Capture Device”: Double-click the “Video Capture Device” source from OBS’s “Sources”.
- Check “Use Custom Audio Device”: This will display the selection options for “Audio Device.”
- Correctly set the “Audio Device”: Select the device that corresponds to your capture board from the list.
The above settings are not required for all capture boards.
For example, models like GC550 PLUS or Elgato HD60 S+ may allow audio input without the custom audio device setting.
Additionally, the display names for “Audio Devices” may vary by capture board, so be sure to select the correct option.
OBS is Muted
If OBS is muted, you will not hear the game sound from the Switch.
When the speaker icon in the audio mixer is red, the input audio will not be output. If you cannot hear the game sound or it is not reflected in the stream, you need to first confirm whether it is in a muted state.
Here are the steps to unmute:
- Check the speaker icon: Make sure the speaker icon in the audio mixer is not displayed in red like below.
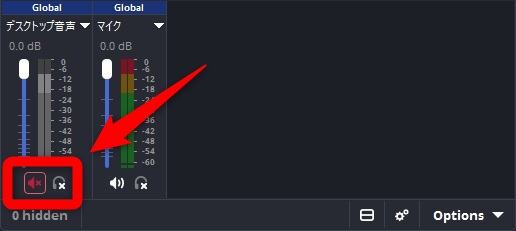
- Unmute: Click the red speaker icon to return to the normal state.
- Adjust the volume slider: Raise the slider to set an appropriate volume.
Sometimes it may be unintentionally muted, so it is advisable to check this first if there is no sound.
“Audio Output Mode” is Not Configured
One cause for no sound from the Switch in OBS might be that “Audio Output Mode” is not set.
The audio output mode is an item found within the properties of the video capture device, but it may not be visible by default, leading to the audio not being output without realizing it. Depending on the environment, if the audio output mode is not correctly selected, OBS may not handle audio.
Here are the setup steps for the audio output mode:
- Open Properties: Double-click the “Video Capture Device” source to display the settings screen.
- Scroll down to the end of the screen: Move down until you reach the position where “Audio Output Mode” is displayed.

- Set Audio Output Mode: Select “Output Audio Only” or the appropriate item.
If you feel that the audio output mode is missing, it could be due to insufficient scrolling, so make sure to check all the way to the bottom of the screen.
“Audio Input Capture” is Not Set
One cause for no sound from the Switch in OBS is that “Audio Input Capture” is not set.
Depending on the type of capture board, video and audio may be handled separately, meaning that audio won’t be captured without adding an audio input capture. If an audio input capture is not added, nothing will be displayed in the audio mixer.
Here are the setup steps for audio input capture:
- Add Audio Input Capture: Add a new item from “Sources” to create it.

- Select the device: Choose the audio device corresponding to the capture board.
- Check the audio mixer: Confirm whether the level meter reacts after adding it.
This setting is essential for equipment where audio and video are separated, so prioritize reviewing it when there’s no sound.
Dedicated Software for Capture Board is Interfering
One reason for no game sound from the Switch may be that the dedicated software for the capture board is interfering.
Many capture boards may face usage conflicts when both the dedicated software and OBS are running simultaneously, leading to the inability for OBS to capture audio. Especially with well-known manufacturers’ capture boards, the dedicated software tends to prioritize device usage.
The solution is simple: ensure that you run only OBS with the dedicated software fully closed. By avoiding simultaneous use of multiple software, you can capture audio in OBS.
Causes and Solutions for No Sound from Switch in OBS [PC Settings]
If there is no sound from the Switch in OBS, the following PC configuration issues could also be contributing factors.
- Windows microphone access permissions are off
- Incorrect sound settings on the PC
- Mac settings are not enabled
Identify the key points to check for each environment and proceed with appropriate solutions.
Windows Microphone Access Permissions are Off
The Windows microphone access permission is off can also be a reason for no sound from the Switch in OBS.
Since the audio from the capture board is treated as an input device, if access to the microphone is restricted in Windows’ privacy settings, this may prevent sound from being captured, depending on the environment. Even if the settings on OBS are correct, if it’s blocked on the Windows side, it won’t be reflected in the audio mixer.
Here are the steps to configure the microphone access permissions in Windows:
- Open the settings screen: Select “Privacy and Security” from “Settings.”
- Check the microphone settings: Open the “Microphone” section and verify that access is turned on.
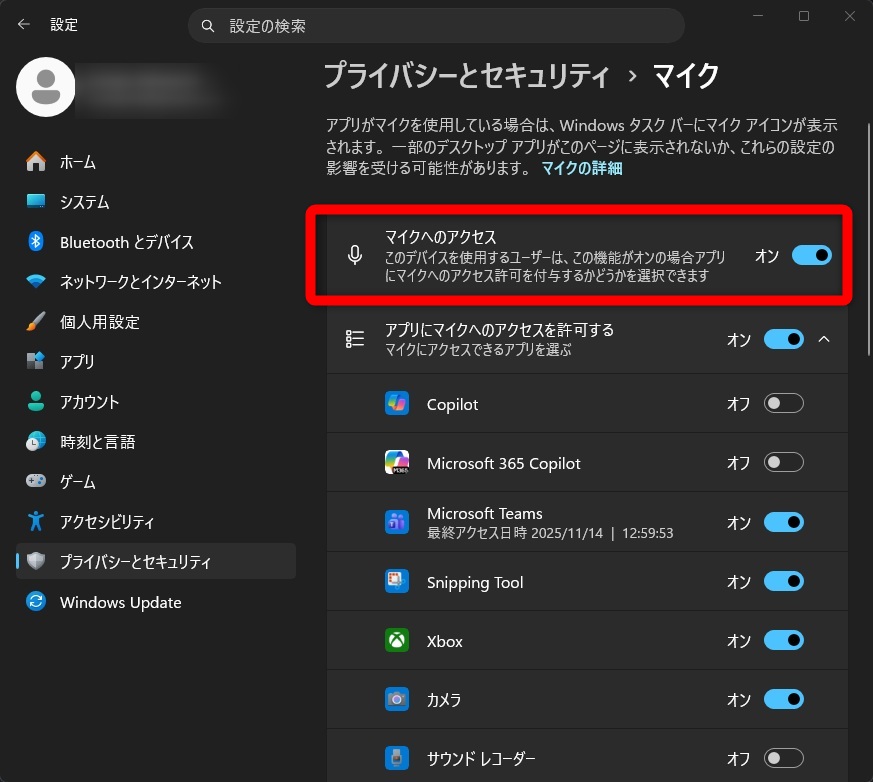
- Allow app permissions: Check individually whether OBS is allowed to use the microphone.
If permissions remain off, audio will not be input, so microphone access permissions are a crucial point to check first.
Additionally, there is an article detailing the causes and solutions when the microphone audio does not enter OBS, so please check that as well.
» Fixing OBS Microphone Issues: Common Causes and Solutions
Incorrect Sound Settings on the PC
If the sound settings on the PC are incorrect, this can also be a reason for no sound from the Switch in OBS.
If the audio output destination is not appropriate, even if OBS captures audio, you may experience a situation where you do not actually hear the sound. This is particularly common in environments where multiple speakers or headphones are connected, where a different device may be set as the default output.
Here are the steps to check the sound settings on the PC:
- Open sound settings: Select “System” from “Settings,” and then open “Sound.”

- Check the output device: Confirm whether the speakers or headphones you are using are selected.
- Change the default device: If another device is selected, switch to the correct output destination.
If the output destination is incorrect, the audio will not be heard, so be sure to check this as well.
Mac Settings are Not Enabled
If you are using OBS with a Mac and the Switch audio is not coming through, the causes are often inadequacies in audio settings or connection issues. Many issues can be resolved simply by reviewing basic settings, so it’s essential to first identify the main causes and solutions.
| Issue | Cause | Solution |
|---|---|---|
| Game audio doesn’t reach the Mac | Capture card is not fully configured | Add an Audio Input Capture source and enable Audio Monitoring. |
| No sound is heard | OBS audio device is disabled | Go to Settings → Audio and select the correct device. |
| Capture card works but no sound | Connection is unstable | Unplug and reconnect the cable, then restart OBS. |
| No sound on the latest OBS version | Latest OBS isn’t compatible with your capture card | Try a previous version of OBS. |
Most audio issues can be resolved through verifying settings and reviewing connections. It is especially important to prioritize checking the capture board settings and audio monitoring.
What to Do If There’s Still No Sound from Switch in OBS
If you’ve reviewed all the settings mentioned above and still have no sound, trying the following basic steps may increase the chances of resolution.
- Step 1: Restart OBS
- Step 2: Restart the PC
- Step 3: Update OBS to the latest version
- Step 4: Reinstall the drivers for the capture board
- Step 5: Review the initial connections and settings
Execute these steps in order and resolve the sound issue.
Step 1: Restart OBS
If there’s no sound from the Switch in OBS, the first step is to do a restart of OBS. A temporary malfunction within the application or an audio recognition error may prevent the correct capture of game audio or microphone audio.
Close OBS, wait a few seconds, and then reopen it. After restarting, check the audio mixer’s level meter to see if there is any activity; if so, audio is being input correctly. Restarting alone resolves the issue in many cases, so this is a fundamental step to try first.
Step 2: Restart the PC
If restarting OBS does not fix the issue of no sound from the Switch, proceed to restart the PC. Extended periods of uptime can lead to unstable internal processes, causing problems with the recognition of capture boards and audio devices.
Restarting the PC can reset the recognition of each device, potentially restoring everything to a normal state. After restarting, relaunch OBS and check for responses in the audio mixer.
Step 3: Update OBS to the Latest Version
If the sound from the Switch is still not coming through even after restarting the PC, proceed to update OBS to the latest version. Using outdated versions can lead to issues that prevent audio from being captured correctly. Compatibility problems with capture boards are often resolved by updating.
Download the latest version from the official site and perform an overwrite install to update. After the update, restart OBS and check for responses in the audio mixer.
Additionally, there is an article detailing how to update OBS, so please check that as well.
» OBS Studio Update Guide: Complete Tutorial & Troubleshooting Tips
Step 4: Reinstall the Drivers for the Capture Board
If updating OBS to the latest version does not solve the issue of no sound from the Switch, proceed to reinstall the drivers for the capture board. If the drivers are outdated or corrupted, the audio data may not be recognized correctly, resulting in no sound.
Obtain the latest drivers from the official site, uninstall the current drivers, and then reinstall them. After reinstalling, it is crucial to launch OBS and verify the operation of the audio mixer.
Step 5: Review the Initial Connections and Settings
If the sound from the Switch doesn’t come through even after reinstalling the drivers, take a moment to review the initial connections and settings once more. If steps 1 through 4 did not yield improvement, there may still be basic connection errors or missed settings causing the issue.
Revisit the following settings:
- Equipment & Connection
- Software Settings
- PC Settings
Moreover, there is an article explaining the causes and solutions when game audio does not enter OBS, so please check that as well.
» Fix No Sound in OBS for Gaming: Causes & Solutions Explained
No Sound from Switch2 in OBS? Points to Consider for Next-Generation Consoles
If there is no sound from Switch2 in OBS, there are different specifications compared to previous models, so attention must be paid to the following points.
- Use the latest HDMI cable
- Update the firmware of the capture board to the latest version
By heeding these next-generation console-specific considerations, you can establish a stable audio environment.
Use the Latest HDMI Cable
If there is no sound from Switch2 in OBS, the specification of the HDMI cable may be the cause.
If you use a cable that does not support the latest video standards, while the video may display, sound may not be output correctly. It is especially important to pay attention to the signal transmission stability if using an older standard cable.
Use the included HDMI cable or a product that complies with the latest specifications, and confirm that both video and audio are output correctly. Choosing the right cable will help avoid audio issues.
Update the Firmware of the Capture Board to the Latest Version
If the firmware of the capture board is outdated, this can also result in no sound from Switch2 in OBS.
If the firmware does not sufficiently support the latest video and audio specifications, scenarios can arise where audio cannot be captured properly. Even when there are no issues with the settings or connections, differences in specifications can lead to no audio being output, so caution is warranted.
Check the official site of the manufacturer for the latest firmware and perform the update. Updating may expand the range of compatibility and stabilize audio capture.
Conclusion
When sound from the Switch is not coming through in OBS, accurately isolating the cause leads to resolution.
First, check the state of the level meter and review the equipment connections, software settings, and PC settings in order.
Since multiple factors may be at play, it is necessary to incrementally address them through restarts, updates, and driver reviews.
Use the steps outlined in this article to isolate the causes and establish a stable game streaming environment.