Share
How to Start Streaming on Twitch: Setup, Gear & Monetization
Index
Twitch is an exciting space to share your world—through gaming, talking, or anything in between.
That said, getting started takes a bit of prep. Hardware like a PC and a mic, configuring software like OBS, creating a Twitch account—there are a lot of steps, and the process can feel overwhelming if you’re new to it.
This guide walks you through everything a first-time Twitch streamer needs: required gear, how to pick the right hardware, how to stream from a PC or PS5, and what it takes to start earning money.
If you’ve been thinking, “I want to go live today,” this is the place to start.

What Is Twitch Streaming? A Quick Overview
Twitch is one of the world’s largest live-streaming platforms, owned by Amazon. It started as a hub for gaming—hosting esports tournaments, pro-gamer streams, and game commentary—and built its reputation there.
These days, the platform has expanded well beyond games. Just-chatting streams, music, cooking—you’ll find creators in nearly every category, and the barrier to entry is low.
The biggest difference from YouTube Live is how close you feel to the audience. On Twitch, chat-driven, two-way conversation is the norm: streamers read messages on the fly and engage in real time.
Another draw is how accessible monetization is. The entry-level Affiliate Program has relatively forgiving requirements, making Twitch a solid pick if you’d like to earn a little while you stream.
What You Need to Start Streaming on Twitch
Here’s a quick list of the gear and software you’ll need:
- A streaming PC or smartphone
- Streaming software (such as OBS)
- A capture card (for console streams)
- A microphone and audio gear
A streaming PC or smartphone
What you need depends on how you plan to stream. Just-chatting streams can run from a phone, while serious gameplay streams almost always call for a PC.
PC streaming gives you sharper visuals and far more flexibility—the right pick if you want room to grow. As a target spec, aim for the following encoder settings:
- Resolution: 1920×1080
- Frame rate: 60fps (or 50fps)
- Bitrate: 6,000kbps
- Rate control: CBR (constant bitrate)
- Keyframe interval: 2 seconds
- Codec: NVIDIA NVENC or x264
- NVENC preset: Quality
- x264 preset: veryfast to medium
- Profile: Main or High
- B-frames: 2
Phone streaming is more limited feature-wise, but it’s hard to beat for “I want to go live right now.” It costs almost nothing to set up, and works well for chat or outdoor streams.
Streaming software like OBS
You need streaming software to push video and audio to Twitch. The de facto standard is OBS Studio: free, powerful, and endlessly customizable.
With OBS you can mix gameplay, your camera, images, and text overlays however you like—showing chat alongside the game, adding lower-thirds, and so on.
If you’re new to all this, Twitch’s own Twitch Studio is worth a look. It links automatically to your Twitch account and walks you through setup. It’s especially handy for phone-based streamers.
A capture card
To stream a console like a Switch or PS5 from your PC, you need a capture card. Without one, the console’s video can’t reach your PC—and therefore can’t reach Twitch.
What to look for when picking one:
- Resolution: Full HD (1080p) or higher
- Frame rate: 60fps support
- Pass-through: To avoid input lag while playing
- Connection: USB is the easiest plug-and-play option
Some popular options:
| Brand | Price range | Strengths |
|---|---|---|
| Elgato | $140–$200 | Reliable, built to last |
| AVerMedia | $100–$140 | Great value, popular with beginners |
A microphone and audio gear
How easy your voice is to listen to has a huge impact on whether viewers stick around. Even great content loses people fast if your voice sounds muffled or your audio is full of noise.
The main mic types:
- USB mic: Beginner-friendly and easy to plug in
- XLR mic: Higher-quality audio, but requires an audio interface
- Headset: Convenient, but audio quality is usually modest
Pickup pattern matters too:
- Cardioid: Best for solo streams—it captures what’s right in front of it
- Bidirectional: Good for face-to-face conversations
- Omnidirectional: Picks up evenly from all sides—good for group settings
Pick a mic that matches your style and your stream’s audio quality will jump immediately.
How to Start Streaming on Twitch: PC Edition
Walk through these steps in order:
1. Create a Twitch account and turn on two-factor authentication
2. Connect OBS to Twitch
3. Configure your stream layout and audio
4. Set your title and category
STEP 1: Create your account and enable 2FA
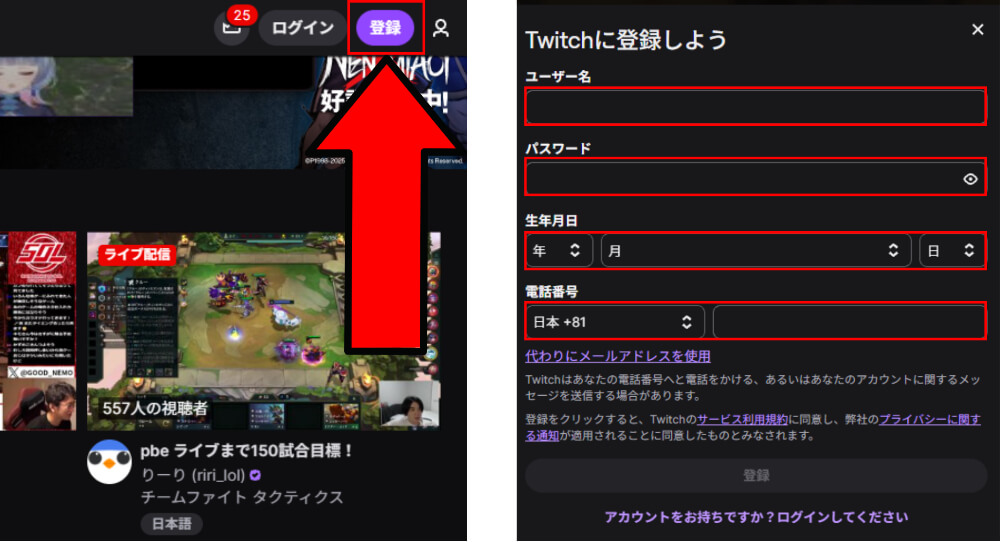
Start by creating a Twitch account. Head to the Twitch website and click “Sign Up” in the top right.
You’ll need to enter:
- Username (this becomes your streaming handle)
- Password (8 or more characters)
- Date of birth (you must be at least 13)
- Phone number or email address
Just creating the account isn’t enough—Twitch requires two-factor authentication before you can go live. Set it up like this:
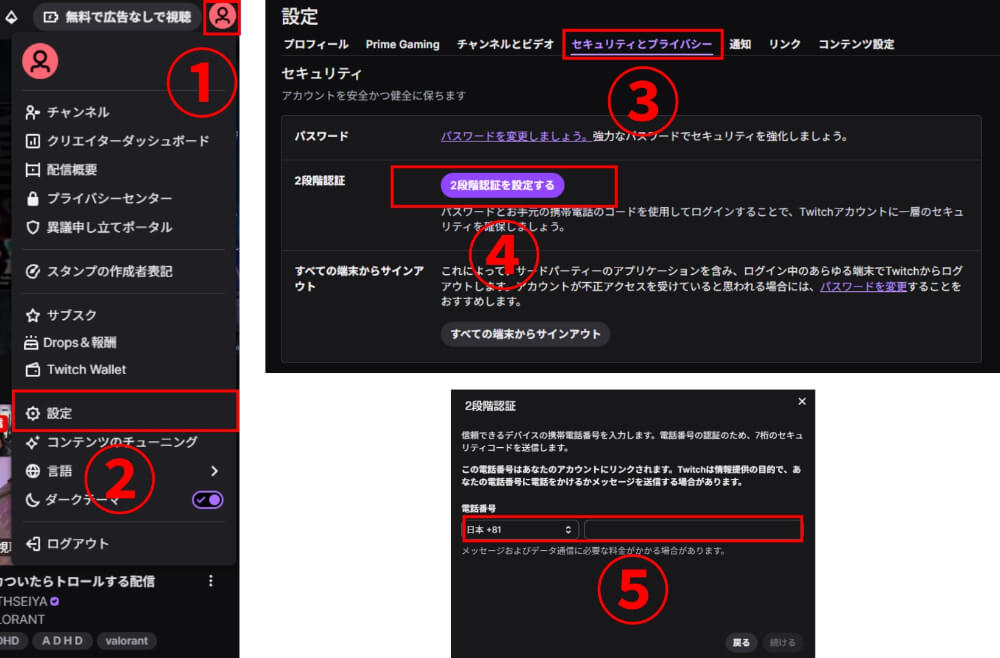
1. Click your profile picture
2. Click “Settings”
3. Open “Security and Privacy”
4. Click “Set Up Two-Factor Authentication”
5. Enter your phone number and the code Twitch sends via SMS
For extra protection, an authenticator app (like Authy) is a smart upgrade.
STEP 2: Connect OBS to Twitch
Next, install OBS Studio and link it to your Twitch account. Grab the installer from the OBS official site.
After install, launch OBS and skip the auto-configuration wizard by clicking “Cancel” the first time it appears.
To link with Twitch:
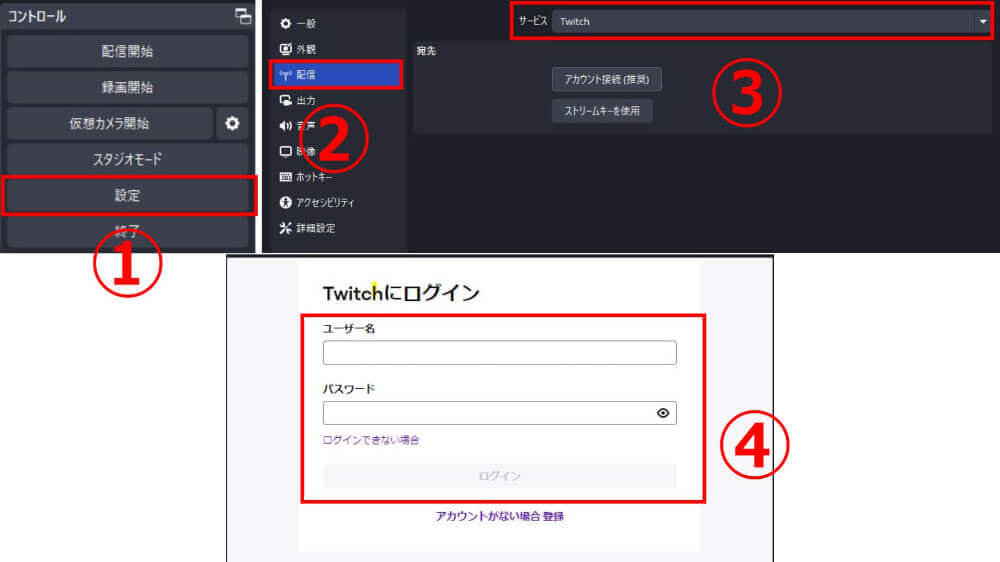
1. Click “Settings” in OBS
2. Click “Stream”
3. Choose “Twitch” as the service, then click “Connect Account”
4. Sign in with your Twitch username and password
Once connected, OBS auto-fills your stream key. From here, OBS can send video to Twitch.
STEP 3: Set up your stream layout and audio
Now configure what your viewers will actually see and hear in OBS. Start by adding the visuals you want on screen as “Sources.”
Click “+” in the Sources panel and add the type that fits your stream:
- Game stream → “Game Capture”
- Just-chatting stream → “Video Capture Device” (your webcam)
- Images or logos → “Image”
Then check your audio.

Open OBS Settings → Audio and confirm “Desktop Audio” and “Mic/Auxiliary Audio” are both set to “Default.”
STEP 4: Add a title and category
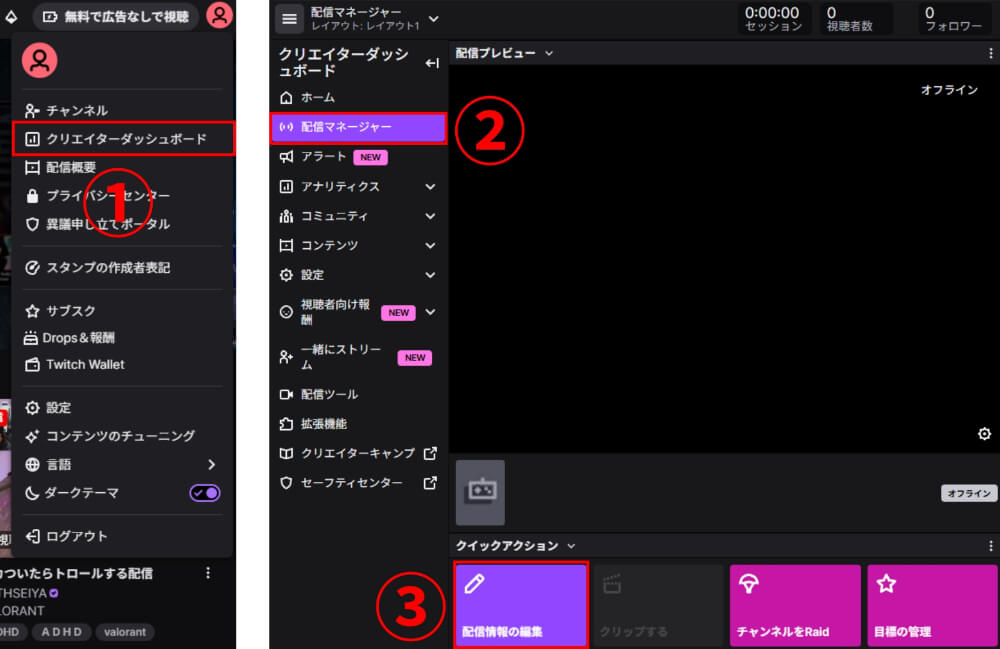
Once your tech is ready, give your viewers some context. Open the Twitch Creator Dashboard → Stream Manager → Edit Stream Info.
The fields to fill in:
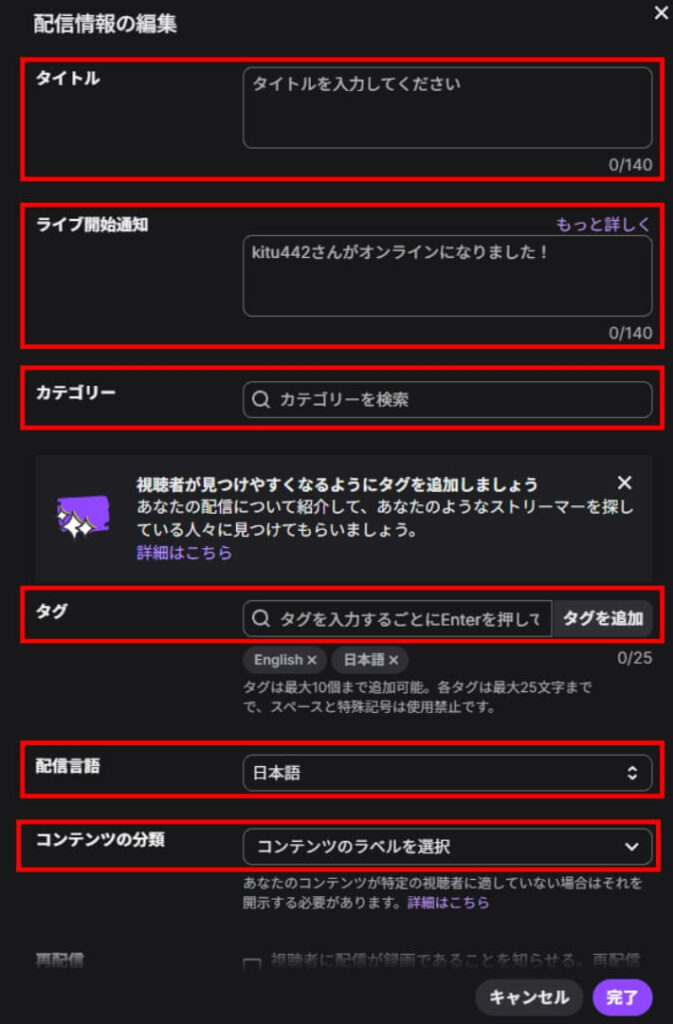
- Stream title: Make it clear what the stream is (e.g. “Apex—come play with me! Beginners welcome”)
- Category: The game you’re playing, “Just Chatting,” etc.
- Tags: Stream traits (“Drop-in friendly,” “First-timers welcome”)
- Stream language: Pick yours
For a deeper dive on streaming with OBS and Twitch, this guide covers the full setup:
>>OBS and Twitch Streaming Guide: From Setup to Live Broadcast!
How to Start Streaming on Twitch: PS5 Edition
The PS5 ships with built-in broadcasting—you can stream straight to Twitch without a PC or external software. Setup takes a few steps the first time, but after that you’re live in seconds.
What you need:
- A PS5 and DualSense controller
- A game you want to stream
- A solid internet connection
- A Twitch account
- A microphone (the controller’s built-in mic works in a pinch)
How to set it up:
First, link your Twitch account. On the PS5, go to Settings → Users and Accounts → Linked Services, choose “Twitch,” and click “Link Account.” On your phone, scan the QR code or open the URL shown and enter the displayed code to complete the link.
Next, configure broadcast details. Go to Settings → Captures and Broadcasts → Broadcast and set video quality to 1080p. From here you can also toggle mic audio, configure an external HD camera, and choose whether to display viewer comments on screen.
Once everything’s set, launch your game and long-press the Create button on the DualSense. From the menu, pick Broadcast → Twitch, fill in the title and description, and tap “Start Broadcast.”
While you’re live, “You’re Broadcasting” appears in the top right of the screen. To stop, press Create again and choose “Stop Broadcast.”
Twitch Streaming by Style
The setup and gear shift depending on what kind of streams you plan to do. Here’s how to handle three popular styles:
- Just chatting
- PC games
- Mobile games
Just chatting
“Just chatting” streams are the simplest format—no game, just talk. The fact that you can stream with nothing more than a phone makes it incredibly approachable. If “I just feel like talking today” is enough motivation, you can be live in minutes.
What you’ll need:
- A smartphone or PC
- A microphone (not needed if you’re using a phone)
- A camera, if you’d like your face on screen (also not needed for phone streams)
From a phone, just open the Twitch app and tap “Stream.” From a PC, OBS gives you room to add a background image, a chat overlay, and other touches that make the stream nicer to watch.
PC games
PC gaming is the most popular kind of stream on Twitch. Crisp visuals and high-energy commentary make it engaging both to watch and to participate in.
Recommended PC settings:
- Resolution: 1920×1080
- Frame rate: 60fps (or 50fps)
- Bitrate: 6,000kbps
- Rate control: CBR (constant bitrate)
- Keyframe interval: 2 seconds
- Codec: NVIDIA NVENC or x264
- NVENC preset: Quality
- x264 preset: veryfast to medium
- Profile: Main or High
- B-frames: 2
OBS handles the actual streaming. To configure it:

1. Add “Game Capture” as a Source in OBS
2. Set Mode to “Capture specific window”
3. Pick the running game in the Window dropdown
For sharp visuals and smooth motion, target around 6,000kbps bitrate at 60fps.
If you’d like chat to appear on the stream itself, this guide walks through your options:
>>4 Ways to Display Chat in OBS for Twitch Streamers
Mobile games
You can’t broadcast a mobile game directly to Twitch—you need to route the screen through a PC first.
The two common approaches:
| Method | What you need | Pros and cons |
|---|---|---|
| Mirroring | PC and phone on the same Wi-Fi, plus mirroring software | Cheap and easy to set up; latency depends on your Wi-Fi |
| Capture card | An HDMI adapter and a capture card | High image quality, low latency, very stable; costs more |
Twitch Monetization Requirements
Twitch monetization comes in two tiers.
You start with the Affiliate Program, which unlocks bits (tips) and subscription revenue. As your audience grows, the next step is the Partner Program.
Affiliate is the entry point—achievable for most streamers who put in some time. Partner is for streamers running consistent, established channels.
The current requirements:
| Program | Req. 1 | Req. 2 | Req. 3 | Req. 4 |
|---|---|---|---|---|
| Affiliate | 50+ followers | 500+ minutes streamed | 7+ days streamed | 3+ average viewers |
| Partner | 25+ hours streamed | 12+ days streamed | 75+ average viewers | — |
Reference: Twitch—Joining the Affiliate Program
Reference: Twitch—Achievements
Level Up Your Twitch Stream
Once the basics are working, here are a few ways to push your stream further:
- Use a chat text-to-speech tool
- Try a voice changer
- Tune your bitrate
Chat text-to-speech tools
To read chat aloud, you need two pieces: a text-to-speech engine, and a comment viewer that pipes Twitch chat into it.
How it comes together:
1. Install a text-to-speech engine (e.g. Bouyomi-chan)
2. Set up a comment viewer (such as OneComme or Multi Comment Viewer) and connect it to Twitch
3. Have the comment viewer forward chat to the TTS engine
4. Customize voice, volume, and word substitutions to taste
Compared to YouTube, Twitch has fewer comment viewers that integrate cleanly with TTS engines, so picking a Twitch-friendly tool like OneComme matters.
Voice changers
A voice changer transforms your voice in real time. You can sound like an anime character, a robot, or even the opposite gender—great if you’re not confident about your natural voice but still want to stream.
A few well-known options:
Voice changers can lower audio quality slightly and sometimes introduce noise when used with background music. Always do a test run before going live.
Tuning your bitrate
If your stream looks blocky or stutters, the first place to look is bitrate.
Bitrate is how much data your stream sends per second. Higher numbers mean cleaner video and audio, but they also put more load on your viewers’ connections—balance is key.
For high-action games at high quality, 6,000kbps is a solid target. For just-chatting or static-image streams, 3,000kbps is plenty.
For a deeper look at bitrate, this guide goes into detail:
>>Optimal OBS Bitrate Settings for Streaming and Recording Explained
Wrapping Up
This guide covered everything you need to start streaming on Twitch—the gear and software, how to stream from PC, PS5, and mobile, and how monetization works.
For a comfortable streaming experience, make sure you have:
- A capable PC or smartphone
- Streaming software like OBS
- A clear, easy-to-listen-to mic
- A capture card if you’re streaming consoles
Stream at your own pace and the Affiliate requirements aren’t out of reach. Start sharing your world on Twitch—today’s a good day for it.