Share
OBS YouTube Streaming Guide: Setup, Settings & Tips
“I want to start streaming on YouTube but don’t know where to begin.” “OBS settings feel overwhelming.” “I’d like to know the best way to stream in high quality.” If any of those sound familiar, this guide is for you.
Once you’ve got the basic OBS settings and steps down, even total beginners can stream to YouTube in high quality.
This article walks you through everything: pre-stream prep, the actual OBS configuration, building your stream layout, troubleshooting, and recording settings.
By the end you’ll know exactly what to set up and how, so you can start streaming on YouTube without second-guessing.

Pre-Stream Prep for Streaming to YouTube with OBS
Before you can stream to YouTube with OBS, two pieces of prep work are required:
- The hardware and software you’ll need
- Enabling YouTube Live streaming on your account
Let’s walk through each so your stream starts on stable ground.
Required hardware and software
You don’t need top-tier gear to stream to YouTube with OBS. A PC, a microphone, and OBS are enough to get video and audio out to your viewers.
Here’s a quick breakdown of what each piece does so you can plan a setup that fits your budget:
| Hardware/Software | Role |
|---|---|
| PC | The machine that handles streaming and video processing |
| Microphone | Captures your voice clearly for viewers |
| OBS | Combines video and audio and sends them to YouTube |
That setup is enough to start. Once you’re comfortable, adding a camera or upgrading your audio gear is a smart way to level up without overspending.
Enable YouTube Live streaming
To stream to YouTube via OBS, you first need to enable live streaming on the YouTube side.
Open YouTube Studio from your account menu in the top-right of YouTube, then click the camera icon in the top-right and choose “Go live.”

You’ll see the screen below. Click “Request” to start the verification flow.

You’ll be asked to enter your phone number and a confirmation code. Follow the prompts.

When the code is verified, you’ll see “Phone number verified.” That confirms your application has been submitted.
Approval can take up to 24 hours, so submit your request well before you plan to go live.
How to Stream to YouTube with OBS
There are two main ways to connect OBS to YouTube:
- Account linking
- Stream key
Account linking ties your OBS install directly to your YouTube account—and it’s OBS’s recommended approach.
The stream key method involves generating a key on YouTube and pasting it into OBS to enable streaming. Here’s how each works.
Connecting via account linking
First, the account linking method. There’s nothing tricky about it—just follow the steps below and you’ll be connected in a few minutes, even as a beginner.
Configuring OBS
Open OBS and click “Settings” in the controls panel.

The Settings window appears. Choose “Stream” and set the Service to “YouTube – RTMPS”.

You’ll then see a “Connect Account (recommended)” button—click it to start the link.
Connect your account
Clicking “Connect Account (recommended)” brings up the screen below.

You’ll get a verification email on your phone. After confirming the login is yours, select the number shown on the screen.
The image is just an example—always input the number actually displayed on your own device.

After entering the number, you’ll see “Choose an account.” Pick your Google account, and you’ll be asked to grant OBS access.

Click “Continue” here. Once linked, you’ll see the screen below—close the browser and return to OBS.

Back in OBS, your stream settings should now show your account name under “Connected Account”—the link is successful.

Configuring Stream Information
Once your account is linked, a “Manage Broadcast” option appears in the OBS controls panel.

Selecting “Manage Broadcast” opens a panel of fields:

The fields you’ll want to set up:
| Field | What it’s for |
|---|---|
| Title | The title of your stream |
| Description | A summary of what the stream is about |
| Privacy | Who can watch—choose one of three: Public (anyone), Private (only you), or Unlisted (anyone with the link) |
| Category | The content category your stream falls under |
| Made for kids? | Whether your content is targeted at children |
| Thumbnail | The image used as your stream thumbnail |
| Latency | How long the delay is—choose one of three: Normal latency (~10s), Low latency (~6s), or Ultra-low latency (~3s) |
Make sure you fill these in before going live.
Connecting via stream key
Now the stream key approach.
To use a stream key, you’ll need to have completed the prep covered earlier in “Pre-Stream Prep.” Without the live-streaming approval, you can’t generate a stream key.
Configuring OBS
Open OBS, go to Settings, then “Stream.”

Set the Service to “YouTube – RTMPS” and you’ll see a “Get Stream Key” button. Clicking it takes you to YouTube Studio.
Get your stream key
In YouTube Studio, click the camera icon in the top-right and choose “Go live.”

The page changes to the screen above. Click “Streaming software” on the left side and copy the stream key.
Use your stream key
Once you’ve copied the key, head back to OBS.

You’ll see a “Stream Key” field in OBS’s stream settings. Paste in the key you just copied—done.
From here, you can go live anytime by hitting “Start Streaming” in OBS’s controls panel.
Recommended OBS Settings for YouTube Streaming
Below are the OBS settings we’d recommend for YouTube streams. We’ll cover three areas:
- Video quality
- Audio
- Recording
Putting effort into video and audio settings means clearer visuals and easier-to-follow audio for your viewers—which keeps people watching and helps you grow your audience.
And on the recording side, higher-quality saves are easier to review later, so it’s worth dialing those in too.
Video quality settings
Here’s how to configure clean video for your YouTube stream in OBS.
From OBS’s controls panel, choose Settings → Output.

| Field | Recommended value |
|---|---|
| Video bitrate | 4,500–9,000 Kbps |
| Audio bitrate | 128 Kbps |
| Video encoder | Hardware (NVENC, etc.) |
For the encoder: if you really want maximum quality, “Software (x264)” is technically the higher-fidelity choice.
The downside is that x264 is CPU-heavy, which can slow your machine and cause issues mid-stream.
For most setups, the hardware encoder gives you a solid balance: it leaves your CPU free for other work and keeps the stream stable.
Audio settings
To clean up your audio, set up filters in the right order. OBS audio filters compound on each other, so the order they run in matters for sound quality.
First, in the audio mixer, click the three-dot menu under “Mic.”

Then choose “Filters.”

In the Filters window, click the plus button to add new audio filters.

Add them in this order, top to bottom:
- Noise Suppression
- Gain
- Noise Gate
- Compressor
Once they’re set up, your filter chain should look like this:

What each filter does and how to dial it in:
| Filter | Purpose and tuning tips |
|---|---|
| Noise Suppression | Removes mic hiss and background noise. For light noise: 0 to -5dB. For heavy noise: -10 to -20dB. |
| Gain | Adjusts your mic’s volume. Lower gain = quieter mic; higher gain = louder mic. |
| Noise Gate | Close threshold: removes sounds quieter than the set value—great for cutting out room noise. Open threshold: registers sounds louder than the set value—captures whispers and quiet voices. |
| Compressor | Prevents audio clipping when you get loud. For beginners, just adjust ratio and threshold. If you’re still clipping, raise the ratio. The compressor kicks in once your audio crosses the threshold. |
Set these and your viewers will hear you clearly.
Recording settings
Recording settings live under Settings → Output → “Recording” in the OBS controls panel.

You can set the recording path to wherever you’d like—just click “Browse” and choose a folder.
For the recording format, MPEG-4 (.mp4) is broadly compatible and easy to work with across devices and software. That said, mp4 files can become unrecoverable if your PC crashes mid-recording, so mkv is also worth considering for stability. We’ll cover this more in the recording-format section below.
You can leave “Custom Muxer Settings” blank.
Building Your OBS Stream Layout for YouTube
A clean OBS layout makes your YouTube streams much easier to watch. Pay attention to these elements when laying things out:
- Adding captures and images
- Adding chat and text
- Adding background music
Mix and match them to build a layout that’s clear and easy to follow.
Adding captures and images
For YouTube game streams, treat “what gets captured” and “how it looks” as separate concerns in OBS. Get the video showing first, then layer images on top—that order makes layout work much smoother.
Set up your capture and your overlay images in that order.
Add a game capture from the “+” button in OBS’s Sources panel, choose “Game Capture,” and select the running game to grab the screen directly.
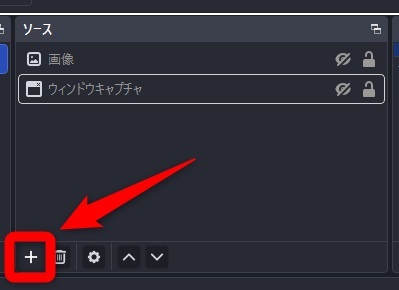
If the game doesn’t show up correctly, switch to “Window Capture” and select the game’s window instead.
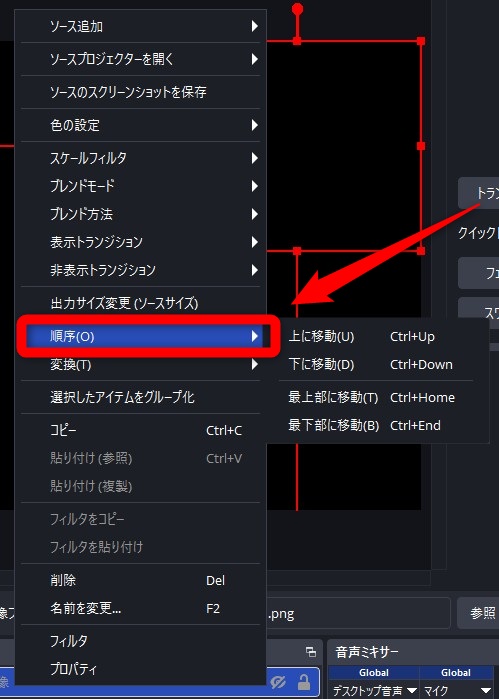
To layer an image over your gameplay, click “+” again and add an “Image” source. Drag to resize and position it. Right-click the image source and use “Order” to send it above the game capture, and you’ve got an overlay.
Thoughtful image placement makes for a clean, cohesive-looking stream.
For more on streaming consoles via a capture card with OBS, this guide goes deeper:
» OBS Streaming Guide: Mastering Game Broadcasting with Capture Cards
Adding chat and text
Showing chat and text on screen deepens the connection with your viewers.
OBS lets you add chat through a Browser source and overlays through a Text source. Pick what info matters and lay it out so it’s easy to read.
For chat, pop out the chat from your YouTube live page to get its dedicated URL. Add a “Browser” source in OBS via the “+” button and paste the chat URL.
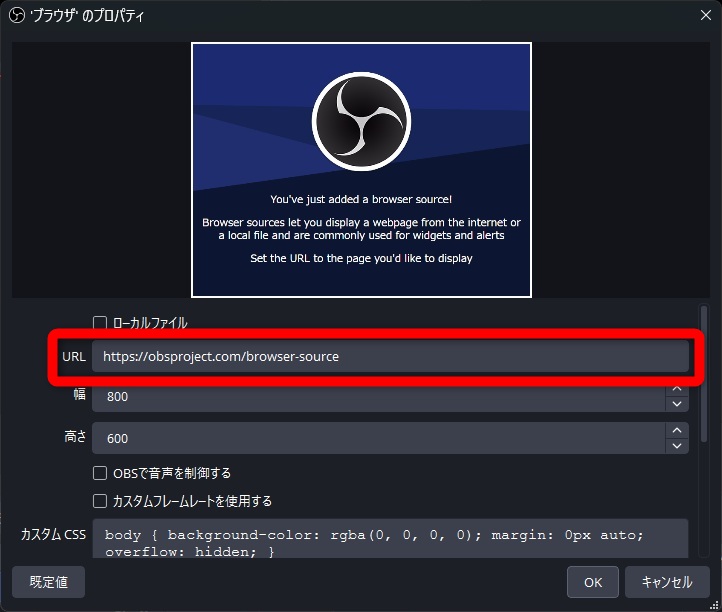
Once the URL is set, chat updates in real time on your stream layout, so you can see it on screen as you talk to viewers. Tucking it into a corner of the layout keeps it out of the way.
For text, click “+” in Sources, choose “Text,” and type what you want shown. Use it for stream titles, important rules, or anything that should stay on screen the whole time.
Update text as needed during the stream to keep info fresh.
For more on using a chat viewer with OBS, see this guide:
» OBS Comment Viewer Guide: Top 3 Tools and How to Install Them
Adding background music
Long stretches of silence cause viewers to drop off, so background music is worth setting up.
OBS supports both Media sources and audio captured from your browser, so you can pick whichever fits the stream. Build a stable audio environment by choosing the right approach for the situation.
For Media sources, click “+” in OBS, choose “Media Source,” and point it at your audio file. Enable looping so it doesn’t stop mid-stream—great for waiting rooms or chat streams. Use the mixer to keep the music level below your voice.
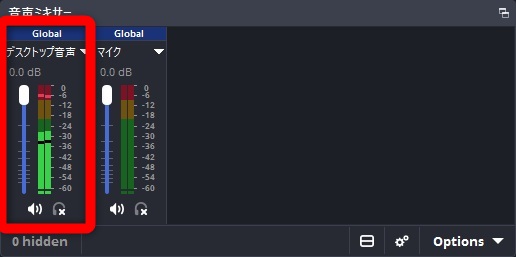
For browser-based audio, play a BGM video from somewhere like YouTube and let OBS capture it through Desktop Audio. If your Desktop Audio meter responds like the screenshot below, the audio’s in your stream.
Adjust both the source video’s volume and OBS’s levels so everything stays comfortable to listen to.
For more on using BGM in OBS streams, this guide covers it:
» How to Play BGM on OBS Streaming: Free Commercial-Use Sites
Going Live and Ending Your YouTube Stream After OBS Setup
Once OBS is configured, here’s the flow for going live on YouTube:
- Set the title and description in YouTube Studio
- Hit “Start Streaming” in OBS
- Verify the stream is healthy and end it cleanly
Knowing the steps in advance keeps your stream smooth from start to finish.
Set the title and description in YouTube Studio
Before you go live, set up the public-facing info in YouTube Studio. If viewers can’t tell what your stream’s about, they’re less likely to drop in—so make the title, description, and thumbnail clearly tell the story.
From your YouTube Studio live page, fill out the following:
| Field | What to enter |
|---|---|
| Title | A short, clear name that gets the stream’s topic across at a glance |
| Description | Stream details, notes, and any links |
| Thumbnail | An eye-catching image to boost click-through |
| Visibility | Choose Public, Unlisted, or Private |
| Latency | Adjust based on how real-time the stream needs to feel |
If you’ve linked OBS to your YouTube account and you’re using OBS’s broadcast manager, you can fill in the title and visibility from OBS itself. See the “Configuring Stream Information” section earlier for the steps.
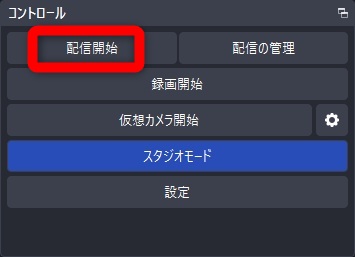
Hit “Start Streaming” in OBS
To go live on YouTube, click “Start Streaming” in the bottom-right of OBS. That sends video and audio to YouTube.
If you’re using a stream key, double-check that YouTube Studio is in standby mode before you start. OBS and YouTube both need to be ready before you go live.
Verify the stream is healthy and end it cleanly
After starting, confirm video and audio are reaching YouTube and follow the right shutdown order when you’re done.
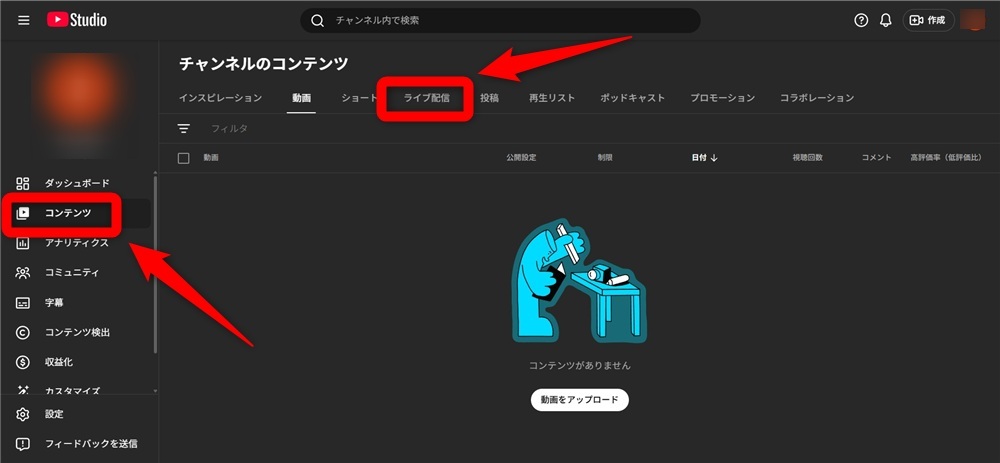
To check status, in YouTube Studio, go to Content → Live and open your active stream’s view page.
Mute the playback to avoid feedback and check for visual glitches or stutter. For audio, opening the share URL on your phone and listening from there is a reliable way to confirm sound’s coming through and not desynced.
To end the stream, hit “Stop Streaming” in OBS first to cut off the video and audio feed. Then end the stream from YouTube—that order ensures the recording saves cleanly. Stopping OBS first prevents the stream from being cut off mid-frame.
OBS Recording Settings to Help You Review Your YouTube Streams
To improve stream quality over time, dial in these recording settings in OBS:
- Recording format
- Recording quality
Tuning these gives you a higher-quality build to learn from after the fact.
Recording format
If you’re recording your stream, mkv is the format we’d recommend. mp4 files corrupt easily if your PC crashes mid-recording, leaving you with an unplayable file.
The main differences:
| Aspect | mkv | mp4 |
|---|---|---|
| Stability | Less likely to corrupt if recording stops unexpectedly | Likely to corrupt if recording is interrupted |
| Compatibility | Some environments can’t play it | Plays almost everywhere |
| Editability | Hard to use directly in editors | Easy to drop into video editors |
| Best for | Long-term recording | Distribution and uploading |
Recording in mkv means your file usually survives crashes—you keep whatever was captured up to that point. Once you’re done recording, OBS’s File menu has a “Remux Recordings” option that converts mkv to mp4.
Recording quality
To record your YouTube streams in high quality, tune your encoder, bitrate, and other settings carefully. The wrong settings cause quality drops or performance issues, so use these targets:
| Setting | Recommended value |
|---|---|
| Encoder | GPU-based (NVENC, etc.) |
| Resolution | 1920×1080 (Full HD) |
| Bitrate | Around 10,000kbps |
For Full HD streams, ~9,000kbps is the streaming target. For recordings, push that up to ~10,000kbps to keep the saved version sharper than what aired.
For more on getting high-quality recordings out of OBS, see this guide:
» Optimize OBS Recording Settings for High-Quality Videos: Solutions to Prevent Lag
Recommended OBS Plugins for YouTube Streaming
Here are some plugins that come in handy in specific situations:
- For shooting vertical short-form video
- For multistreaming alongside YouTube
- For matching YouTube’s preferred volume
Plugins extend what OBS can do—install the ones that fit your workflow and you’ll find your stream setup quickly becoming your own.
For shooting vertical short-form video
For vertical short-form content, Aitum Vertical is a great pick. It lets you set up a vertical stream layout inside OBS Studio.
YouTube was traditionally a horizontal video platform.
But with TikTok and Instagram driving demand for vertical, YouTube Shorts has taken off. Editing horizontal footage into vertical is a hassle, so a plugin that lets you film vertical from the start saves a lot of work.
For more on vertical streaming on YouTube, this guide covers the full workflow:
» How to Stream Vertical Videos on YouTube: Complete Guide from OBS Setup to Mobile and Simulcasting
For multistreaming alongside YouTube
For streaming to multiple platforms at once, obs-multi-rtmp is the plugin to grab.
obs-multi-rtmp lets you stream to YouTube, Twitch, and more simultaneously.
It also makes switching between platforms easy if you stream to different ones based on the content.
For Twitch + YouTube multistreaming specifically, see:
» How to Simultaneously Stream on Twitch and YouTube Using OBS
For matching YouTube’s preferred volume
To stream at YouTube’s preferred volume, Loudness Dock is your friend. It shows you exactly how loud you’re streaming in real time.
YouTube targets -14 LUFS as its reference loudness. LUFS (Loudness Units Full Scale) is a perceptual loudness measurement—how the human ear actually hears volume. Anything louder than -14 LUFS gets automatically attenuated down to that level.
Loudness Dock lets you see your current loudness so you can adjust to match YouTube’s target.
For installing OBS plugins, this guide goes through the steps:
» How to Install Plugins in OBS and Recommended Ones
Common YouTube + OBS Streaming Issues and How to Fix Them
Some issues come up often when streaming to YouTube via OBS. Here are the big four and how to handle each:
- Live stream cuts out
- Latency issues
- Stuttering or lag
- Can’t connect your YouTube account
Knowing the fixes ahead of time means you can recover quickly when something goes wrong.
Live stream cuts out
The most common causes are other apps running alongside OBS, or OBS itself being out of date. Update OBS and close other apps before going live.
If that doesn’t help, restart your PC and see if it stabilizes.
If your stream does cut out, you’ll need to share the new YouTube Live link with your viewers. Without their contact info, you can’t share the link quickly—so collect emails or messaging contacts in advance to make recovery faster.
Latency issues
The three main causes of latency:
- Internet connection issues
- Underspec’d PC
- Wrong OBS settings
Cheap routers and low-spec PCs cause latency frequently. If your hardware is the bottleneck, an upgrade is worth considering.
You can also reduce latency through OBS settings.
Click “Manage Broadcast” in the controls panel.

Under the additional settings at the bottom, find “Latency” and choose “Ultra-low latency” or “Low latency.”
For more on fixing OBS latency, this guide covers it:
» Reduce OBS Streaming Delay: Easy Setup Tips and Troubleshooting
Stuttering or lag
If OBS feels sluggish or your stream stutters, the most common culprits are:
- An underspec’d PC
- Too many plugins installed
- Wrong OBS settings
Recommended PC specs:
| CPU | RAM |
|---|---|
| Intel Core i7 or better, or AMD Ryzen 7 or better | 16GB or more |
If your machine meets these specs, OBS shouldn’t feel sluggish. Compare against your own setup to confirm you’re in good shape.
OBS also has plenty of plugins. Each one takes up resources, so too many installed can drag performance. Uninstalling the ones you don’t use is often enough to lighten things up.
On the settings side, lowering bitrate can help.
From OBS’s controls panel, choose Settings → Output.

Lowering “Video Bitrate” can sometimes resolve performance issues.
Just don’t drop it too far—your video starts looking fuzzy if you do. Keep an eye on the stream preview while adjusting.
If none of this helps, this guide goes deeper:
» Fix OBS Lag and Stutter: Causes and Solutions Explained Clearly
Can’t connect your YouTube account
Sometimes the OBS-to-YouTube account link refuses to work. The cause is usually credential mismatches or settings issues—and there are several possibilities, so work through them in order.
Try these basic fixes one at a time and check whether the connection improves:
- Clear your browser cache and sign in again
- Sign out of YouTube in OBS and reconnect
- Try signing in with a different browser to verify your auth state
- Confirm live streaming is enabled in YouTube Studio
That usually clears up most connection issues. If it still won’t connect, fall back to the stream key approach—it’s more stable, and a solid backup when account linking misbehaves.
Wrapping Up
YouTube streaming with OBS is all about getting prep, settings, and operations right end to end—that’s how you balance stability and high-quality output. Once the basic OBS settings and streaming flow click, even beginners can put together a high-quality streaming setup.
That said, gear choice, bitrate tuning, and connection reliability all directly affect stream stability. Skipping the prep work tends to bite you mid-stream, so be thorough up front.
Use this guide as your reference for the full flow—from prep to streaming to review—and you’re set up for stable YouTube streams.